Modifying an additional storage volume
Last updated on
This tutorial guides you through the process of changing additional storage volumes in the STACKIT portal.
In relation to the existing storage volume, the name can be changed afterwards. On the other hand, the storage volume can be connected or disconnected from a server in particular. The binding and unbinding process is done from the server perspective and described below.
For both processes - connecting and decoupling - the VM should be shut down beforehand in order to avoid undesirable side effects.
Connecting a new storage volume to a server
Section titled “Connecting a new storage volume to a server”Before coupling the storage volume to a server, it must have been created in advance.
-
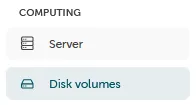
The management of the storage volume can be found in the portal: “Computing” → “Disk volumes”
-
Data volumes that are already connected are also displayed in this menu and can be reconnected. To create a new data carrier, select “Create disk volume”:

-
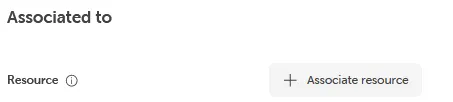
After selecting the data volume, the connection process to a server can be completed with “Associate resource”.
Decoupling a volume from a server
Section titled “Decoupling a volume from a server”-
The management of the storage volume can be found in the portal: “Computing” → “Disk volumes”
-
Here you can select the server for which an already coupled storage volume should be separated. In the detailed view of the server, the data volume to be removed can be selected in the volume area.

Please note that a boot volume cannot be detached (this is the disk containing the operating system).
- The decoupling process can be finally completed with the confirmation button.