Install the Server Agent via Portal
Last updated on
If you aim to use our latest features such as ‘Run Command’, ‘Server Update Management Service’ and many more in the future, the STACKIT Server Agent must be installed on your server as a basis. It serves as an interface between our infrastructure and the operating system and receives and processes scripts sent remotely and runs them locally on your server, allowing you to configure your server as required.
The following documentation describes two ways to get your server fully configured with the latest STACKIT Server Agent version available. You can either set up a new server in the STACKIT Portal that automatically deploys the STACKIT Server Agent on first boot, or if you already have a running Linux or Windows server, you can manually run a script which downloads and installs the STACKIT Server Agent.
If you prefer to configure your system and manage the Run Command feature via API, please refer to this documentation: Install the Server Agent via API.
Installing the STACKIT Server Agent via STACKIT Portal during server deployment
Section titled “Installing the STACKIT Server Agent via STACKIT Portal during server deployment”-
Check with the table if your operating system supports an automated first boot installation of the STACKIT Server Agent via STACKIT Portal.
Image Installation via API Installation via STACKIT Portal Windows Server 2016 ✅ ✅ Windows Server 2019 ✅ ✅ Windows Server 2022 ✅ ✅ Windows Server 2025 ✅ ✅ RHEL ✅ ✅ CentOS ✅ ✅ Ubuntu ✅ ✅ Fedora ✅ ✅ Rocky Linux ✅ ✅ AlmaLinux ✅ ✅ Debian ✅ ✅ (Not yet supported in Debian 11) If it does not, use the API: Install the Server Agent via API
Alternatively you can install the agent manually once the server is set up and running, see below. -
During the server creation, go to the General information tab, and select
Provision STACKIT Server Agent.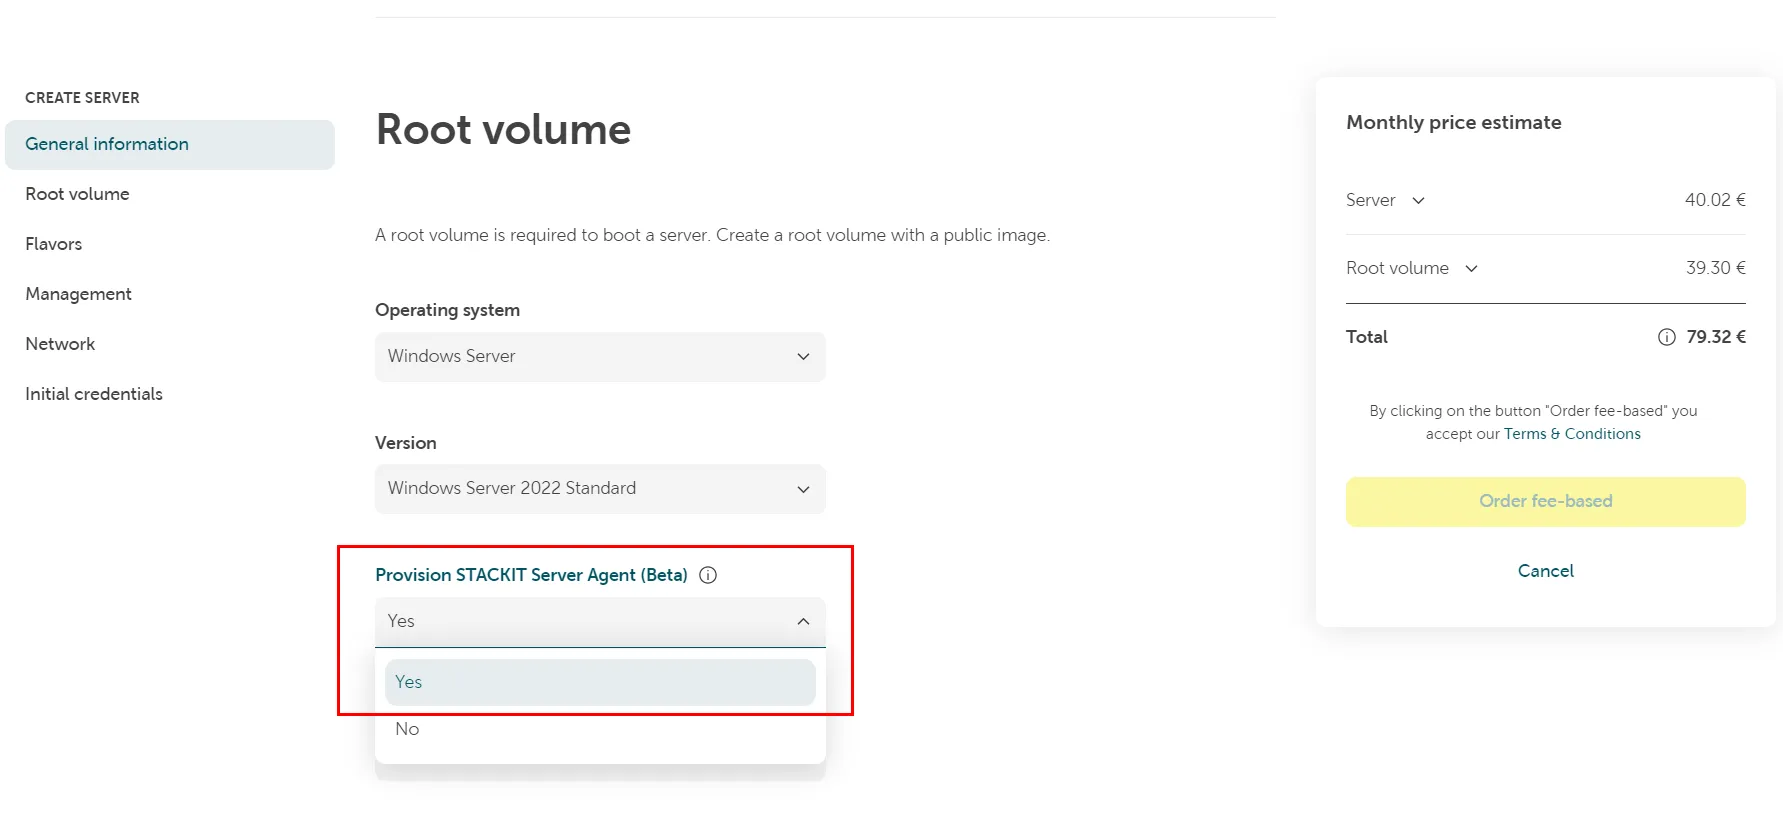
-
Finish the server ordering procedure.
The STACKIT Server Agent will then be installed during the initial first boot configuration. Once the server completes its deployment configuration routines, it is ready-to-use and can be used to run commands.
Example of the STACKIT Server Agent on a Windows Server 2022:

Installing the STACKIT Server Agent on an existing server (Linux)
Section titled “Installing the STACKIT Server Agent on an existing server (Linux)”-
Logon to your server remotely. Use a method that includes a clipboard functionality, e. g. Remote Desktop Connection.
-
Open a shell.
-
Optional: Verify the signature
You can verify the GPG signature of the STACKIT Server Agent package with the following scripts:- Linux, RPM-based (Fedora, RedHat)
Source file: RPM (Fedora/RedHat based)
#!/bin/bash#Download GPG public keycurl https://stackit-server-agent.object.storage.eu01.onstackit.cloud/stackit-server-agent.gpg -o /tmp/stackit-server-agent.gpg### Install dependenciesyum install gnupg -y### Import GPG Public keygpg --import /tmp/stackit-server-agent.gpg### Download STACKIT Server Agentcurl http://169.254.169.254/stackit/v1/server-agent/amd64/rpm -o /tmp/stackit-server-agent.rpm### Download the package signature filecurl https://stackit-server-agent.object.storage.eu01.onstackit.cloud/stackit-server-agent.rpm.sig -o /tmp/stackit-server-agent.rpm.sigif gpg --verify /tmp/stackit-server-agent.rpm.sig /tmp/stackit-server-agent.rpmthenecho "The STACKIT Server Agent is verified successfully"elseecho "The STACKIT Server Agent is not verified successfully"rm -rf /tmp/stackit-server-agent.gpg /tmp/stackit-server-agent.rpm.sig /tmp/stackit-server-agent.rpmexit 1firm -rf /tmp/stackit-server-agent.gpg /tmp/stackit-server-agent.rpm.sig- Linux, DEB-based (Debian, Ubuntu)
Source file: DEB (Debian based)
#!/bin/bash#Download GPG public keycurl https://stackit-server-agent.object.storage.eu01.onstackit.cloud/stackit-server-agent.gpg -o /tmp/stackit-server-agent.gpg### Install dependenciesapt-get update && apt-get install gnupg -y### Import GPG Public keygpg --import /tmp/stackit-server-agent.gpg### Download STACKIT Server Agentcurl http://169.254.169.254/stackit/v1/server-agent/amd64/deb -o /tmp/stackit-server-agent.deb### Download the package signature filecurl https://stackit-server-agent.object.storage.eu01.onstackit.cloud/stackit-server-agent.deb.sig -o /tmp/stackit-server-agent.deb.sigif gpg --verify /tmp/stackit-server-agent.deb.sig /tmp/stackit-server-agent.debthenecho "The STACKIT Server Agent is verified successfully"elseecho "The STACKIT Server Agent is not verified successfully"rm -rf /tmp/stackit-server-agent.deb /tmp/stackit-server-agent.deb.sig /tmp/stackit-server-agent.gpgexit 1firm -rf /tmp/stackit-server-agent.gpg /tmp/stackit-server-agent.deb.sigOnce the package is successfully verified you can install it by running:
Source file: RPM (Fedora/RedHat based)Terminal window yum localinstall /tmp/stackit-server-agent.rpm -yor
Source file: DEB (Debian based)Terminal window dpkg -i /tmp/stackit-server-agent.deb - Linux, RPM-based (Fedora, RedHat)
-
Download and install the STACKIT Server Agent (without GPG verification)
Copy and paste the script into the shell and run it:- Linux, RPM-based (Fedora, RedHat)
Source file: RPM (Fedora/RedHat based)
#!/bin/bash### Download STACKIT Server Agentcurl http://169.254.169.254/stackit/v1/server-agent/amd64/rpm -o /tmp/stackit-server-agent.rpm### Install the Agentyum localinstall /tmp/stackit-server-agent.rpm -y### Cleaning uprm -rf /tmp/stackit-server-agent.rpm- Linux, DEB-based (Debian, Ubuntu)
Source file: DEB (Debian based)
#!/bin/bash### Download STACKIT Server Agentcurl http://169.254.169.254/stackit/v1/server-agent/amd64/deb -o /tmp/stackit-server-agent.deb### Install the Agentdpkg -i /tmp/stackit-server-agent.deb### Cleaning uprm -rf /tmp/stackit-server-agent.deb - Linux, RPM-based (Fedora, RedHat)
-
If the installation was successful, check if the service is running:
systemctl status stackit-server-agent.service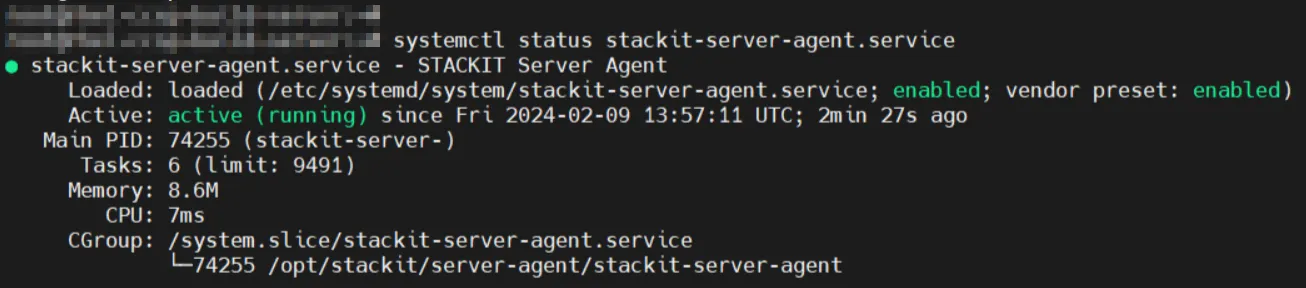
The STACKIT Server Agent is now fully configured and can accept commands remotely and run them locally on your system.
Installing the STACKIT Server Agent on an existing server (Windows)
Section titled “Installing the STACKIT Server Agent on an existing server (Windows)”-
Logon to your server remotely. Use a method that includes a clipboard functionality, e. g. Remote Desktop Connection.
-
Start PowerShell ISE with elevated permissions.
-
Copy and paste the script into the shell and run the script.
Source file: MSITerminal window ## Download STACKIT Server AgentNew-Item -ItemType Directory -Path "C:\ProgramData\STACKIT\ServerAgent" -ForceInvoke-WebRequest -Uri "http://169.254.169.254/stackit/v1/server-agent/amd64/msi" -OutFile "C:\ProgramData\STACKIT\ServerAgent\STACKITServerAgent.msi"### Install the AgentStart-Process -FilePath "C:\Windows\System32\msiexec.exe" -ArgumentList "/i C:\ProgramData\STACKIT\ServerAgent\STACKITServerAgent.msi /quiet /l*v C:\Windows\Temp\STACKITServerAgent_install.log" -NoNewWindow -Wait -
After successful installation, check if the service is running. Open the PowerShell and run the following command:
Get-Service STACKITServerAgentAlternatively check the status in the Service tab of the task manager:

The STACKIT Server Agent is now fully configured and can be used to run commands.