Push your app to Cloud Foundry
Last updated on
In this document we want to take a look on how you can push your application from your local system to STACKIT Cloud Foundry and deploy it there. After going through this document, you will be able to access your hosted application via a STACKIT Cloud Foundry wildcard domain.
In this tab you will learn how to use the Cloud Foundry CLI to:
- Login and select the correct org and space
- Prepare your application
- Understand the cf push command output
Login and select the correct org and space
Section titled “Login and select the correct org and space”Login with the Cloud Foundry CLI to the according Cloud Foundry API and point to the organisation and space you want to push your app to. You can learn how to do that in the documentation Interact with Cloud Foundry.
Prepare your application
Section titled “Prepare your application”If you want to push your application as source code (i.e. static files) or build artifact (i.e. JAR file) to the Cloud Foundry you have to be in the terminal in the directory of your application code, so for example:
cd myProjects/appcloudExampleIf you want to push your application already containerized, for example as an Docker Image, you have to already build your container image, but can start the push process from everywhere with just the reference to your (local) container registry.
After you logged in the Cloud Foundry CLI, set your org and space as target and have your source code/build artifact/docker container located in your terminal, all you have to do is a simple cf push command that usually looks like this:
cf push myFirstApp -p build/myfirstapp.jar --random-route --var TEST_ENV=TRUEIn this example you can see, that we defined multiple arguments for our applications deployment. You can use various options to enrich your push command as seen below.
cf push APP_NAME [-b BUILDPACK_NAME]If you want to push an already existing docker image:
cf push APP_NAME --docker-image [REGISTRY_HOST:PORT/]IMAGE[:TAG] [--docker-username USERNAME]In both cases you have to add the required APP_NAME Parameter, which defines the name of your application with which you identify your application in your space. This name has to be unique within one space.
Pushing a docker image you also have to reference the image in the registry you want to use with the argument --docker-image [REGISTRY_HOST:PORT/]IMAGE[:TAG].
Pushing a build artifact It is recommended to also define the argument -p PATH, which references the exact path to the artifact you want to push.
Since the Cloud Foundry creates a route for your application from a combination of your application name and the wildcard domain it is also recommended to define a random-route with the --random-route argument, adding a random text to this combination. Alternatively you could run into issues when the combination of your application name and the wildcard domain is already taken.
You can enrich your push command with even more options. In order to find out more about the possible options, check out the Cloud Foundry CLI Reference Guide for the push command.
Alternatively you can also use a manifest file to store the configuration of your application as code. You can find more about using the manifest file in How to use manifest files.
Understand the cf push command output
Section titled “Understand the cf push command output”After you have run the cf push command, the Cloud Foundry CLI is working its magic and creates the application in your space with the configuration given via arguments or the manifest.yml.
Afterwards it uploads the artifact,—if not already containerized—containerizes it with a fitting buildpack (see Containers and buildpacks) and prepares the resulting droplet to be started in your Cloud Foundry space.
You can follow this whole process with the output of the working cf CLI in your terminal. Once the push process is successful you get the information about your pushed application that looks like the example below:
Name: spring-musicrequired state: startedRoutes: spring-music-responsible-jackal-jh.apps.01.cf.eu01.stackit.cloudLast Upload: Wed 12 Jan 14:45:33 CET 2022Stack: cflinuxfs3Buildpacks:  Name Version detect output buildpack name  java_buildpack v4.42-git@github.com:cloudfoundry/java-buildpack.git#91aefacf java java
Type: websidecars:Instances: 1/1Memory Usage: 1024MExecution:    JAVA_OPTS="..." State   since CPU RAM Memory Details#0 active 2022-01-12T13:46:05Z 0.0% 272.2M von 1G 201.5M von 512M
Here you can see all the details of your application. From the name of the application with which you can identify it, over the routes assigned to your application, under which you can access it, to the containers state within your application.
If you now copy and paste the route listed in this overview in your browser, you will now be able to access your application. Congratulations: You have successfully hosted an application on Cloud Foundry!
In this tab you will learn how to use the Stratos UI to:
- Navigate to and log into Stratos
- Create a new application
- Select an application source
- Select an instance, org and space
- Define a name and the source image
- Configure and deploy your application
Navigate to and log into Stratos
Section titled “Navigate to and log into Stratos”Login to the Cloud Foundry Console UI and point to the organisation and space you want to push your app to. You can learn how to do that in the documentation Interact with Cloud Foundry.
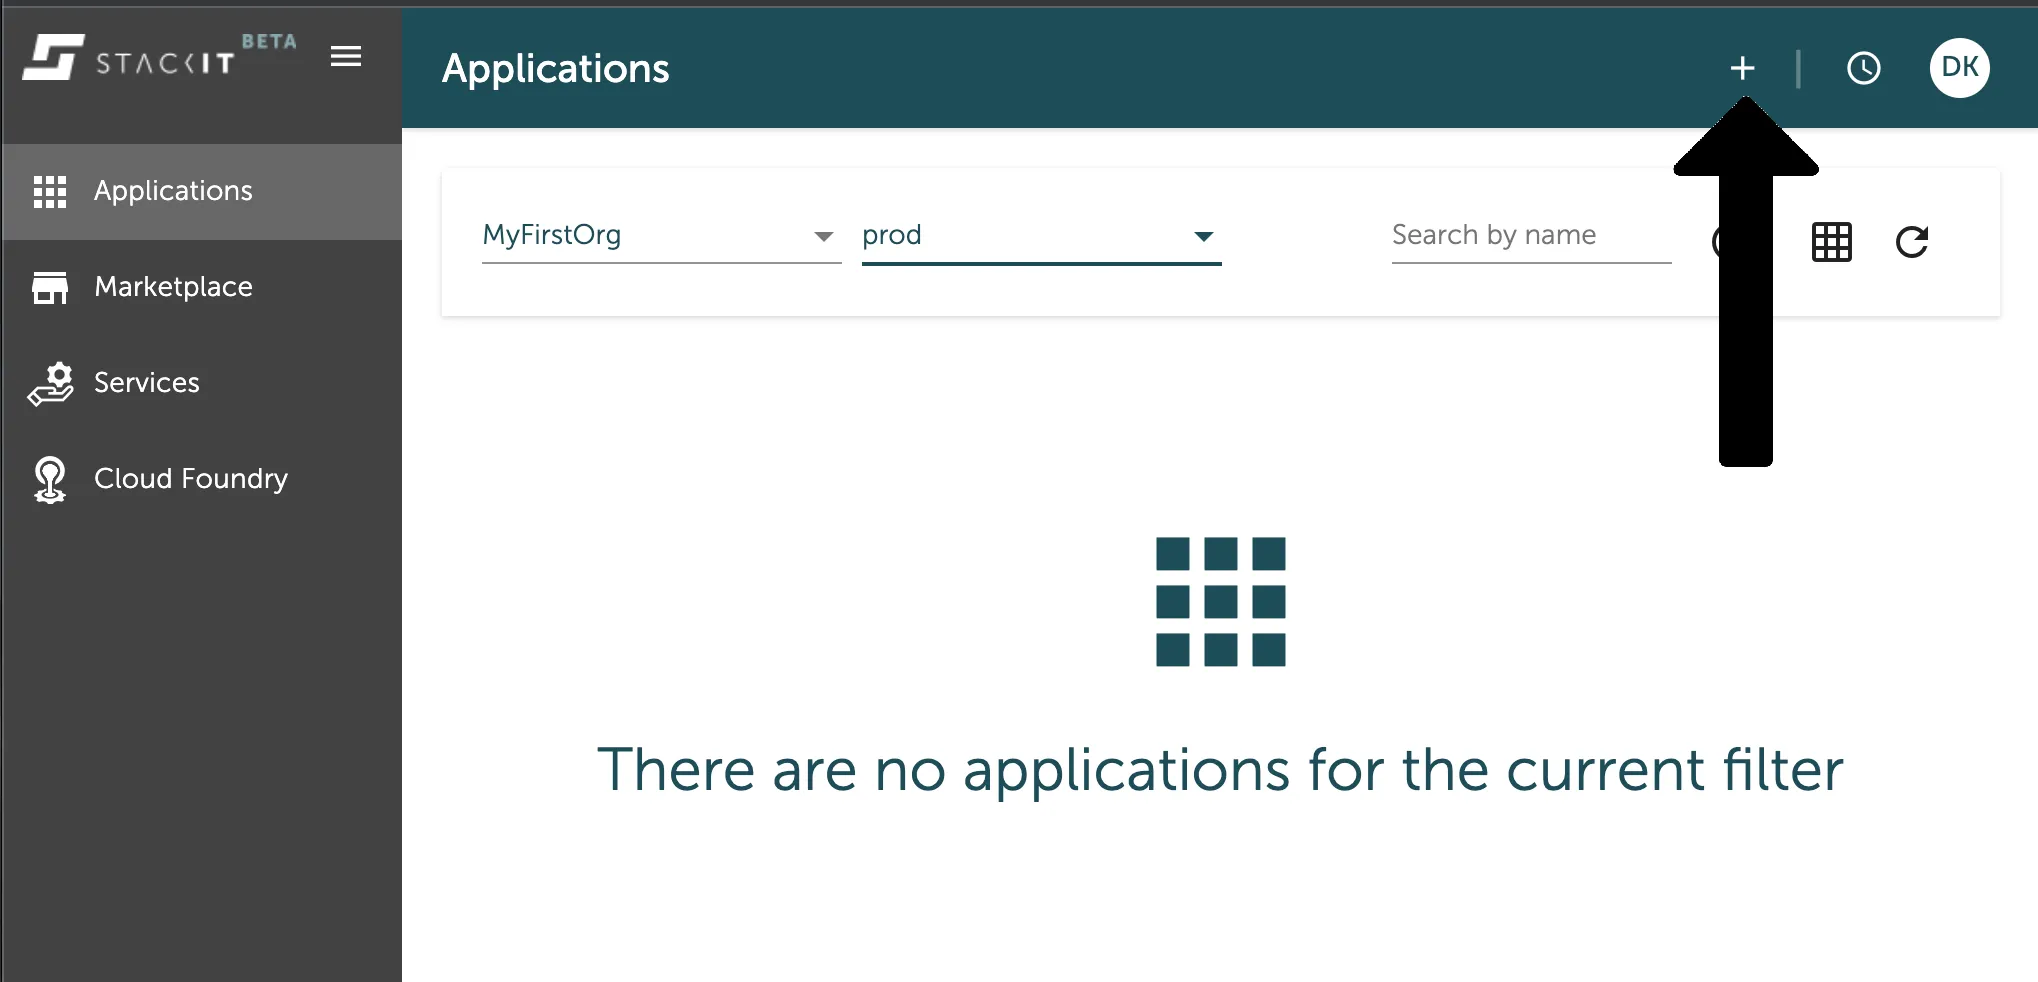
Create a new application
Section titled “Create a new application”If you are located in the Console UIs application overview, you can simply create a new Application by pressing the +-Button in the top right corner of the window, which is marked in the image below.
Select an application source
Section titled “Select an application source”This will directly lead you to the selection of your application source. Here you can select from where you want to push your deployment artifact - code, build or container - to the STACKIT Cloud Foundry.
For this example we will upload a Docker Image and therefore click on the Docker Image panel as seen in the image below.
The Docker Image option can see marked here in the application source selection is also connected to the Docker container registry “Docker Hub”, which means you can easily pull images from that registry. But you can also use any other container registry with this option.
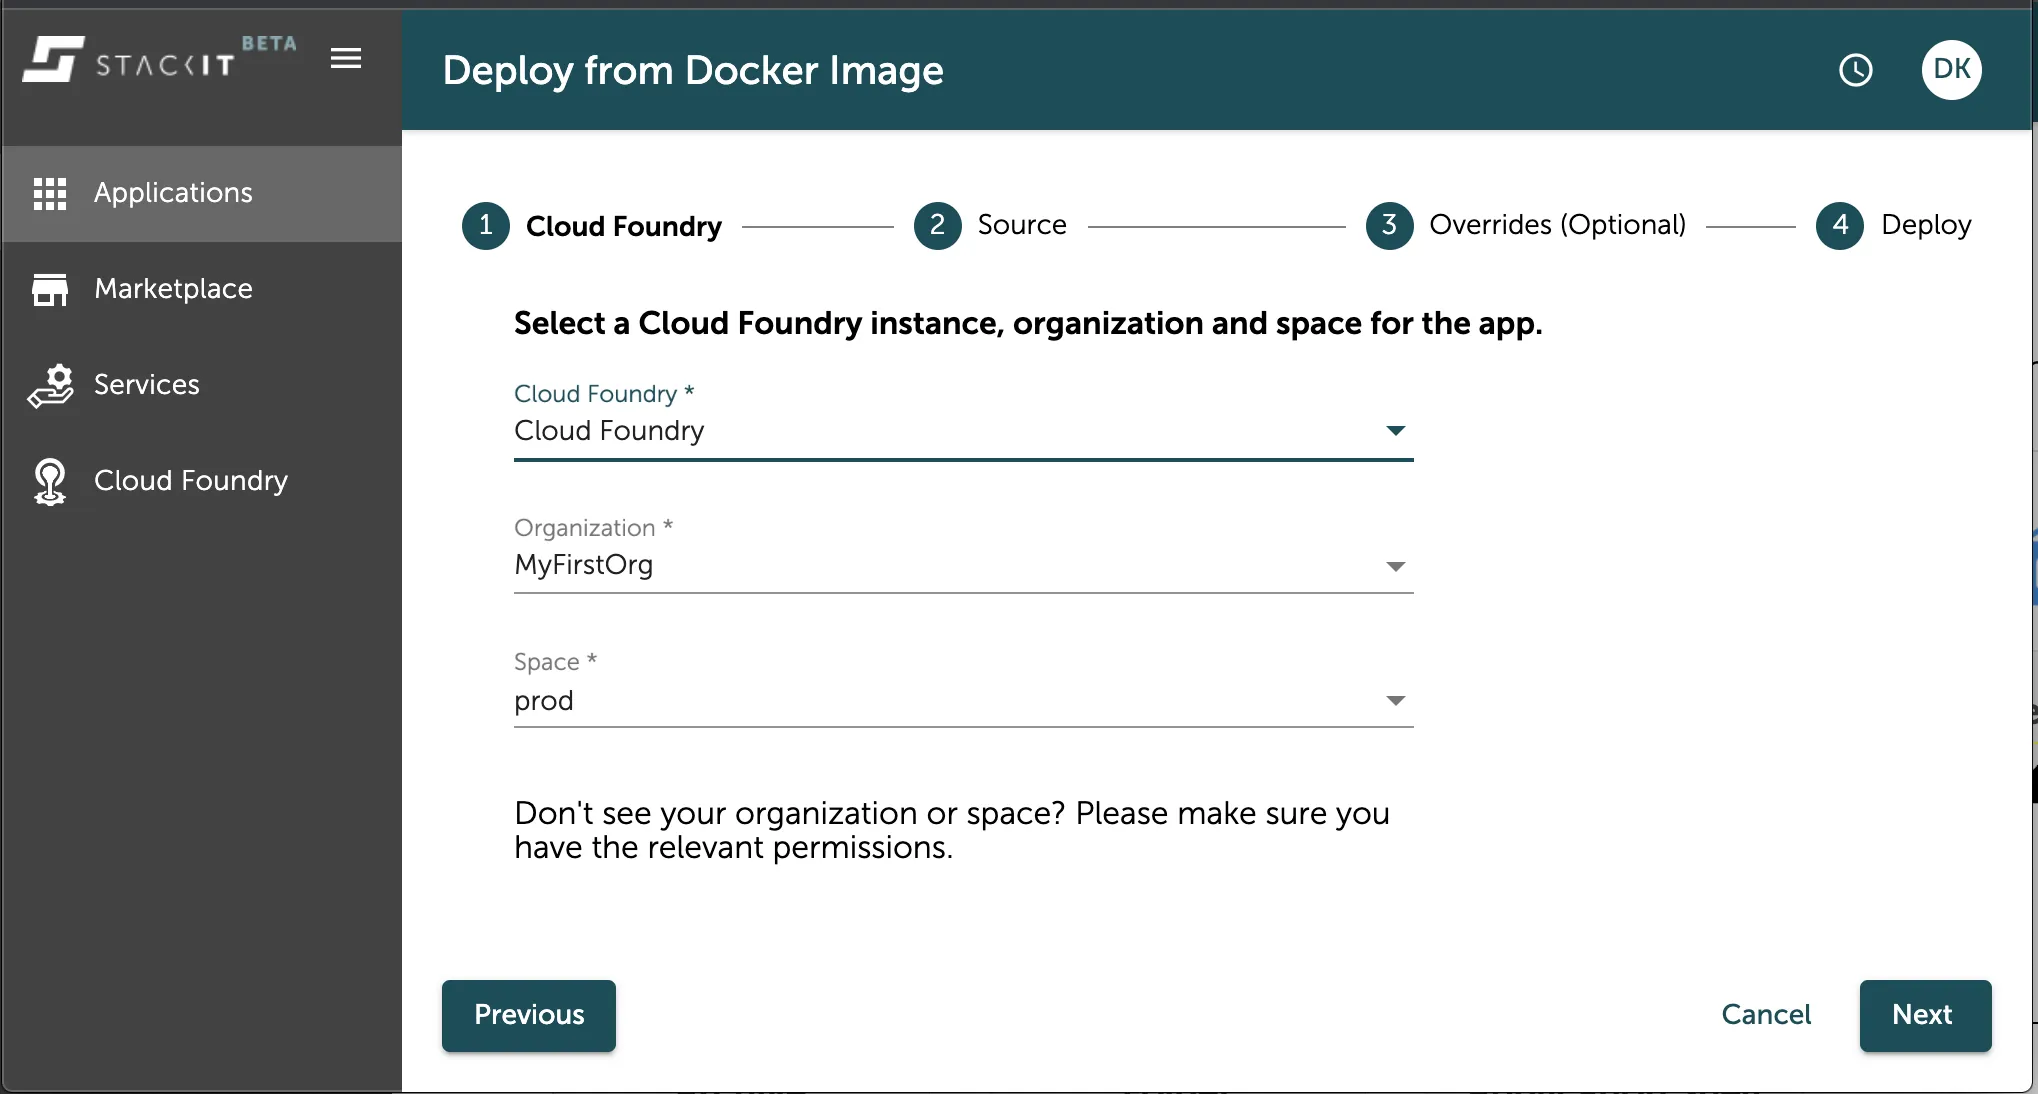
Select an instance, org and space
Section titled “Select an instance, org and space”In the next step you can select your organisation and space you want to deploy your application to. If you filtered the view in the application overview already to the target org and space for this new application then it will already be preselected in this overview. In any other case, select Cloud Foundry as the Instance to deploy to (this would be a relevant selection if any other of our container runtimes would be connected here) and then choose the org and space from the according labeled dropdown fields as seen in the image below.
Define a name and the source image
Section titled “Define a name and the source image”After selecting your target org and space, you have to define the name of your application. The name is the identifier of your application. You also have to select the docker image you want to deploy.
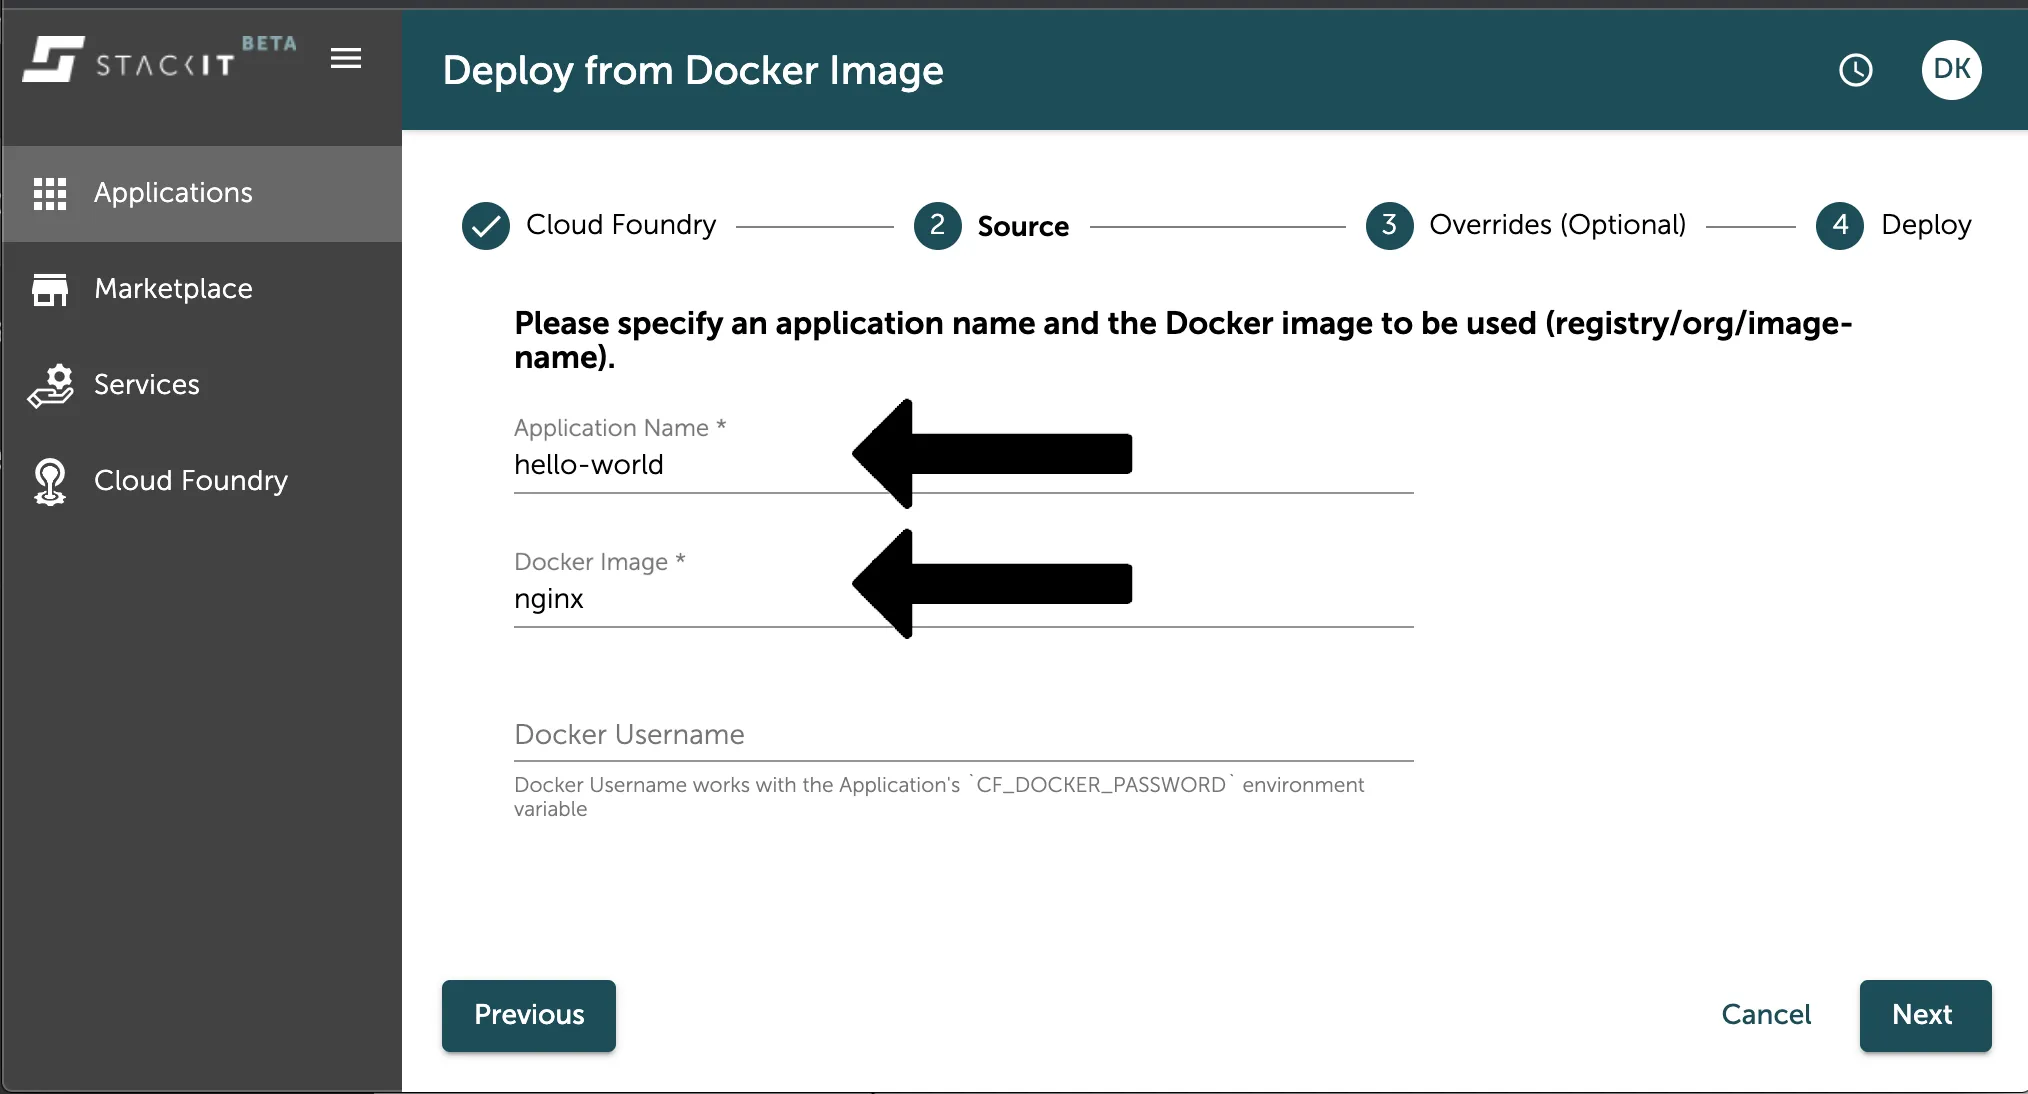
As in this option of the artifact source has DockerHub directly integrated you only need to define the identifying name of the container image you want to pull from as seen in the image above. In this hello-world example we just use the nginx container image on Docker Hub deploying just a basic web server to test the deployment.
You can also pull private images from the DockerHub Container Registry, but then have to define the Docker Credentials with the access rights to that image in the fields below.
Configure and deploy your application
Section titled “Configure and deploy your application”After defining the name and the source image you can configure your application by setting some configuration parameters in the console UI that can overwrite any existing manifest file from the images source registry.
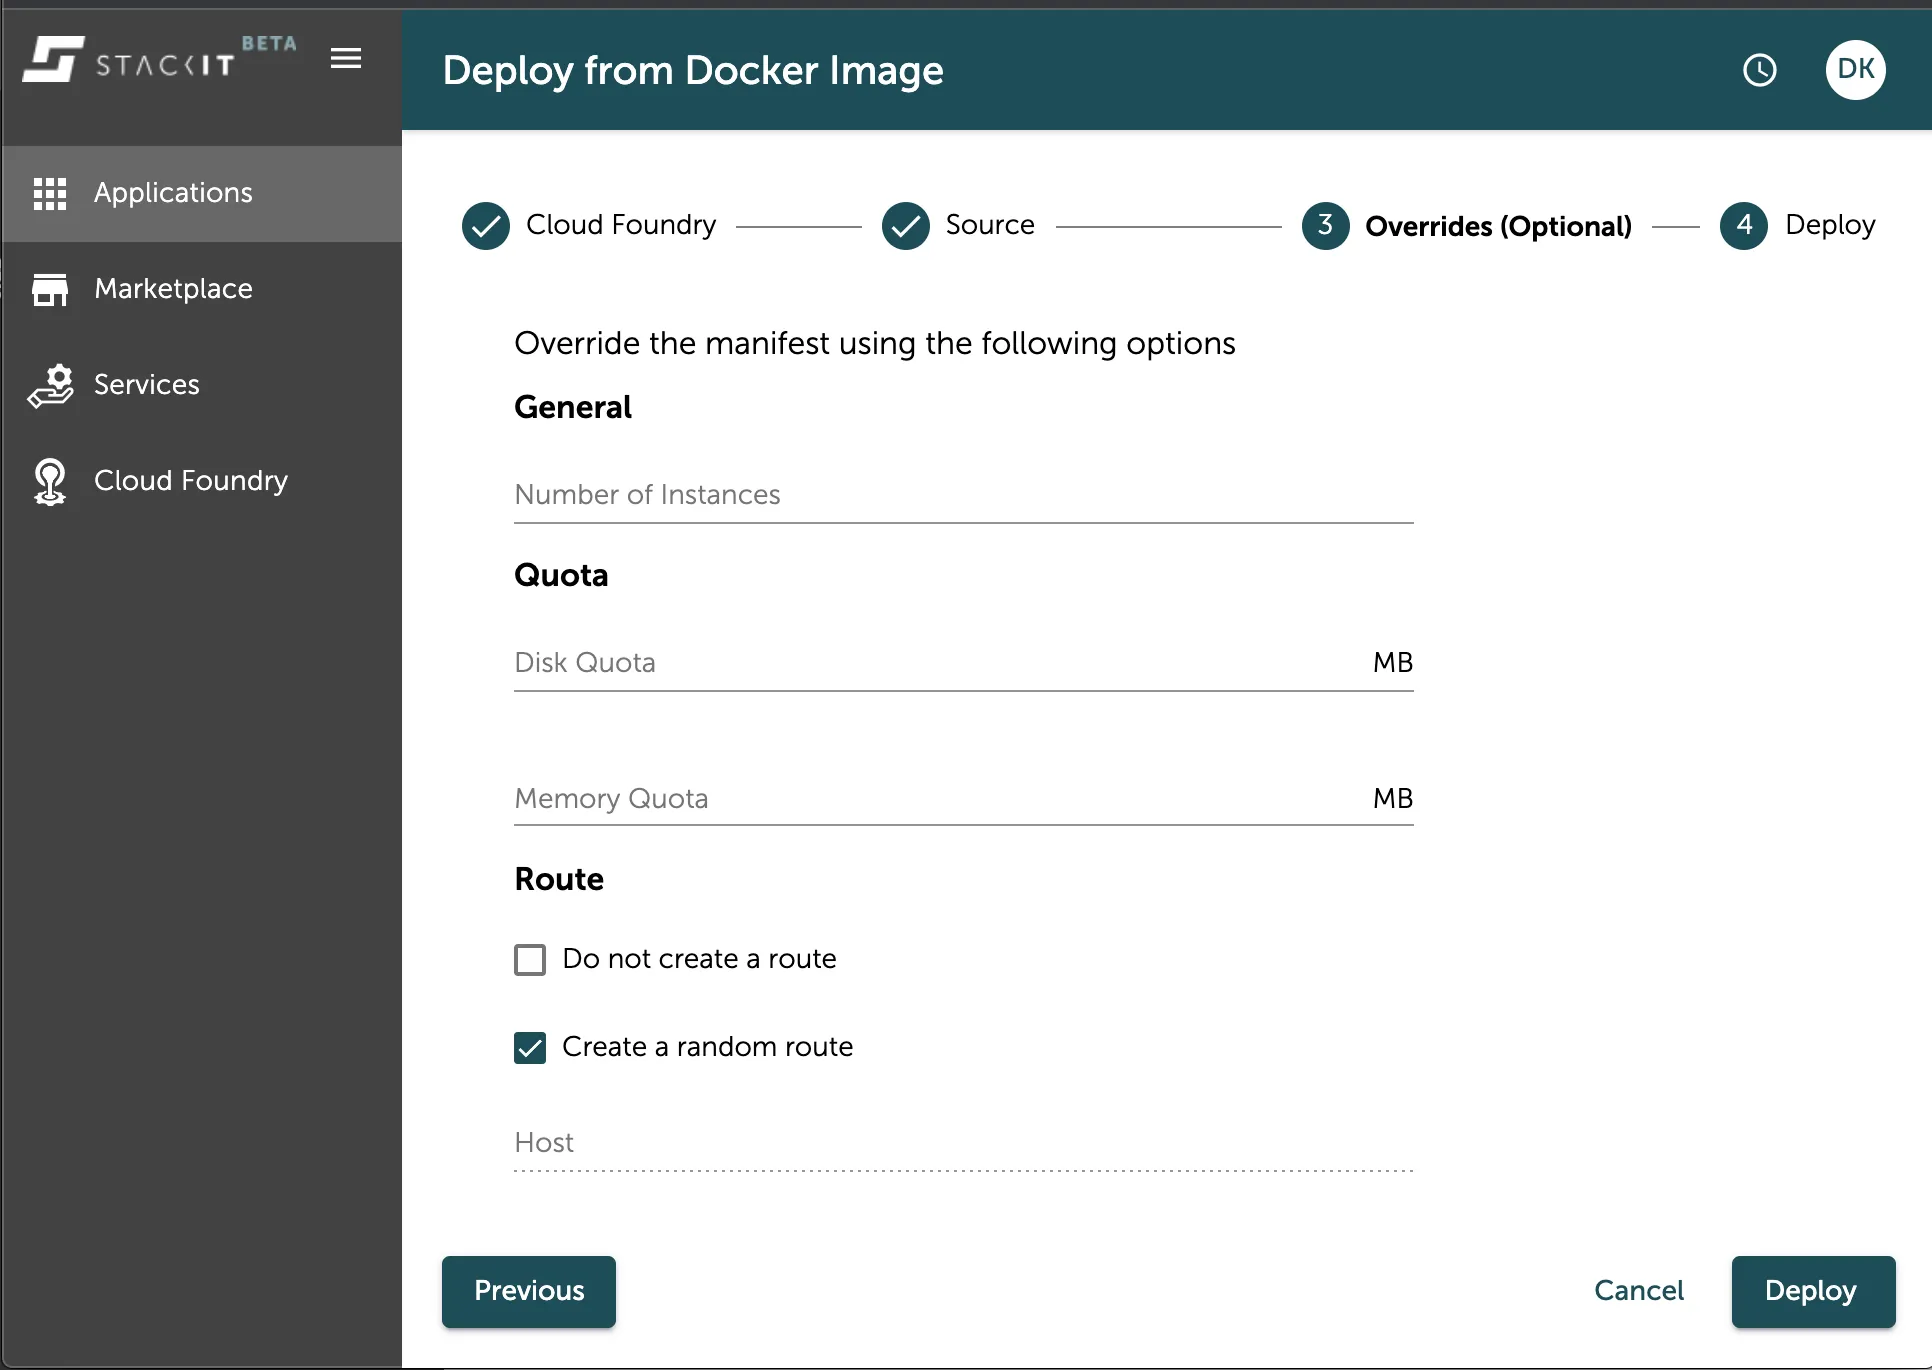
As seen in the image above you can set various configurations for the number of instances, quota limits, route, run commands and build details.
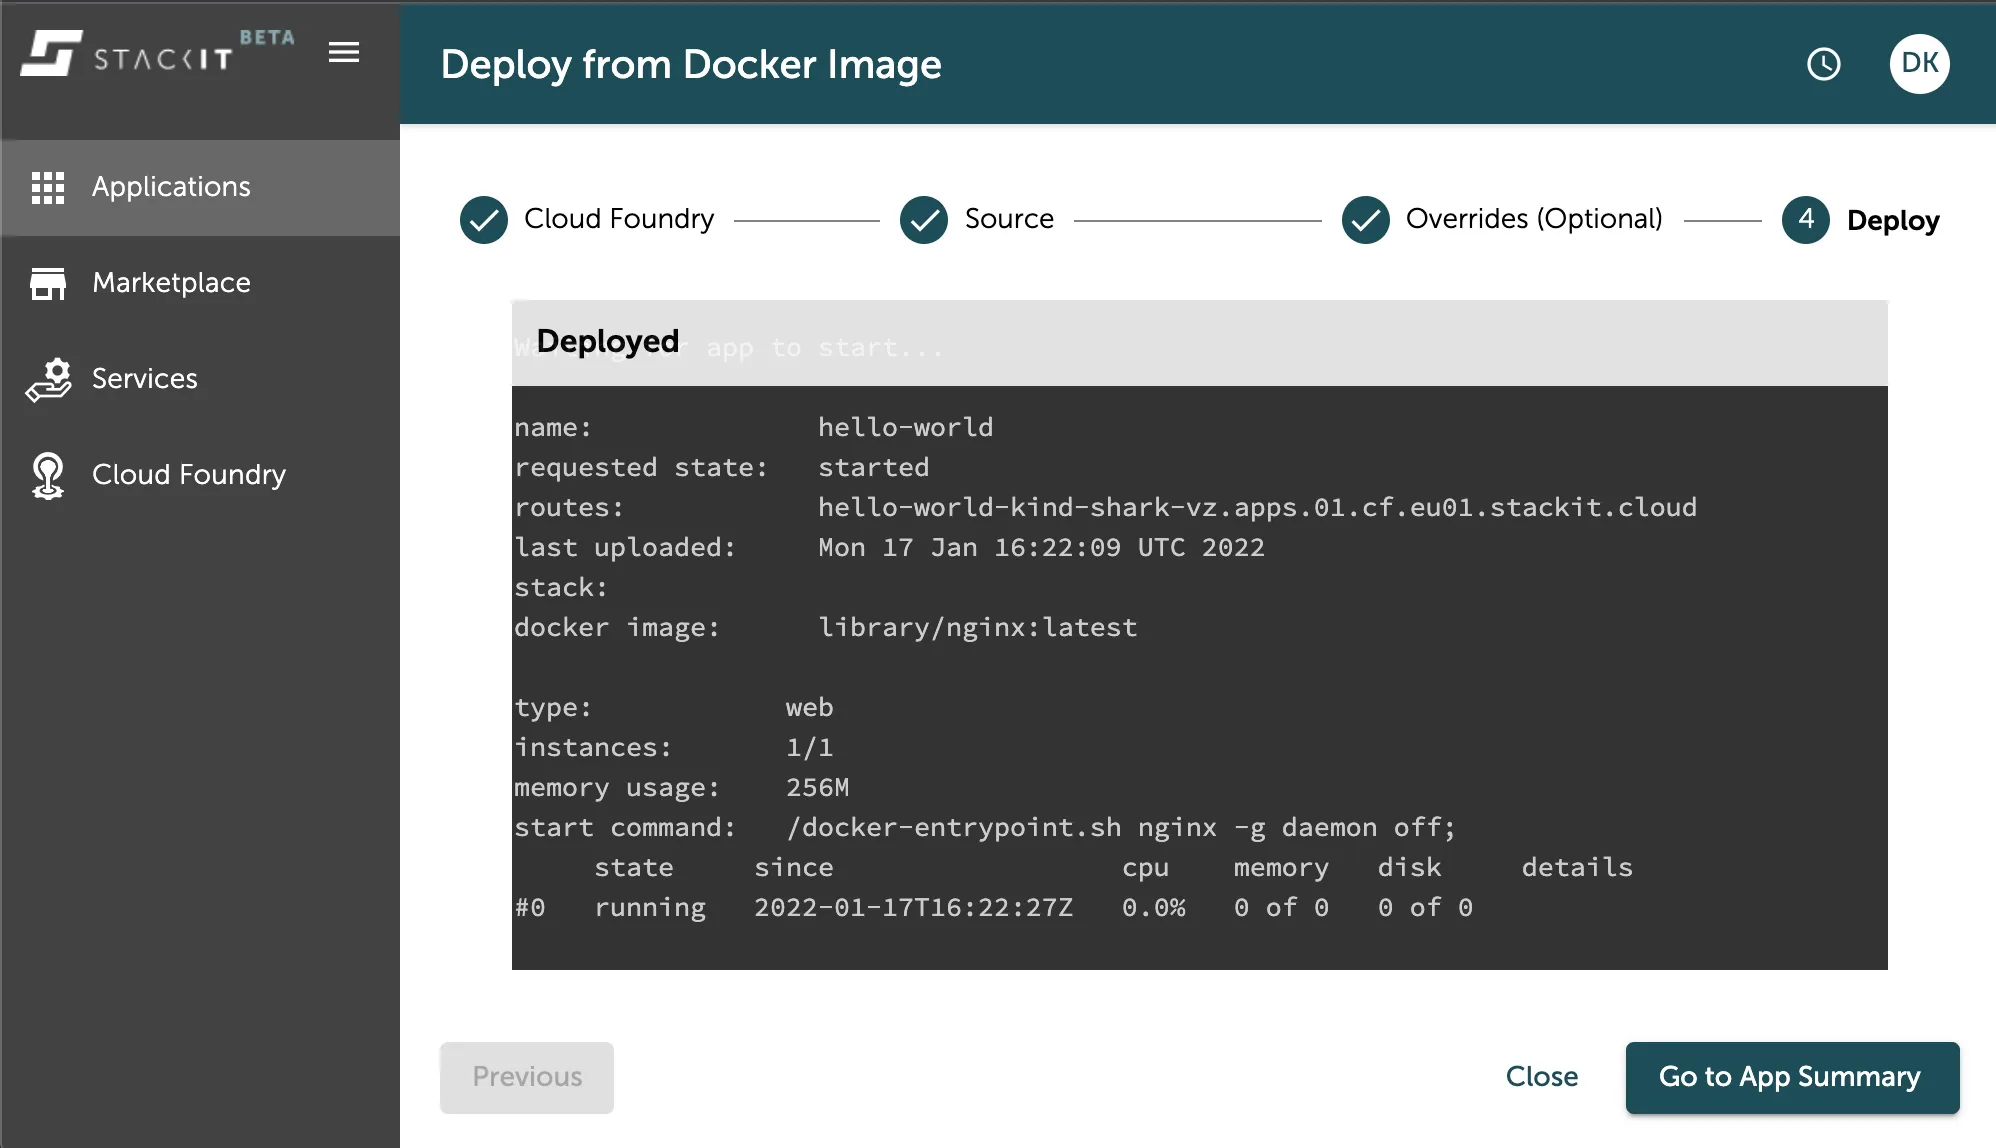
After you set the configuration of your application, you can press the Deploy”-Button, which will directly trigger the push of your artifact and create the application in your space for you. You can follow this process via the output the console prints into the center of the deployment overview as seen in the image below.
After a successful deployment you can press the Go to App Summary-Button to see more details about your application as seen in the image below.
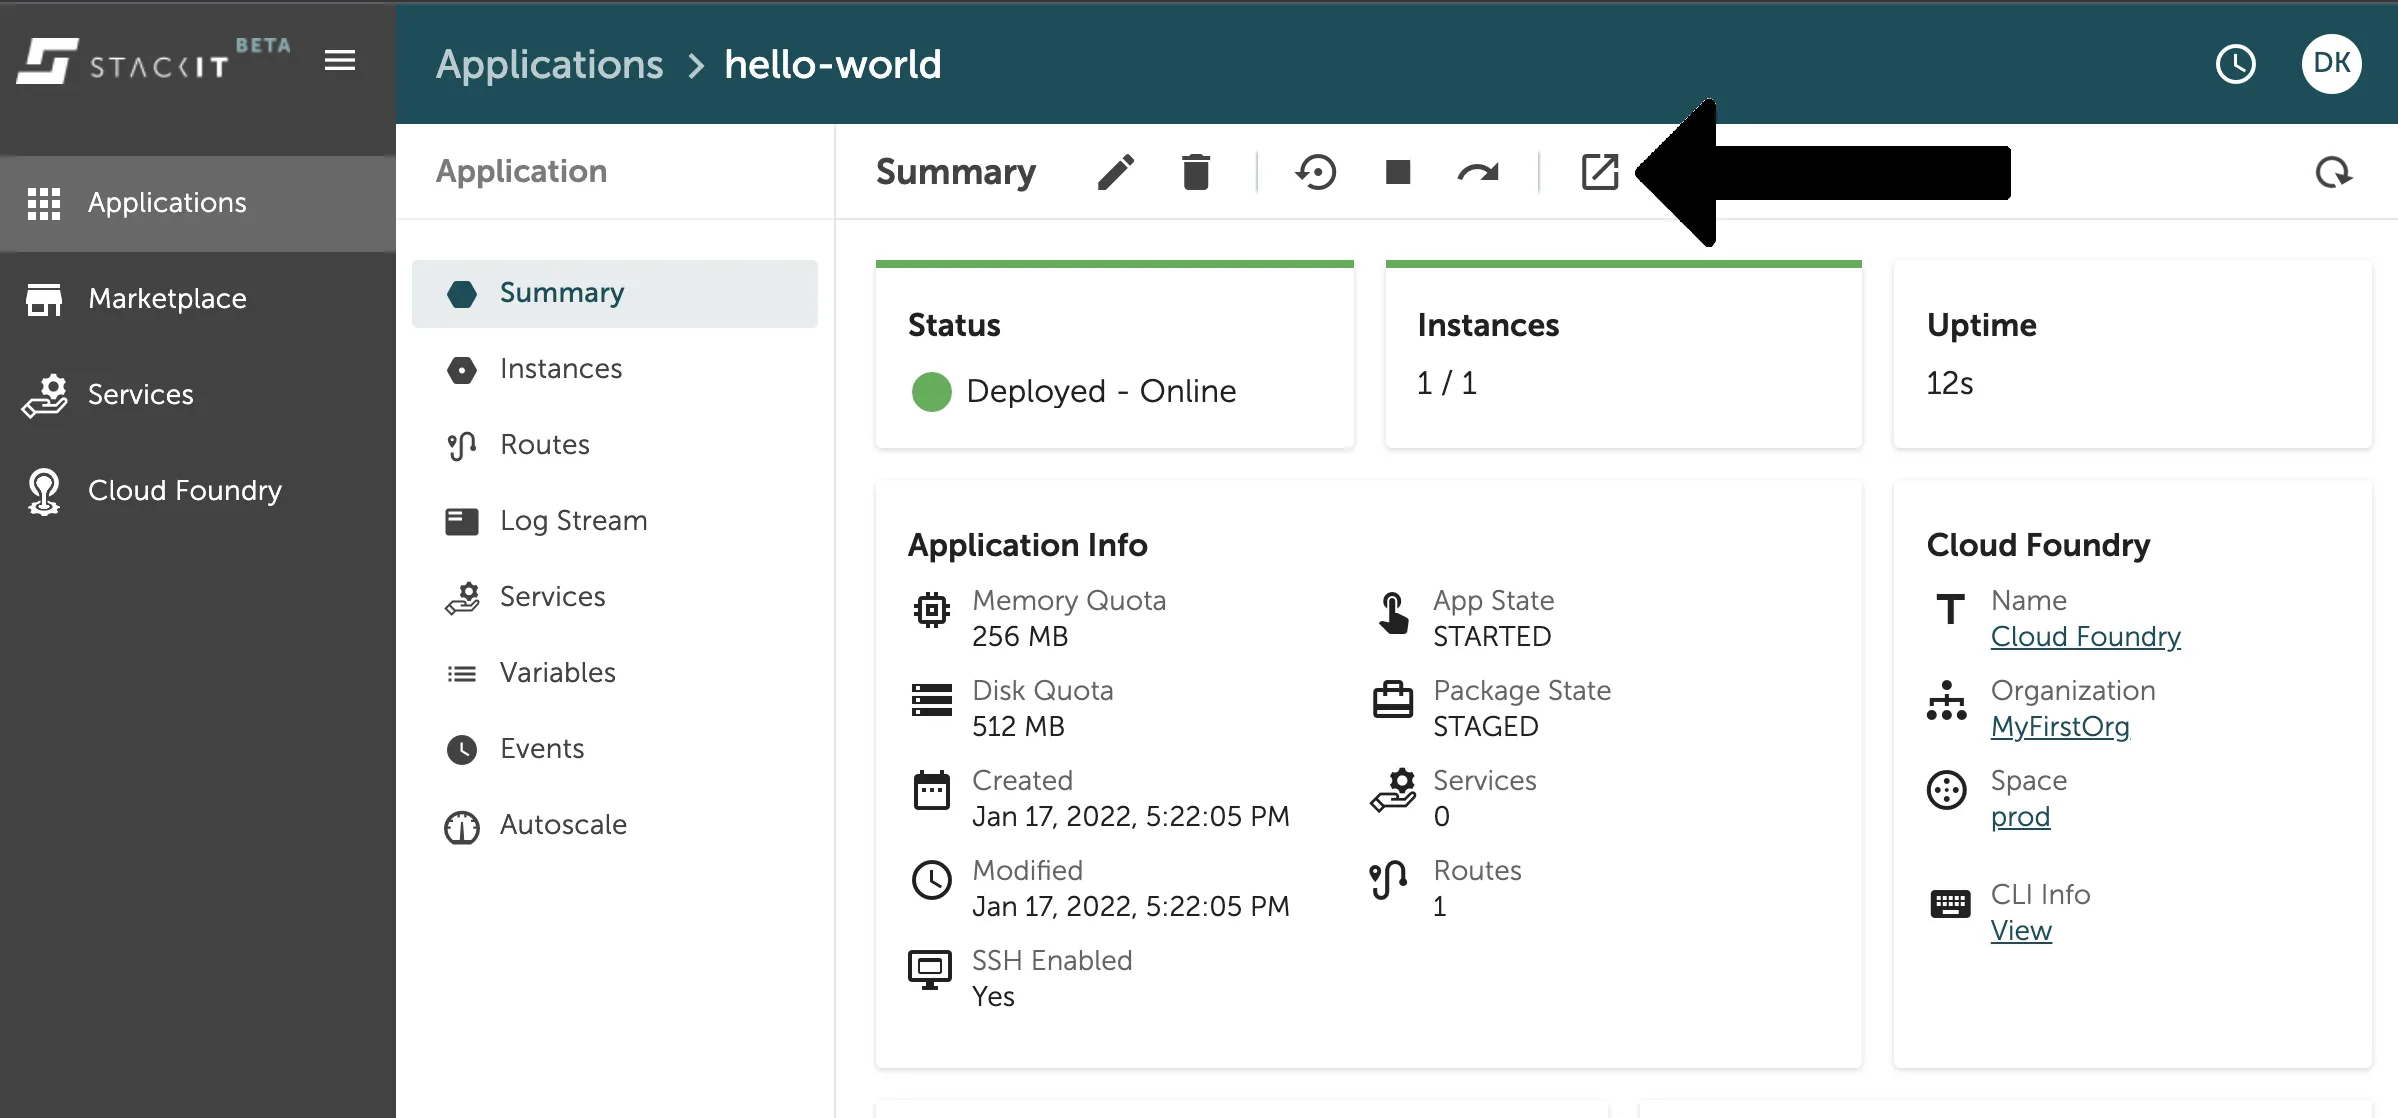
Besides all the application information you can find here, you can also easily access the route of your application with the “Visit”-Button marked in the image above.
With this link you should now be able to access your application. Congratulations: You have successfully hosted an application on Cloud Foundry!