SSH-Key generieren und hochladen
Zuletzt aktualisiert am
In dieser Anleitung erfahren Sie, wie Sie ein SSH-Schlüsselpaar generieren und den öffentlichen Schlüssel im STACKIT Portal hochladen.
Was ist ein SSH-Schlüssel?
Abschnitt betitelt „Was ist ein SSH-Schlüssel?“SSH (Secure Shell) ist ein Tool für Systemadministratoren, um den Dateiaustausch und andere (z. B. administrative) Kommunikation sicher über das Internet zu ermöglichen. Das SSH-Protokoll wird mit der Open-Source-Software OpenSSH implementiert.
Für die Verschlüsselung wird ein asynchrones Verfahren verwendet, bei dem zwei Schlüssel benötigt werden: ein öffentlicher Schlüssel und ein privater Schlüssel. Der öffentliche Schlüssel wird zur Verschlüsselung der Datenverbindungen verwendet und kann an andere Dienste wie einen OpenSSH-Server weitergegeben werden. Diese Datenverbindungen können dann mit dem privaten Schlüssel wieder entschlüsselt werden. Geben Sie den privaten Schlüssel nicht weiter, da sonst unbefugte Benutzer auf die Daten zugreifen könnten.
SSH-Schlüsselpaar unter macOS und Linux generieren
Abschnitt betitelt „SSH-Schlüsselpaar unter macOS und Linux generieren“SSH-Schlüsselpaar erstellen
Abschnitt betitelt „SSH-Schlüsselpaar erstellen“Öffnen Sie ein Terminal und geben Sie Folgendes ein:
$ ssh-keygen -t rsa -b 4096 -C "your\_email@example.com" > Enter a file in which to save the key (/home/you/.ssh/id\_rsa): [Drücken Sie Enter]Die Eingabeaufforderung zeigt den Standardpfad des Schlüsselpaars an. Um diesen zu verwenden, müssen Sie Enter drücken oder einen anderen Pfad eingeben.
Geben Sie im nächsten Schritt zweimal ein sicheres Passwort ein und bestätigen Sie jedes Mal mit Enter.
> Enter passphrase (empty for no passphrase): [Type a passphrase] > Enter same passphrase again: [Type passphrase again]Das SSH-Schlüsselpaar ist nun erfolgreich erstellt und der öffentliche Schlüssel kann nun in das STACKIT Portal hochgeladen werden.
$ cat \~/.ssh/id\_rsa.pub > ssh-rsa AAAAB3NzaC1yc2EAAAADAQABAAyFT1hOdXCfG3EVDPr5w== your\_email@example.comSSH-Konfigurationsdatei erstellen (nur für Mac erforderlich)
Abschnitt betitelt „SSH-Konfigurationsdatei erstellen (nur für Mac erforderlich)“Für macOS Sierra 10.12.2 oder höher muss die Datei ~/.ssh/config bearbeitet werden, um die Schlüssel automatisch in den SSH-Agenten zu laden und die Passwörter im Schlüsselbund zu speichern.
Öffnen oder erstellen Sie die Datei ~/.ssh/config und fügen Sie gegebenenfalls Folgendes hinzu:
Host * AddKeysToAgent yes UseKeychain yes IdentityFile \~/.ssh/id\_ed25519SSH-Key zum SSH-Agenten hinzufügen
Abschnitt betitelt „SSH-Key zum SSH-Agenten hinzufügen“Starten Sie den SSH-Agenten im Hintergrund:
$ eval "$(ssh-agent -s)" > Agent pid 1045343Fügen Sie den neu erstellten privaten SSH-Schlüssel zum SSH-Agenten hinzu.
Enter passphrase for /home/you/.ssh/id\_rsa: > Identity added: /home/you/.ssh/id\_rsa (your\_email@example.com)SSH-Schlüsselpaar unter Windows generieren
Abschnitt betitelt „SSH-Schlüsselpaar unter Windows generieren“Das Programm Putty kann zur Generierung des SSH-Schlüsselpaars unter Windows verwendet werden.
Putty ist normalerweise unter C:\Programme\PuTTY\puttygen.exe installiert und kann von dort aus gestartet werden.
Nach dem Start von Putty können Sie auf die Schaltfläche Generate klicken, um ein neues SSH-Schlüsselpaar zu erstellen.
Wählen Sie bei der Erstellung ein starkes Passwort, um das SSH-Schlüsselpaar zu verschlüsseln und unbefugten Zugriff zu verhindern.
Sobald das Schlüsselpaar erstellt wurde, kann der öffentliche Schlüssel kopiert und zu STACKIT hochgeladen werden. Klicken Sie abschließend in Putty auf Save public key und Save private key, um beide Schlüssel zu speichern.
Nachdem das SSH-Schlüsselpaar erstellt und gesichert wurde, können Sie den öffentlichen Schlüssel im STACKIT Portal hochladen.
Benutzernamen für SSH-Zugriff
Abschnitt betitelt „Benutzernamen für SSH-Zugriff“Basierend auf den verschiedenen angebotenen VM-Images können Benutzernamen für den SSH-Login erforderlich sein. Diese sind unten aufgeführt:
| VM-Image | Benutzername |
|---|---|
| Ubuntu | ubuntu |
| CentOS 7 | centos |
| CentOS Stream 8 | centos |
| CentOS Stream 9 | centos |
| Debian | debian |
| Fedora | fedora |
| AlmaLinux | almalinux |
| Rocky Linux | rocky |
Öffentlichen SSH-Schlüssel in das STACKIT Portal hochladen
Abschnitt betitelt „Öffentlichen SSH-Schlüssel in das STACKIT Portal hochladen“Der öffentliche SSH-Schlüssel kann im STACKIT Portal unter SSH key settings hochgeladen werden.
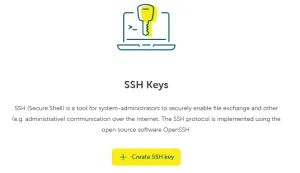
Klicken Sie auf die Schaltfläche SSH-Key erstellen, um einen Dialog mit 2 Eingabefeldern zu öffnen:
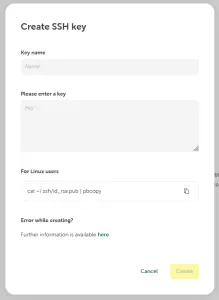
- Key Name: Die Schlüsselbezeichnung, wie z. B. “Laptop” oder “Max Mustermanns Computer”.
- Key: Der zuvor erstellte öffentliche Schlüssel.
Wenn die beiden Felder ausgefüllt sind, klicken Sie auf die Schaltfläche Erstellen, um den Schlüssel im STACKIT Portal zu speichern.