Erstellen Sie Ihre erste Workflows-Instanz und führen Sie Tasks darauf aus
Zuletzt aktualisiert am
Voraussetzungen
Abschnitt betitelt „Voraussetzungen“- Sie haben ein STACKIT-Kundenkonto: Kundenkonto erstellen
- Sie haben ein STACKIT-Benutzerkonto: Benutzerkonto erstellen
- Sie haben ein STACKIT-Projekt: Projekt erstellen
In dieser Anleitung erstellen Sie eine STACKIT Workflows-Instanz, schreiben Ihren ersten DAG und lösen diesen aus.
Workflows-Instanz erstellen
Abschnitt betitelt „Workflows-Instanz erstellen“Um eine Workflows-Instanz zu bestellen, navigieren Sie zum Produkt im STACKIT Portal und klicken Sie auf Workflows erstellen.
Zuerst müssen Sie einige allgemeine Informationen über die Instanz eingeben. Der Instanzname darf nicht länger als 25 Zeichen sein und muss DNS-konform sein (Kleinbuchstaben, Zahlen, Bindestrich). Der gewählte Instanzname wird Teil der URL der Instanz. Beschreibung ist ein optionales Feld mit maximal 255 Zeichen.
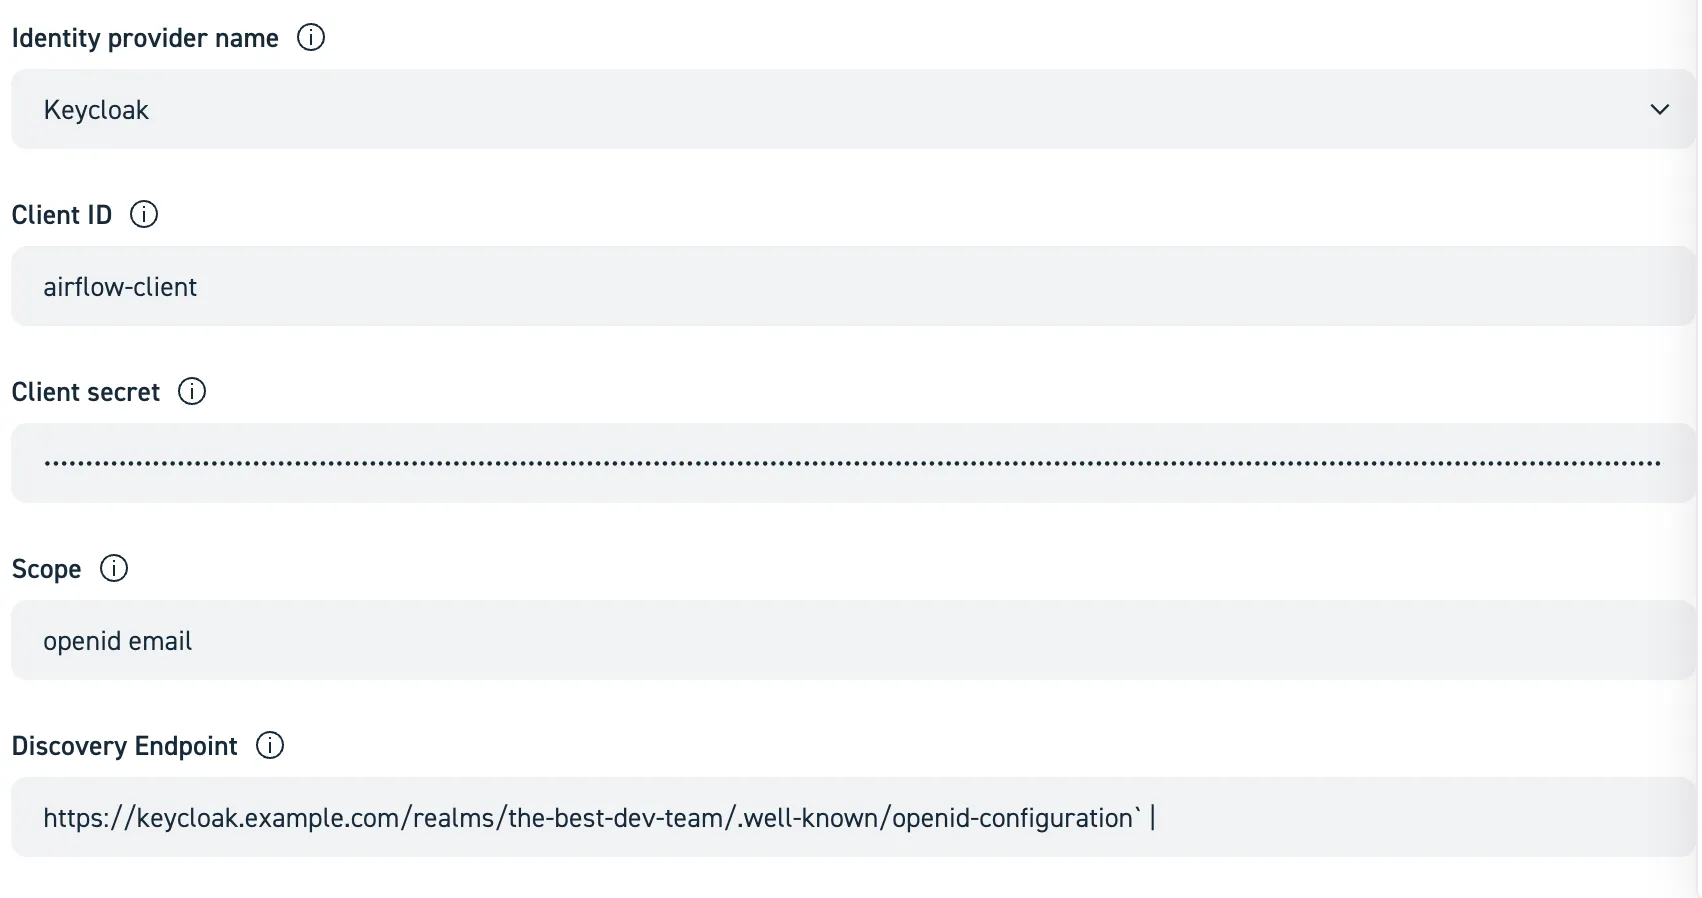
In diesem Tutorial zeigen wir eine Implementierung mit Keycloak. Nutzen Sie unsere Anleitung Erstellen und Verwalten von Instanzen, um weitere Informationen zur Konfiguration Ihres IdP zu erhalten.
Nehmen wir an, dass Sie die folgenden Zugangsdaten von Ihrem Keycloak-Administrator erhalten haben:
| clientId | clientSecret | scope | discoveryEndpoint |
|---|---|---|---|
airflow-client | YDaXT@s&%7UikF7@q_NLFBVdfUHjX^ | openid email | https://keycloak.example.com/realms/the-best-dev-team/.well-known/openid-configuration |
Geben Sie diese in die entsprechenden Felder ein:
Wie oben erwähnt, werden Airflow-DAGs als Python-Code geschrieben. Der Code muss in einem Git-Repository gespeichert werden und STACKIT Workflows benötigt Lesezugriff auf das Repository. Beim Start des Servers klont er das Repository und synchronisiert Änderungen anschließend regelmäßig in Workflows. Sie müssen Folgendes angeben:
- DAG-Repository-URL (z. B.
https://github.com/acme/myrepo.git) - Branch-Name (z. B. „main“)
- Benutzernamen + Passwort oder PAT (Personal Access Token)
- Monitoring Um Einblicke in den Ressourcenverbrauch, die Laufzeit usw. Ihrer DAGs zu erhalten, können Sie den Export von Metriken an eine bereits vorhandene STACKIT Observability-Instanz aktivieren. Hinweis: Eine Observability-Instanz mit dem Plan „Observability-Monitoring-Basic-EU01“ oder höher wird empfohlen. Wenn Sie nicht planen, sie auch für die Log-Aggregation zu verwenden, nutzen Sie die Variante „Monitoring-only“.
Ihren ersten Python-Task ausführen
Abschnitt betitelt „Ihren ersten Python-Task ausführen“Diese Anleitung führt Sie durch den gesamten Prozess der Erstellung eines einfachen Workflows, dessen Hinzufügen zu Ihrem Git-Repository und die Anzeige der Ausführung in STACKIT Workflows.
-
Schreiben Sie Ihren ersten DAG
Ein DAG (Directed Acyclic Graph, siehe auch Apache Airflow 2.10 Dokumentation) ist eine Python-Datei, die die Tasks Ihres Workflows und deren Abhängigkeiten definiert.
Erstellen Sie auf Ihrem lokalen Rechner eine neue Datei mit dem Namen
hello_world_dag.pyund fügen Sie den folgenden Code ein. Dieser einfache DAG hat zwei Tasks: einen, der „Hello“ zurückgibt, und einen anderen, der die Ausgabe des ersten Tasks ausgibt und „World“ sowie eine weitere Nachricht hinzufügt.from __future__ import annotationsimport pendulumfrom airflow.decorators import dag, task# 1. Der @dag-Decorator definiert den DAG@dag(dag_id="hello_world_taskflow",start_date=pendulum.datetime(2025, 1, 1, tz="Europe/Berlin"),schedule=None,catchup=False,tags=["example", "taskflow"],)def hello_world_dag():# 2. Der @task-Decorator macht aus einer Funktion einen Task@taskdef say_hello():print("Hello from a TaskFlow task!")return "Hello World"@taskdef say_world(message: str):print(f"The first task says: {message}")print("Workflows make orchestration easy!")# 3. Abhängigkeiten werden aus den Funktionsaufrufen abgeleitetmessage_from_hello = say_hello()say_world(message_from_hello)# Diese Zeile wird benötigt, um den DAG für Airflow sichtbar zu machenhello_world_dag() -
Fügen Sie die DAG-Datei zu einem dags-Ordner hinzu
Erstellen Sie im Root-Verzeichnis des Git-Repositorys, das Sie im Portal-basierten Setup als DAGs Repository eingegeben haben, einen Ordner mit dem Namen
dags. Workflows scannt diesen Ordner automatisch nach neuen Workflow-Dateien.Es ist nicht zwingend erforderlich, den Ordner
dagszu nennen, aber es gilt als Best Practice, siehe auch DAGs Repository im Abschnitt Konzepte.Legen Sie Ihre Datei
hello_world_dag.pyin diesendags-Ordner. Ihre Repository-Struktur sollte wie folgt aussehen:your-dags-repo/└── dags/└── hello_world_dag.py -
Commit und Push Ihrer Änderungen
Speichern Sie Ihre Änderungen in Ihrem Git-Repository mit den folgenden Befehlen in Ihrem Terminal:
Terminal-Fenster # Die neue DAG-Datei hinzufügen, damit sie von Git verfolgt wirdgit add dags/hello_world_dag.py# Speichern der Änderungen mit einer beschreibenden Nachrichtgit commit -m "Add my first hello world DAG"# Änderungen in Ihr Remote-Repository pushengit push -
Ihren DAG in der Airflow-UI anzeigen
Da Ihr Repository mit dem Workflows-Service verbunden ist, synchronisiert das System Ihre Änderungen automatisch. Nach höchstens einer Minute erscheint Ihr neuer DAG in der Airflow-UI.
Navigieren Sie zur Airflow-UI für Ihre Workflows-Instanz.
Suchen Sie hello_world_dag in der Liste der DAGs (Sie können auch nach dem Tag
exampleodertaskflowfiltern, da wir den DAG so getaggt haben).Wichtig: Standardmäßig sind neue DAGs pausiert. Klicken Sie auf den Schalter links, um ihn zu aktivieren.
-
Ihren DAG auslösen und überwachen
Um Ihren Workflow sofort auszuführen, klicken Sie auf die Schaltfläche „Play“ (▶️) auf der rechten Seite.
Klicken Sie auf den DAG-Namen (hello_world_dag), um zur Grid View zu gelangen. Sie sehen den DAG Run erscheinen. Klicken Sie auf
Graph, um den Ausführungsgraphen des DAG zu sehen. Die Quadrate werden grün, sobald jeder Task erfolgreich abgeschlossen wurde.Sie können auf jedes grüne Quadrat und dann auf den Tab „Logs“ klicken, um die Ausgabe Ihrer Tasks zu sehen, wie z. B. „Hello from your first Airflow task!“.
Herzlichen Glückwunsch! Sie haben erfolgreich Ihren ersten Workflow erstellt und ausgeführt.
Ihren ersten Spark-Task ausführen
Abschnitt betitelt „Ihren ersten Spark-Task ausführen“In diesem Abschnitt zeigen wir Ihnen, wie Sie Spark-Tasks auf einem bestehenden Spark-Cluster innerhalb von STACKIT Workflows ausführen können. Der nächste Abschnitt zeigt eine komfortablere Version mit dem Spark-Operator von STACKIT, die kein bestehendes Spark-Cluster erfordert.
Ihr erster Spark-DAG: Eine Schritt-für-Schritt-Anleitung Diese Anleitung zeigt Ihnen, wie Sie ein einfaches PySpark-Skript als Workflow mit Airflow übermitteln. Wir erstellen ein Spark-Skript, definieren einen Airflow-DAG, um es auszuführen, und überwachen den Job in der Airflow-UI. Siehe auch Apache Spark Operators.
Voraussetzungen:
Eine konfigurierte Spark-Umgebung, an die Ihr Workflows-Service Jobs übermitteln kann. Die Umgebung muss in
Airflow als Spark-Verbindung mit dem Namen spark_default konfiguriert sein.
-
Schreiben Sie Ihr PySpark-Skript
Erstellen Sie zunächst ein einfaches Spark-Skript. Dieses Beispielskript erstellt einen kleinen DataFrame, zeigt dessen Inhalt an und endet.
Erstellen Sie eine neue Datei mit dem Namen
hello_spark.pyauf Ihrem lokalen Rechner und fügen Sie den folgenden Code ein:hello_spark.py from pyspark.sql import SparkSessionif __name__ == "__main__":# 1. Erstellen einer SparkSessionspark = SparkSession.builder.appName("HelloWorldSpark").getOrCreate()print("SparkSession created successfully!")# 2. Erstellen eines Beispiel-DataFramesdata = [("Alice", 1), ("Bob", 2)]columns = ["name", "id"]df = spark.createDataFrame(data, columns)# 3. Inhalt des DataFrames anzeigenprint("Sample DataFrame:")df.show()# 4. Stoppen der SparkSessionspark.stop()print("Spark job finished successfully!") -
Schreiben Sie den Airflow-DAG, um das Skript zu übermitteln
Erstellen Sie als Nächstes den Airflow-DAG, der dieses Skript an Ihr Spark-Cluster übermittelt. Dieser DAG verwendet den SparkSubmitOperator.
Erstellen Sie eine neue Datei mit dem Namen
spark_submit_dag.pyund fügen Sie den folgenden Code ein:spark_submit_dag.py from __future__ import annotationsimport pendulumfrom airflow.decorators import dagfrom airflow.providers.apache.spark.operators.spark_submit import SparkSubmitOperator@dag(dag_id="spark_submit_hello_world_taskflow",start_date=pendulum.datetime(2025, 1, 1, tz="Europe/Berlin"),schedule=None,catchup=False,tags=["example", "spark", "taskflow"],)def spark_submit_dag():"""Dieser DAG übermittelt ein einfaches Spark-Skript unter Verwendung der TaskFlow-API."""submit_spark_job = SparkSubmitOperator(task_id="submit_hello_spark_job",application="/dags/tasks/hello_spark.py",conn_id="spark_default",verbose=True,)# 3. Rufen Sie die Funktion am Ende der Datei auf, um das DAG-Objekt zu erstellen.spark_submit_dag() -
Strukturieren und pushen Sie Ihren Code Erstellen Sie einen scripts-Ordner für Ihre PySpark-Datei und einen dags-Ordner für Ihre DAG-Datei. So bleibt Ihr Projekt organisiert.
Ihre Repository-Struktur sollte wie folgt aussehen:
your-dags-repo/├── dags/│ └── spark_submit_dag.py└── dags/tasks/└── hello_spark.pyCommitten und pushen Sie nun diese neuen Dateien in Ihr Git-Repository.
-
Auslösen und Überwachen in Airflow
Wie zuvor suchen Sie, nachdem Ihr Git-Repository mit dem Workflows-Service synchronisiert wurde, den DAG spark_submit_hello_world in der Airflow-UI.
- Aktivieren Sie den DAG mit dem Schalter auf der linken Seite.
- Lösen Sie den DAG aus, indem Sie auf die Schaltfläche „Play“ (▶️) klicken.
- Klicken Sie auf den DAG-Run, um den Fortschritt zu überwachen. Wenn der Task grün wird, klicken Sie darauf und sehen Sie sich die Logs an. Sie sehen die Ausgabe des spark-submit-Befehls und die Print-Statements aus Ihrem Skript, einschließlich der DataFrame-Tabelle.
Verwendung des STACKIT Spark-Operators
Abschnitt betitelt „Verwendung des STACKIT Spark-Operators“Bei Verwendung des STACKIT Spark-Operators ist kein vorbestehendes Spark-Cluster erforderlich. Stattdessen können Sie die benötigten Spark-Ressourcen über Decorator-Parameter definieren, und die Spark-Umgebung wird dann on-the-fly in einem Kubernetes-Cluster erstellt.
-
Schreiben Sie Ihren DAG
Erstellen Sie auf Ihrem lokalen Rechner eine neue Datei mit dem Namen
stackit_spark.pyund fügen Sie den unten stehenden Code ein. Der Code enthält verschiedene Beispiele für die Verwendung des Spark-Operators von STACKIT. Bitte lesen Sie den Code und insbesondere die Kommentare sorgfältig durch.import pendulumfrom airflow.decorators import dag, taskfrom stackit_airflow.airflow_plugin.decorators import stackitfrom stackit_airflow.airflow_plugin.operators import StackITSparkOperator# Es ist gute Praxis, aber nicht erforderlich, das zu verwendende Image anzugeben.default_kwargs = {"image": "schwarzit-xx-sit-dp-customer-artifactory-docker-local.jfrog.io/stackit-spark:spark3.5.3-0.1.2"}@dag(schedule=None,start_date=pendulum.datetime(2021, 1, 1, tz="UTC"),catchup=False,tags=["demo"],dag_id="04_simple_spark",)def simple_spark():# Dies ist ein regulärer Task, der die Airflow TaskFlow-API verwendet@task()def generate_number():import randomreturn random.randint(1, 100)# Dies ist der STACKIT Workflows Spark Kubernetes Provider, der es einfach macht, Spark-Jobs aus Workflows auszuführen.# Standardmäßig wird hier ein Single-Node-Spark mit 1 CPU und 6 GB RAM gestartet.@stackit.spark_kubernetes(**default_kwargs)def spark_single_node(random_number: int):import stackit_sparkimport pandas as pdspark = stackit_spark.get_spark()df = spark.createDataFrame(pd.DataFrame({"random_number": [random_number]}))df.show()# Wenn wir mehr Ressourcen benötigen, können wir diese mit den Parametern `cpu` und `memory_gb` angeben.# Standardmäßig wird der Speicher wie folgt berechnet: Speicher in GB = 6 * CPU.# Der Speicher kann auch explizit angegeben werden.@stackit.spark_kubernetes(cpu=8, memory_gb=50)def spark_single_node_large(random_number: int):import stackit_sparkimport pandas as pdimport timespark = stackit_spark.get_spark()data = pd.DataFrame({"random_number": [random_number]})df = spark.createDataFrame(data)df.show()time.sleep(60)# Optional können Sie die Ressourcen und auch die Anzahl der Executors angeben.# `cpu` und `memory_gb` legen die Ressourcen für den Driver fest, `executor_cpu` und `executor_memory_gb`# legen die Ressourcen für die Executors fest.# Wenn der Speicher nicht angegeben ist, wird er basierend auf den angegebenen CPUs berechnet. (1 CPU = 6 GB RAM)# `executors` legt die Anzahl der Executors fest.# Hierfür wird standardmäßig ein von STACKIT bereitgestelltes Spark-Image verwendet. Es kann überschrieben werden.# Für viele Tasks ist ein Spark-Knoten ausreichend.# Bei sehr großen Transformationen müssen wir jedoch möglicherweise ein Cluster hochfahren.## Gehen Sie diesen Schritt nur, wenn Sie mehr als ca. 16 CPUs und 128 GB RAM benötigen.# Das Ausführen von Spark im Cluster-Modus kann manchmal sogar die Performance beeinträchtigen, da# Daten zwischen den Knoten verschoben werden müssen – und der Netzwerk-I/O oft der Flaschenhals ist.## `cpu` und `memory_gb` können weiterhin zur Konfiguration des Drivers verwendet werden.# Executors werden mit `executor_cpu` und `executor_memory_gb` konfiguriert.# Die Anzahl der Executors kann mit `executors` eingestellt werden. Jeder Executor# erhält die in `executor_cpu` und `executor_memory_gb` angegebenen Ressourcen.@stackit.spark_kubernetes(cpu=2, executors=3, executor_cpu=2, **default_kwargs)def spark_cluster(random_number: int):import stackit_sparkimport pandas as pdimport time# Hier können Sie Spark anpassen:spark = stackit_spark.get_spark(additional_config={"spark.sql.shuffle.partitions": 200,"spark.executor.memoryOverhead": "1g",# Wir fügen zusätzliche Jars von Maven hinzu"spark.jars.packages": "org.apache.hadoop:hadoop-azure-datalake:3.3.4,org.apache.hadoop:hadoop-azure:3.3.4,",})data = pd.DataFrame({"random_number": [random_number]})df = spark.createDataFrame(data)df.show()sc = spark._jsc.sc()executors = [executor.host() for executor in sc.statusTracker().getExecutorInfos()]print(f"Executors: {executors}")time.sleep(60)# Anstatt die TaskFlow-API zu nutzen, können Sie auch einen Operator verwenden und ein Skript zur# Ausführung angeben.t1 = StackITSparkOperator(task_id="spark_operator",# Sie können hier alle Parameter verwenden, die Sie oben bereits kennengelernt haben.cpu=2,# Geben Sie hier einen relativen Pfad vom Root des DAGs-Repositorys anscript="/dags/tasks/hello_spark.py", # Aus dem vorherigen Beispiel**default_kwargs,)# Bei Verwendung des StackITSparkOperator wird das Skript im Kontext des# Git-Repositorys ausgeführt, in dem es enthalten ist. Das bedeutet, dass Sie Importe innerhalb# von Skripten verwenden können!# Standardmäßig wird erwartet, dass sich das Skript im selben Repository wie dieser DAG befindet.# Wenn es sich in einem anderen Repository befindet, können Sie die git_*-Argumente des# Operators angeben. Prüfen Sie das Beispiel `spark-full-configuration.py` unten.t1 = StackITSparkOperator(task_id="spark_operator_with_imports",# Sie können hier alle Parameter verwenden, die Sie oben bereits kennengelernt haben.cpu=2,# Geben Sie hier einen relativen Pfad vom Root des DAGs-Repositorys anscript="/dags/tasks/my_spark_job_with_imports.py",**default_kwargs,)# Selbst wenn Sie Ihr eigenes Image verwenden, können Sie diesen Operator nutzen, um# ein Python-Skript in einem beliebigen Git-Repository im Kontext Ihres Images auszuführen. Sie# können in diesem Fall das Modul `stackit_spark` nicht verwenden.# `python` muss im Image installiert sein.t1 = StackITSparkOperator(task_id="run_script_in_custom_image",# Sie können hier alle Parameter verwenden, die Sie oben bereits kennengelernt haben.# Dies legt weiterhin die Ressourcenanforderungen Ihres Pods fest!cpu=2,# Geben Sie hier einen relativen Pfad vom Root des DAGs-Repositorys anscript="/dags/tasks/basic_python_script.py",image="python:3.12-slim-bullseye",# Alle Pods müssen als Nicht-Root-Benutzer ausgeführt werden. Wir empfehlen die Verwendung von Images,# die bereits als Nicht-Root-Benutzer ausgeführt werden.security_context={"runAsUser": 1000},)random_number = generate_number()spark_single_node(random_number)spark_single_node_large(random_number)spark_cluster(random_number)random_number >> t1simple_spark()Kopieren Sie die folgenden Snippets in Ihren Ordner
dags/tasks/. Der Dateiname ist immer in der ersten Zeile als Kommentar angegeben.dags/tasks/my_spark_job.py import stackit_sparkimport timeimport pandas as pdspark = stackit_spark.get_spark()data = pd.DataFrame({"number": [10]})df = spark.createDataFrame(data)time.sleep(30)df.show()dags/tasks/my_tools/say_hello.py def say_hello():print("Hello from say_hello()")dags/tasks/my_spark_job_with_imports.py import stackit_sparkimport pandas as pdfrom my_tools.say_hello import say_hellosay_hello()spark = stackit_spark.get_spark()data = pd.DataFrame({"number": [10]})df = spark.createDataFrame(data)df.show()dags/tasks/basic_python_script.py # Print current dateimport datetime# Sie können Bibliotheken verwenden, die in Ihrem eigenen Container-Image enthalten sind# import awesome_libprint("Hello from basic_python_script.py")print(f"The current date is {datetime.datetime.now()}") -
Strukturieren und pushen Sie Ihren Code
Erstellen Sie wie zuvor einen scripts-Ordner für Ihre PySpark- und einfachen Python-Dateien und einen dags-Ordner für Ihre DAG-Datei.
Ihre Repository-Struktur sollte wie folgt aussehen:
your-dags-repo/└─ dags/├── stackit_spark.py└── tasks/├── my_spark_job.py├── my_spark_job_with_imports.py├── basic_python_script.py└── say_hello.pyCommitten und pushen Sie nun diese neuen Dateien in Ihr Git-Repository.
-
Auslösen und Überwachen in Airflow
Wie zuvor suchen Sie, nachdem Ihr Git-Repository mit dem Workflows-Service synchronisiert wurde, den DAG spark_submit_hello_world in der Airflow-UI.
- Aktivieren Sie den DAG mit dem Schalter auf der linken Seite.
- Lösen Sie den DAG aus, indem Sie auf die Schaltfläche „Play“ (▶️) klicken.
- Klicken Sie auf den DAG-Run, um den Fortschritt zu überwachen. Wenn der Task grün wird, klicken Sie darauf und sehen Sie sich die Logs an. Sie sehen die Ausgabe des spark-submit-Befehls und die Print-Statements aus Ihrem Skript, einschließlich der DataFrame-Tabelle.
Zusätzliche Einblicke mit STACKIT Observability
Abschnitt betitelt „Zusätzliche Einblicke mit STACKIT Observability“Wenn Sie bei der Einrichtung von STACKIT Workflows das Monitoring aktiviert haben, werden detaillierte Metriken über den Zustand und die Auslastung
Ihrer Workflows-Instanz an Ihre STACKIT Observability-Instanz übertragen.
Die Instanz enthält ein Dashboard namens STACKIT Workflows, das Diagramme zum Status des Clusters selbst
und detaillierte Metriken zur Workflow-Ausführung, z. B. CPU- und Speicherverbrauch, enthält.