Git-Repository einrichten
Zuletzt aktualisiert am
Fast alles bei STACKIT Git findet in einem Repository statt. Stellen Sie sich ein Repository als Zuhause für Ihr Projekt vor, in dem der gesamte Quellcode mithilfe von Git organisiert werden kann und in dem Sie Probleme nachverfolgen sowie im Wiki lesen und schreiben können. Dieser Artikel führt Sie durch den Prozess der Einrichtung eines Repositorys in STACKIT Git, der Verbindung Ihrer lokalen Entwicklungsumgebung und Ihres ersten Commit.
Repository erstellen
Abschnitt betitelt „Repository erstellen“-
Melden Sie sich beim STACKIT Portal an.
-
Klicken Sie oben rechts auf der Seite auf das +-Zeichen und wählen Sie im Menü New repository (Neues Repository) aus. Dadurch gelangen Sie zu dem unten stehenden Formular.
-
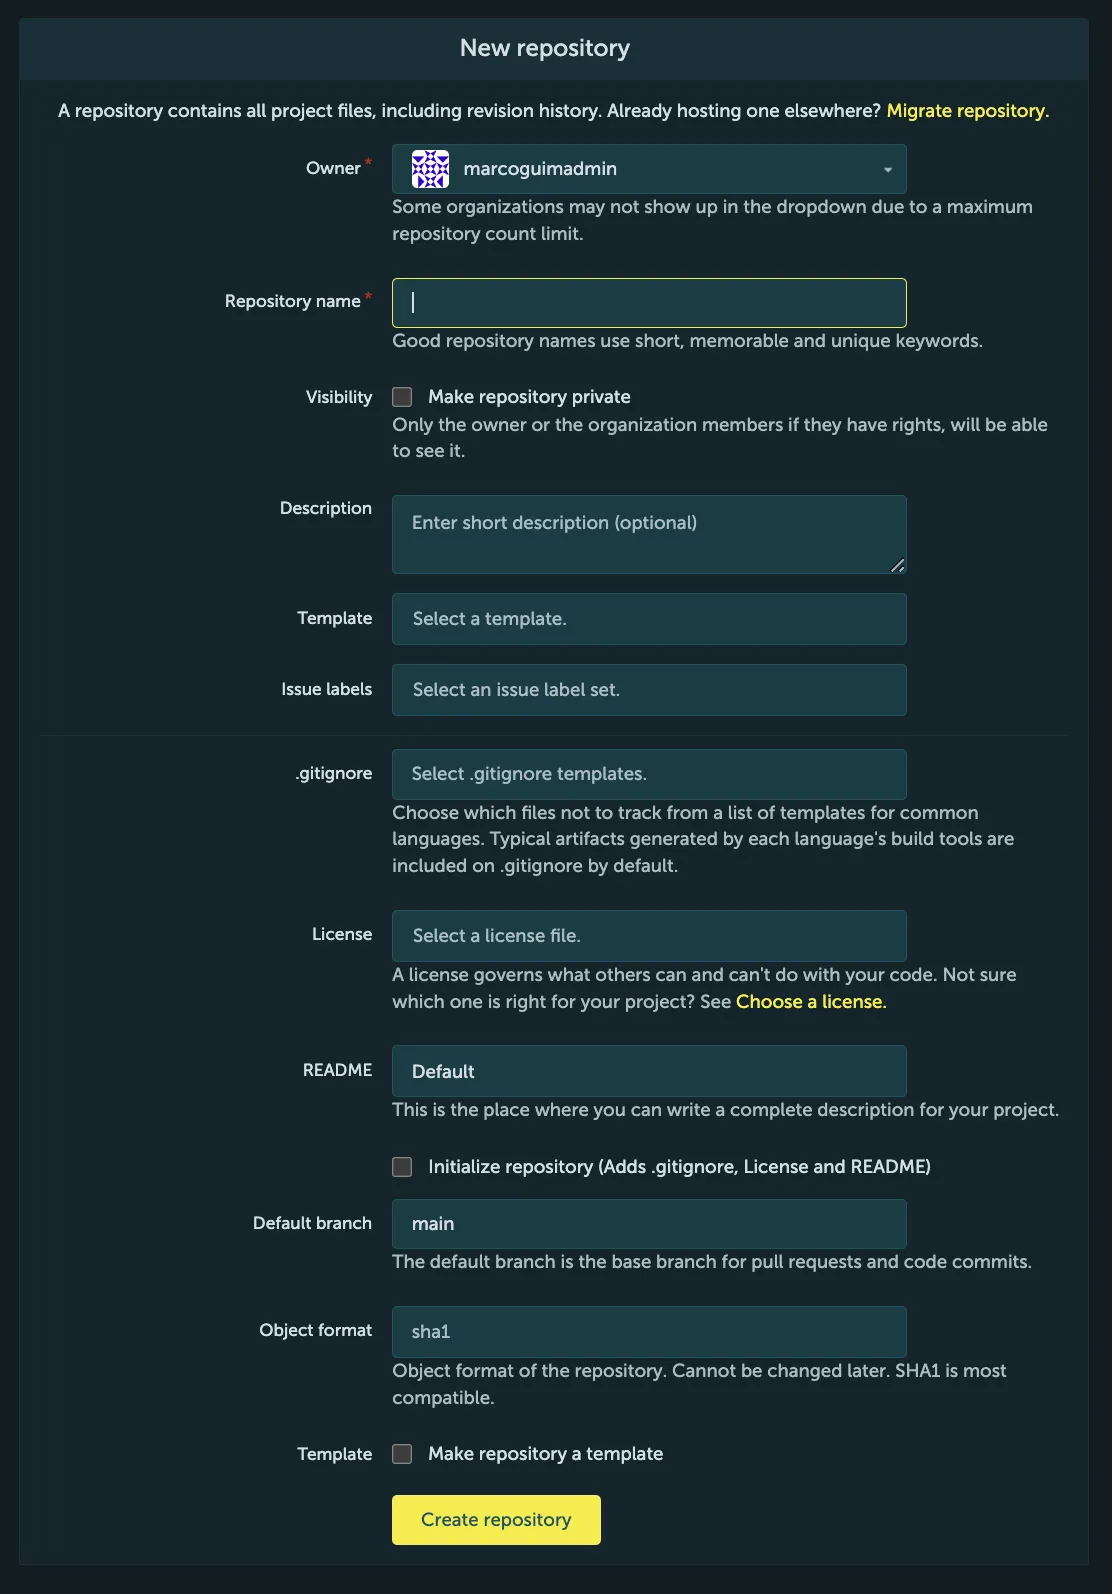
Geben Sie die Details Ihres neuen Repositorys ein.
Formularfeld Owner (Eigentümer) Hier können Sie festlegen, ob es sich um Ihr eigenes persönliches Projekt oder um ein Projekt handeln soll, das Teil einer Organisation ist, der Sie angehören. Repository name (Repository-Name) Ein Name für Ihr Repository (der auch Teil seines Pfades sein wird). Visibility (Sichtbarkeit) Repositorys sind entweder public (öffentlich) oder private (privat), wobei öffentlich bedeutet, dass jeder auf Ihr Repository zugreifen kann, während auf Ihre privaten Repositorys nur Sie und Ihre Collaborators zugreifen können. Description (Beschreibung) Eine kurze Beschreibung, die bei Bedarf neben dem Namen Ihres Repositorys angezeigt wird. Template (Vorlage) Gelegentlich möchten Sie Ihr Repository möglicherweise aus einer bestehenden Vorlage generieren. In diesem Fall können Sie diese Vorlage hier angeben. Andernfalls lassen Sie dieses Feld einfach leer. Issue Labels (Problem-Labels) Wenn Sie den Issue Tracker (Problemverfolgung) Ihres Projekts mit einer Reihe von Labels initialisieren möchten, mit denen Sie Probleme kategorisieren können, können Sie hier eines auswählen. Sie müssen dies jedoch nicht sofort auswählen, da Sie Labels für Probleme auch später auswählen und ändern können. Siehe auch: Using Labels (Labels verwenden). .gitignore Eine .gitignore-Datei definiert, welche Dateien Git nicht nachverfolgen soll. Dies ist beispielsweise nützlich, um zu verhindern, dass Konfigurationsdateien oder Binärdateien in der Versionskontrolle nachverfolgt werden. Sie können wählen, ob Sie jetzt eine vordefinierte Datei hinzufügen möchten, die der von Ihnen verwendeten Programmiersprache entspricht, oder später manuell eine hinzufügen möchten. License (Lizenz) Hier können Sie aus einer Liste von FSF/OSI-genehmigten Lizenzen auswählen. Anschließend wird dem Repository eine LICENSE-Datei hinzugefügt. README Ist die erste Datei, die beim Zugriff auf ein Repository gelesen werden sollte. Es ist auch die erste Datei, die beim Zugriff auf ein Repository angezeigt wird. Sie können es als die „Homepage“ Ihres Repositorys betrachten. Initialize repository (Repository initialisieren) Um die oben genannten LICENSE-, README- und .gitignore-Dateien zu Ihrem neuen Repository hinzuzufügen, stellen Sie sicher, dass Sie dieses Kästchen ankreuzen. Default branch (Standard-Branch) Mithilfe dieses Feldes können Sie auswählen, wie der default branch (Standard-Branch) Ihres Git-Repositorys benannt werden soll. Wir empfehlen Ihnen, den vordefinierten Standardwert zu verwenden. Object format (Objektformat) Ist das Objektformat des Repositorys. Wir empfehlen SHA1, da es am kompatibelsten ist. Es kann später nach dem Erstellen des Repositorys nicht mehr geändert werden. Geben Sie für einen schnellen Start nur Owner (Eigentümer) und Repository name (Repository-Name) an und verwenden Sie für alle anderen Einträge die Standardwerte oder füllen Sie die Felder später aus.
-
Klicken Sie auf Create Repository (Repository erstellen).
Sie sollten nun einen ähnlichen Bildschirm wie den folgenden sehen. Wenn Sie sich gegen das Generieren der DateienLICENSE,READMEund.gitignoreentschieden haben, zeigt der Bildschirm möglicherweise stattdessen Anweisungen an, die nach Ihrem ersten Commit verschwinden.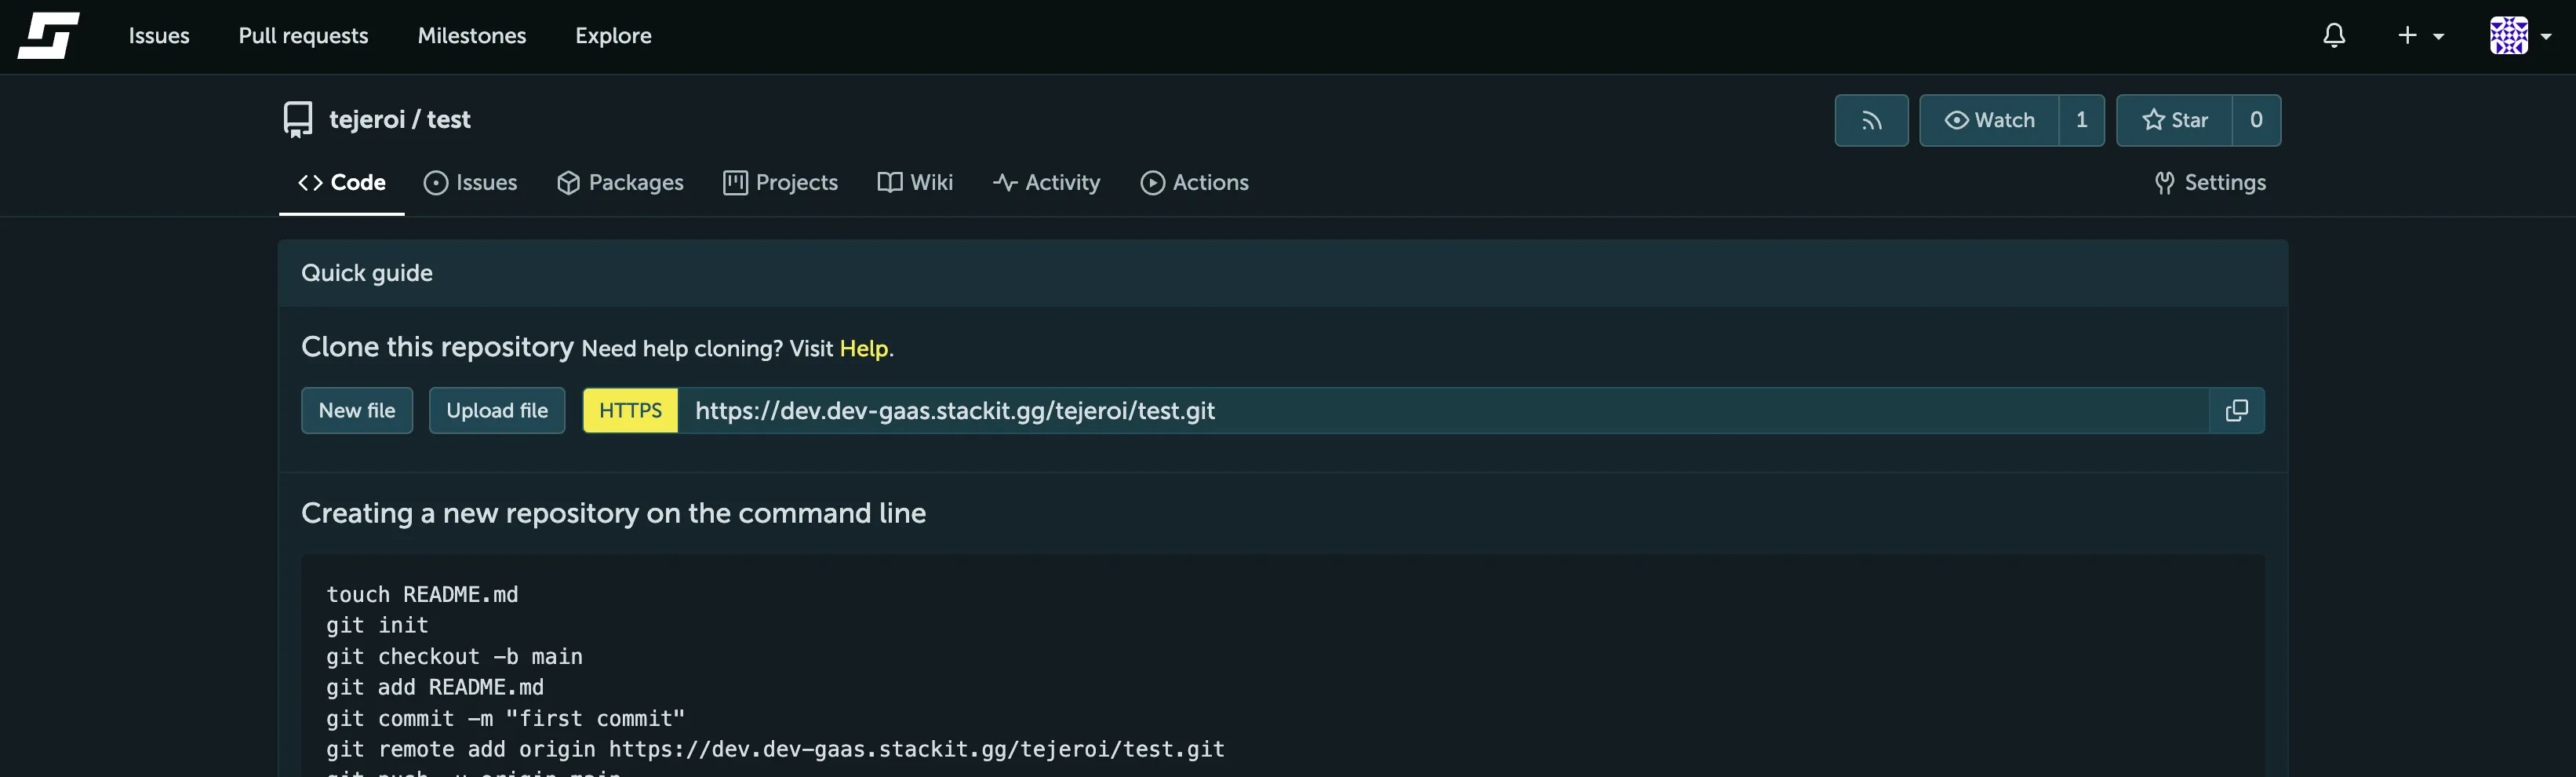
In den Tabs können Sie die Features (Funktionen) des Repositorys steuern (einige sind möglicherweise standardmäßig nicht sichtbar):- Code ermöglicht Ihnen, alle Versionen des Codes dieses Repositorys zu durchsuchen.
- Repository’s Git URLs (Git-URLs des Repositorys) – verwenden Sie diese, um Git mitzuteilen, wo dieses Repository zu finden ist.
- Issues (Probleme) ist ein sehr wichtiges Kommunikations-Tool zwischen dem Autor, seinen Benutzern und seinen Contributors. Stellen Sie es sich als teils Bug-Tracker, teils Forum vor.
- Pull Requests (Pull-Anfragen) ist der Bereich, in dem andere Benutzer den Autor bitten können, Code von einem Fork in das Programm des Autors „herunterzuziehen“.
- Wiki ist ein grundlegendes Wiki-Feature, das in STACKIT Git integriert ist.
-
Klicken Sie auf Settings (Einstellungen) und passen Sie die Repository-Einstellungen nach Bedarf an. Sie können eine Projekt-Website definieren, die Repository-Beschreibung ändern, das Wiki und den Issue Tracker aktivieren/deaktivieren und das Repository löschen.
Lokales Repository mit STACKIT Git verbinden
Abschnitt betitelt „Lokales Repository mit STACKIT Git verbinden“Nach dem Erstellen eines neuen Repositorys können Sie das Repository mit Ihrer lokalen Entwicklungskopie verbinden. In diesem Guide (Leitfaden) konzentrieren wir uns auf die Verbindung mit STACKIT Git über HTTP mithilfe von Git auf der Kommandozeile , aber beachten Sie, dass es noch viele andere Möglichkeiten gibt, sich mit STACKIT Git zu verbinden.
Option A: Das neu erstellte, leere Repository klonen
Abschnitt betitelt „Option A: Das neu erstellte, leere Repository klonen“Wenn Sie ein neues Projekt starten möchten (d. h. wenn Sie noch keinen Quellcode haben, den Sie auf STACKIT Git hochladen möchten), ist das Klonen Ihres neu erstellten Repositorys der schnellste Weg, um loszulegen:
-
Optional, aber empfohlen: Erstellen Sie ein dediziertes Verzeichnis für Ihr neues Projekt und navigieren Sie auf der Kommandozeile dorthin.
-
Klonen Sie das Repository, indem Sie den Befehl
git clone <url>ausführen. Verwenden Sie die in Ihrem Repository angezeigte URL:
-
Navigieren Sie zu dem geklonten Repository. Das Repository sollte sich nun in einem neuen Verzeichnis mit demselben Namen wie Ihr Repository befinden.
Option B: Bestehenden lokalen Quellbaum verbinden
Abschnitt betitelt „Option B: Bestehenden lokalen Quellbaum verbinden“Wenn Sie bereits Quellcode geschrieben haben, den Sie nun auf STACKIT Git hochladen möchten, führen Sie die folgenden Schritte aus:
- Initialisieren Sie ein Git-Repository: Sofern Sie nicht bereits ein Git-Repository in Ihrem lokalen Quellbaum initialisiert haben, führen Sie
git initin Ihrem Projektverzeichnis aus. - Fügen Sie STACKIT Git als Ursprung des Repositorys hinzu.
Sie müssen Git mitteilen, wohin Ihre Änderungen gepusht werden sollen. Sie tun dies, indem Sie STACKIT Git als Remote festlegen. Wenn Sie ein Repository aus dem Internet klonen, wird die URL, von der Sie Ihre Kopie des Repositorys erhalten haben, automatisch für das origin remote verwendet.
Wenn Ihrer lokalen Kopie des Repositorys Commits fehlen, die im Remote-Repository vorhanden sind, führt das Pushen zu einem Error. Es gibt zwei Möglichkeiten, dies zu beheben:
- Führen Sie
git pullaus, um Ihre lokalen Änderungen mit den im Remote-Repository vorhandenen Änderungen zu kombinieren. Wenn dies nicht funktioniert, befolgen Sie bitte die Anweisungen in Ihrem Terminal. - Wenn Sie wissen, was Sie tun, können Sie das Remote-Repository auch mit
git -f pushüberschreiben. Diese Aktion ändert Ihr Remote-Repository dauerhaft und ist nicht geeignet, wenn Sie mit anderen Personen an einem Projekt arbeiten.
Commit erstellen
Abschnitt betitelt „Commit erstellen“Nachdem Sie Ihr Repository mit Ihrer lokalen Entwicklungskopie verbunden haben, ist es Zeit, Commits vorzunehmen.
- Optional, aber empfohlen: Wenn Sie die Dateien
LICENSEundREADME.mdbeim Erstellen des Repositorys nicht generiert haben, fügen Sie jetzt hinzu. Legen Sie in das Verzeichnis Ihrer lokalen Entwicklungskopie und fügen Sie Ihrem Commit hinzu, wie unten gezeigt. - Erstellen oder bearbeiten Sie eine oder mehrere Dateien.
Wenn dies Ihr erster Commit ist, können SieREADME.mderstellen oder ändern, um zu üben. - Fügen Sie jede geänderte Datei mit
git addzu Ihrem Commit hinzu:Wenn Sie alle geänderten Dateien in Ihrem Quellbaum hinzufügen möchten, können SieTerminal-Fenster git add README.mdgit add .ausführen, aber seien Sie vorsichtig, da dadurch auch unerwünschte Dateien hinzugefügt werden könnten. Sie können den Commit überprüfen, indem Siegit statusvor dem Commit ausführen.
Der Befehlgit addsollte keine Ausgabe liefern. - Committen Sie Ihre Änderungen: Führen Sie
git commitaus.
Sie können auch eine Commit-Nachricht hinzufügen, die Informationen zum Inhalt des Commit enthält:git commit -m My first commit. Durch das Committen Ihrer Änderungen erstellen Sie einen neuen Schritt in der Versionshistorie Ihres Programms. Sie fungieren wie Snapshots des Zustands Ihres Programms zu einem bestimmten Zeitpunkt, und Sie können später zwischen diesen hin und her springen. Es wird empfohlen, Commits klein und fokussiert zu halten, damit sie bei Bedarf ohne zu viele Nebeneffekte rückgängig gemacht oder einfach an einen anderen Kontext angepasst werden können. - Pushen Sie Ihre Änderungen auf STACKIT Git.
Wenn Sie mit den vorgenommenen Änderungen zufrieden sind, besteht der nächste Schritt darin, sie der Welt zu präsentieren, indem Sie auf STACKIT Git pushen:
git pushWenn Sie sich über HTTPS verbinden, fragt Git nach Ihrem Benutzernamen und Passwort, die Sie interaktiv eingeben können.
Nach dem Aktualisieren der Repository-Seite sollten Sie Ihre Änderungen im Repository sehen können.