Managing clusters
Zuletzt aktualisiert am
Introduction
Section titled “Introduction”After you created your first STEC managed edge cluster the next step is to use and manage it. This guide leads you through those steps by example.
Accessing a cluster
Section titled “Accessing a cluster”When a new edge cluster is deployed there will be two API endpoints exposed that you can use to interact with it:
- The Talos Linux gRPC API. You interact with it using a compatible version of talosctl to manage Talos Linux.
- The Kubernetes REST API. You interact with it
using any compatible Kubernetes Client, e.g.
kubectl, to manage Kubernetes.
Getting your kubeconfig
Section titled “Getting your kubeconfig”You authenticate with Kubernetes using a kubeconfig file. Follow the next steps to get the file.
Prerequisites:
- Successfully authenticated in the UI of a STEC instance.
Steps:
-
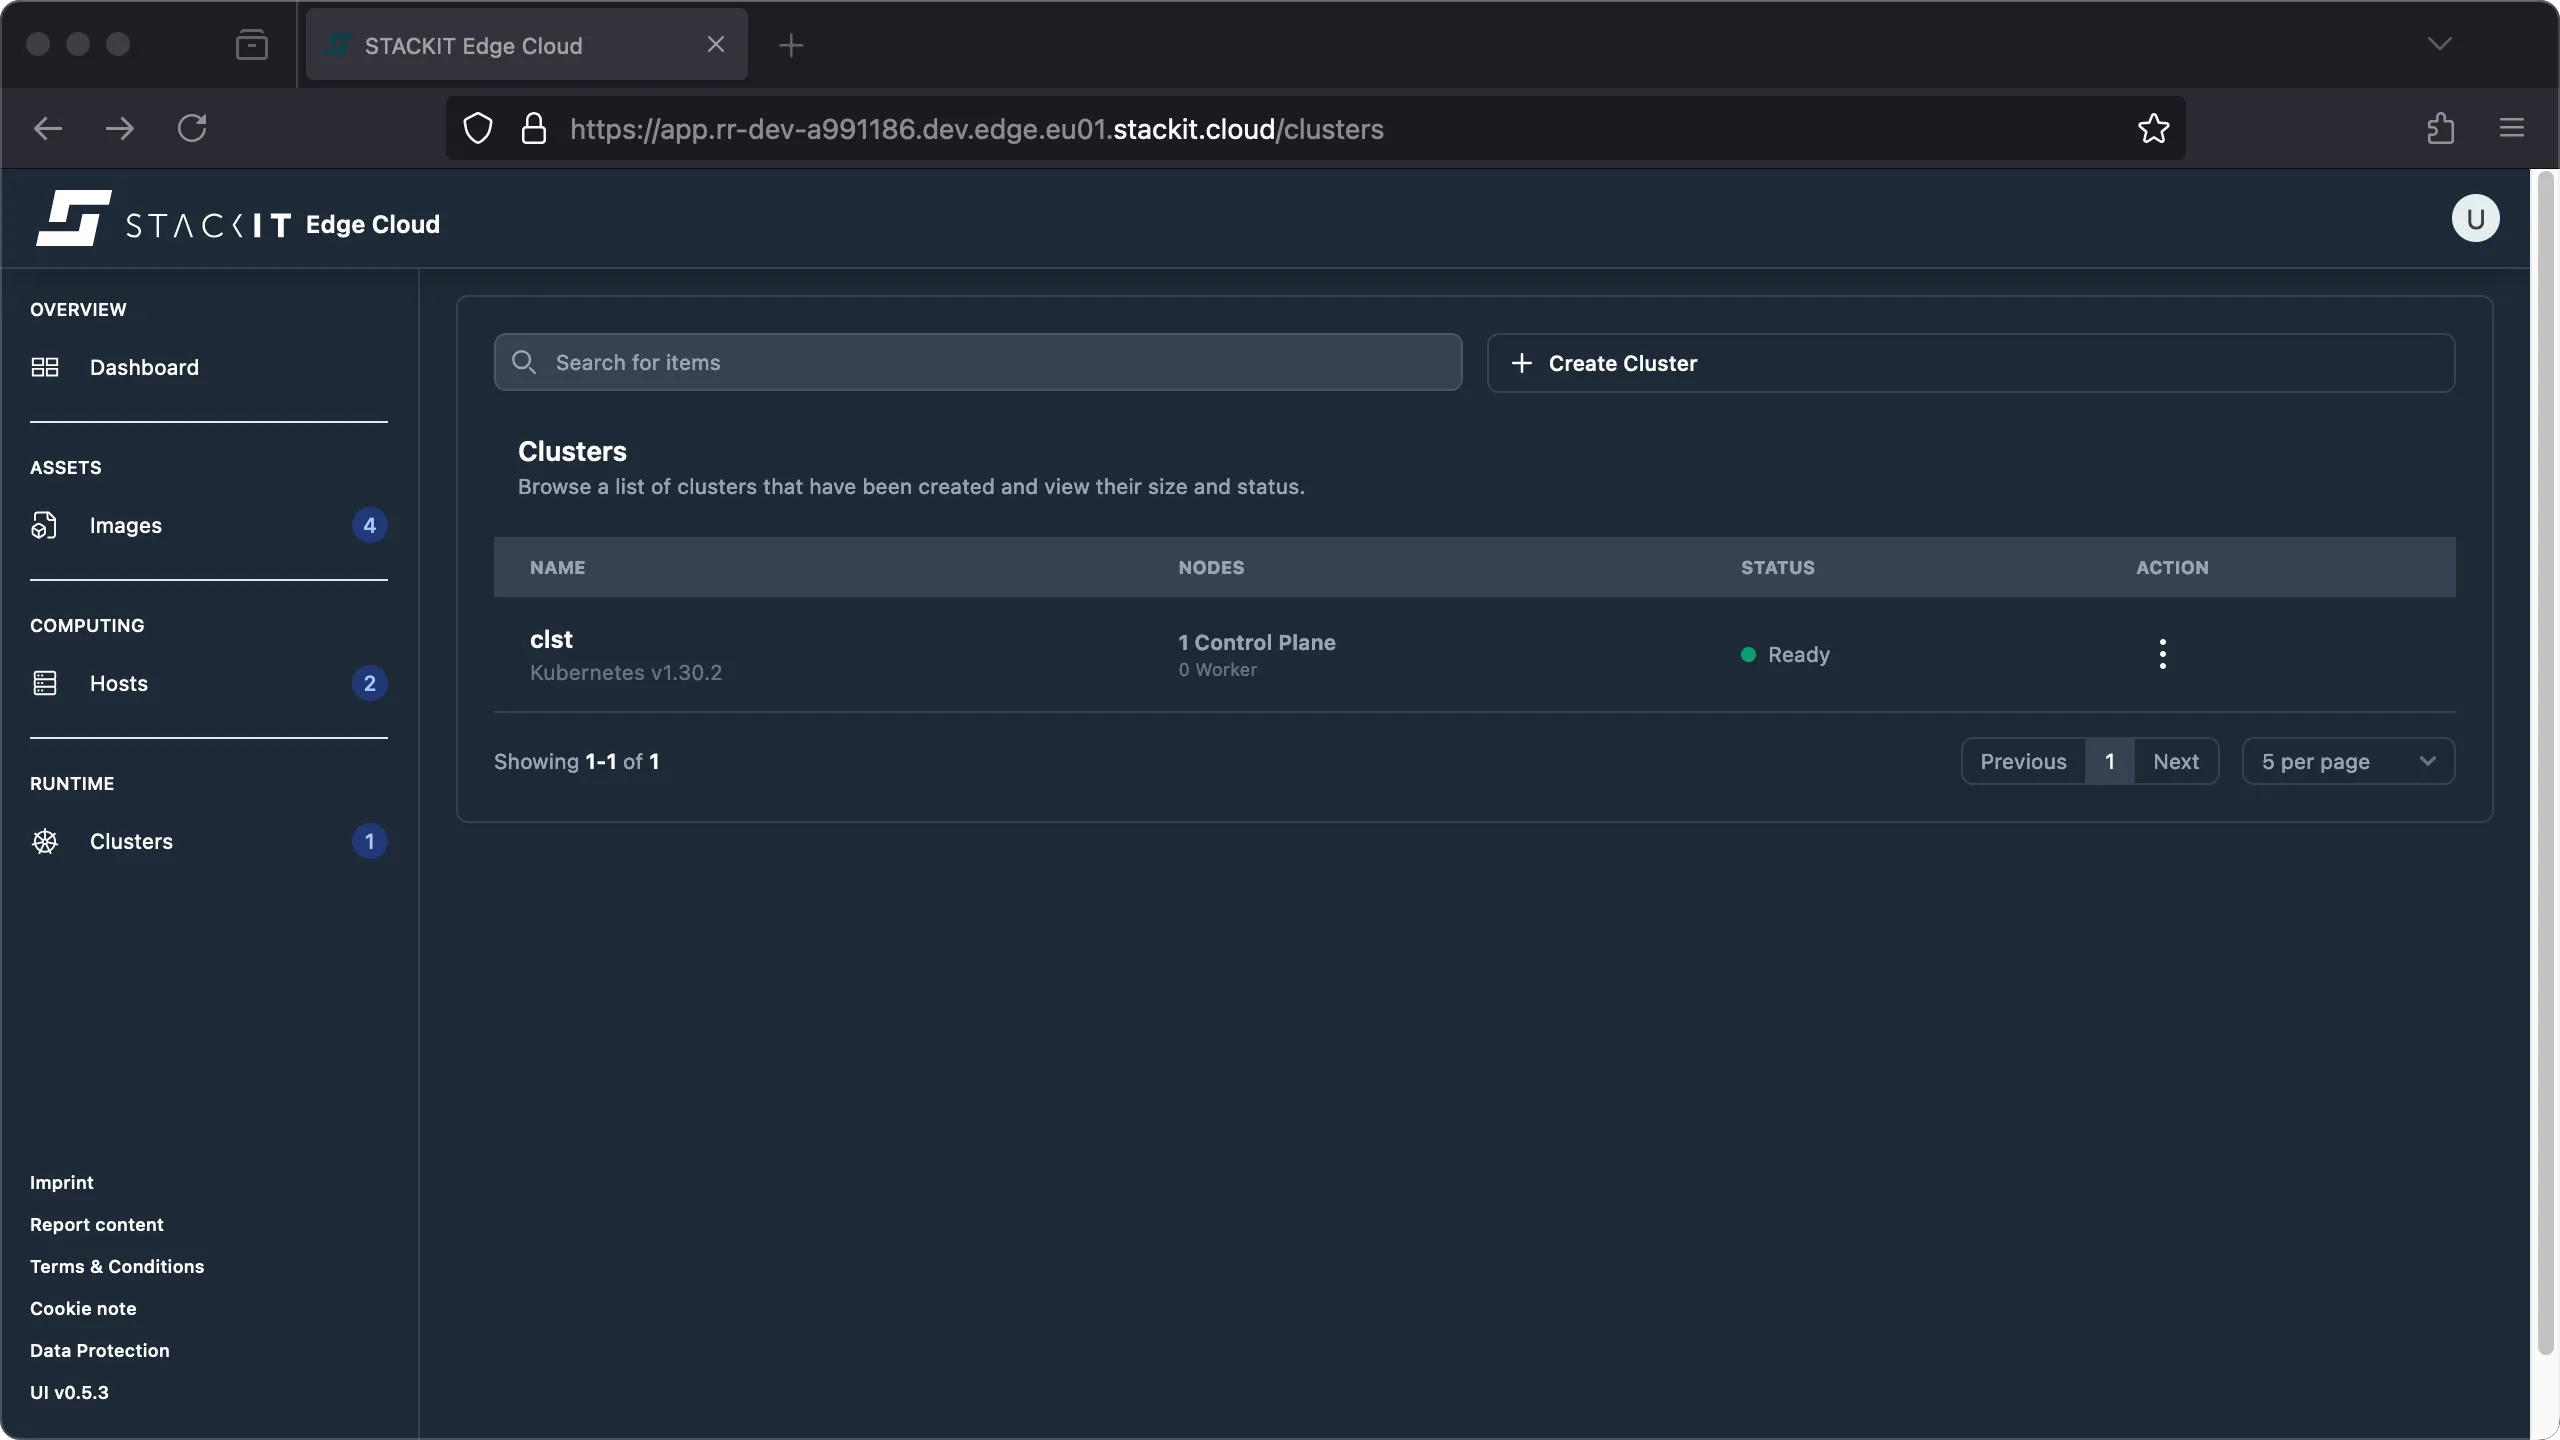
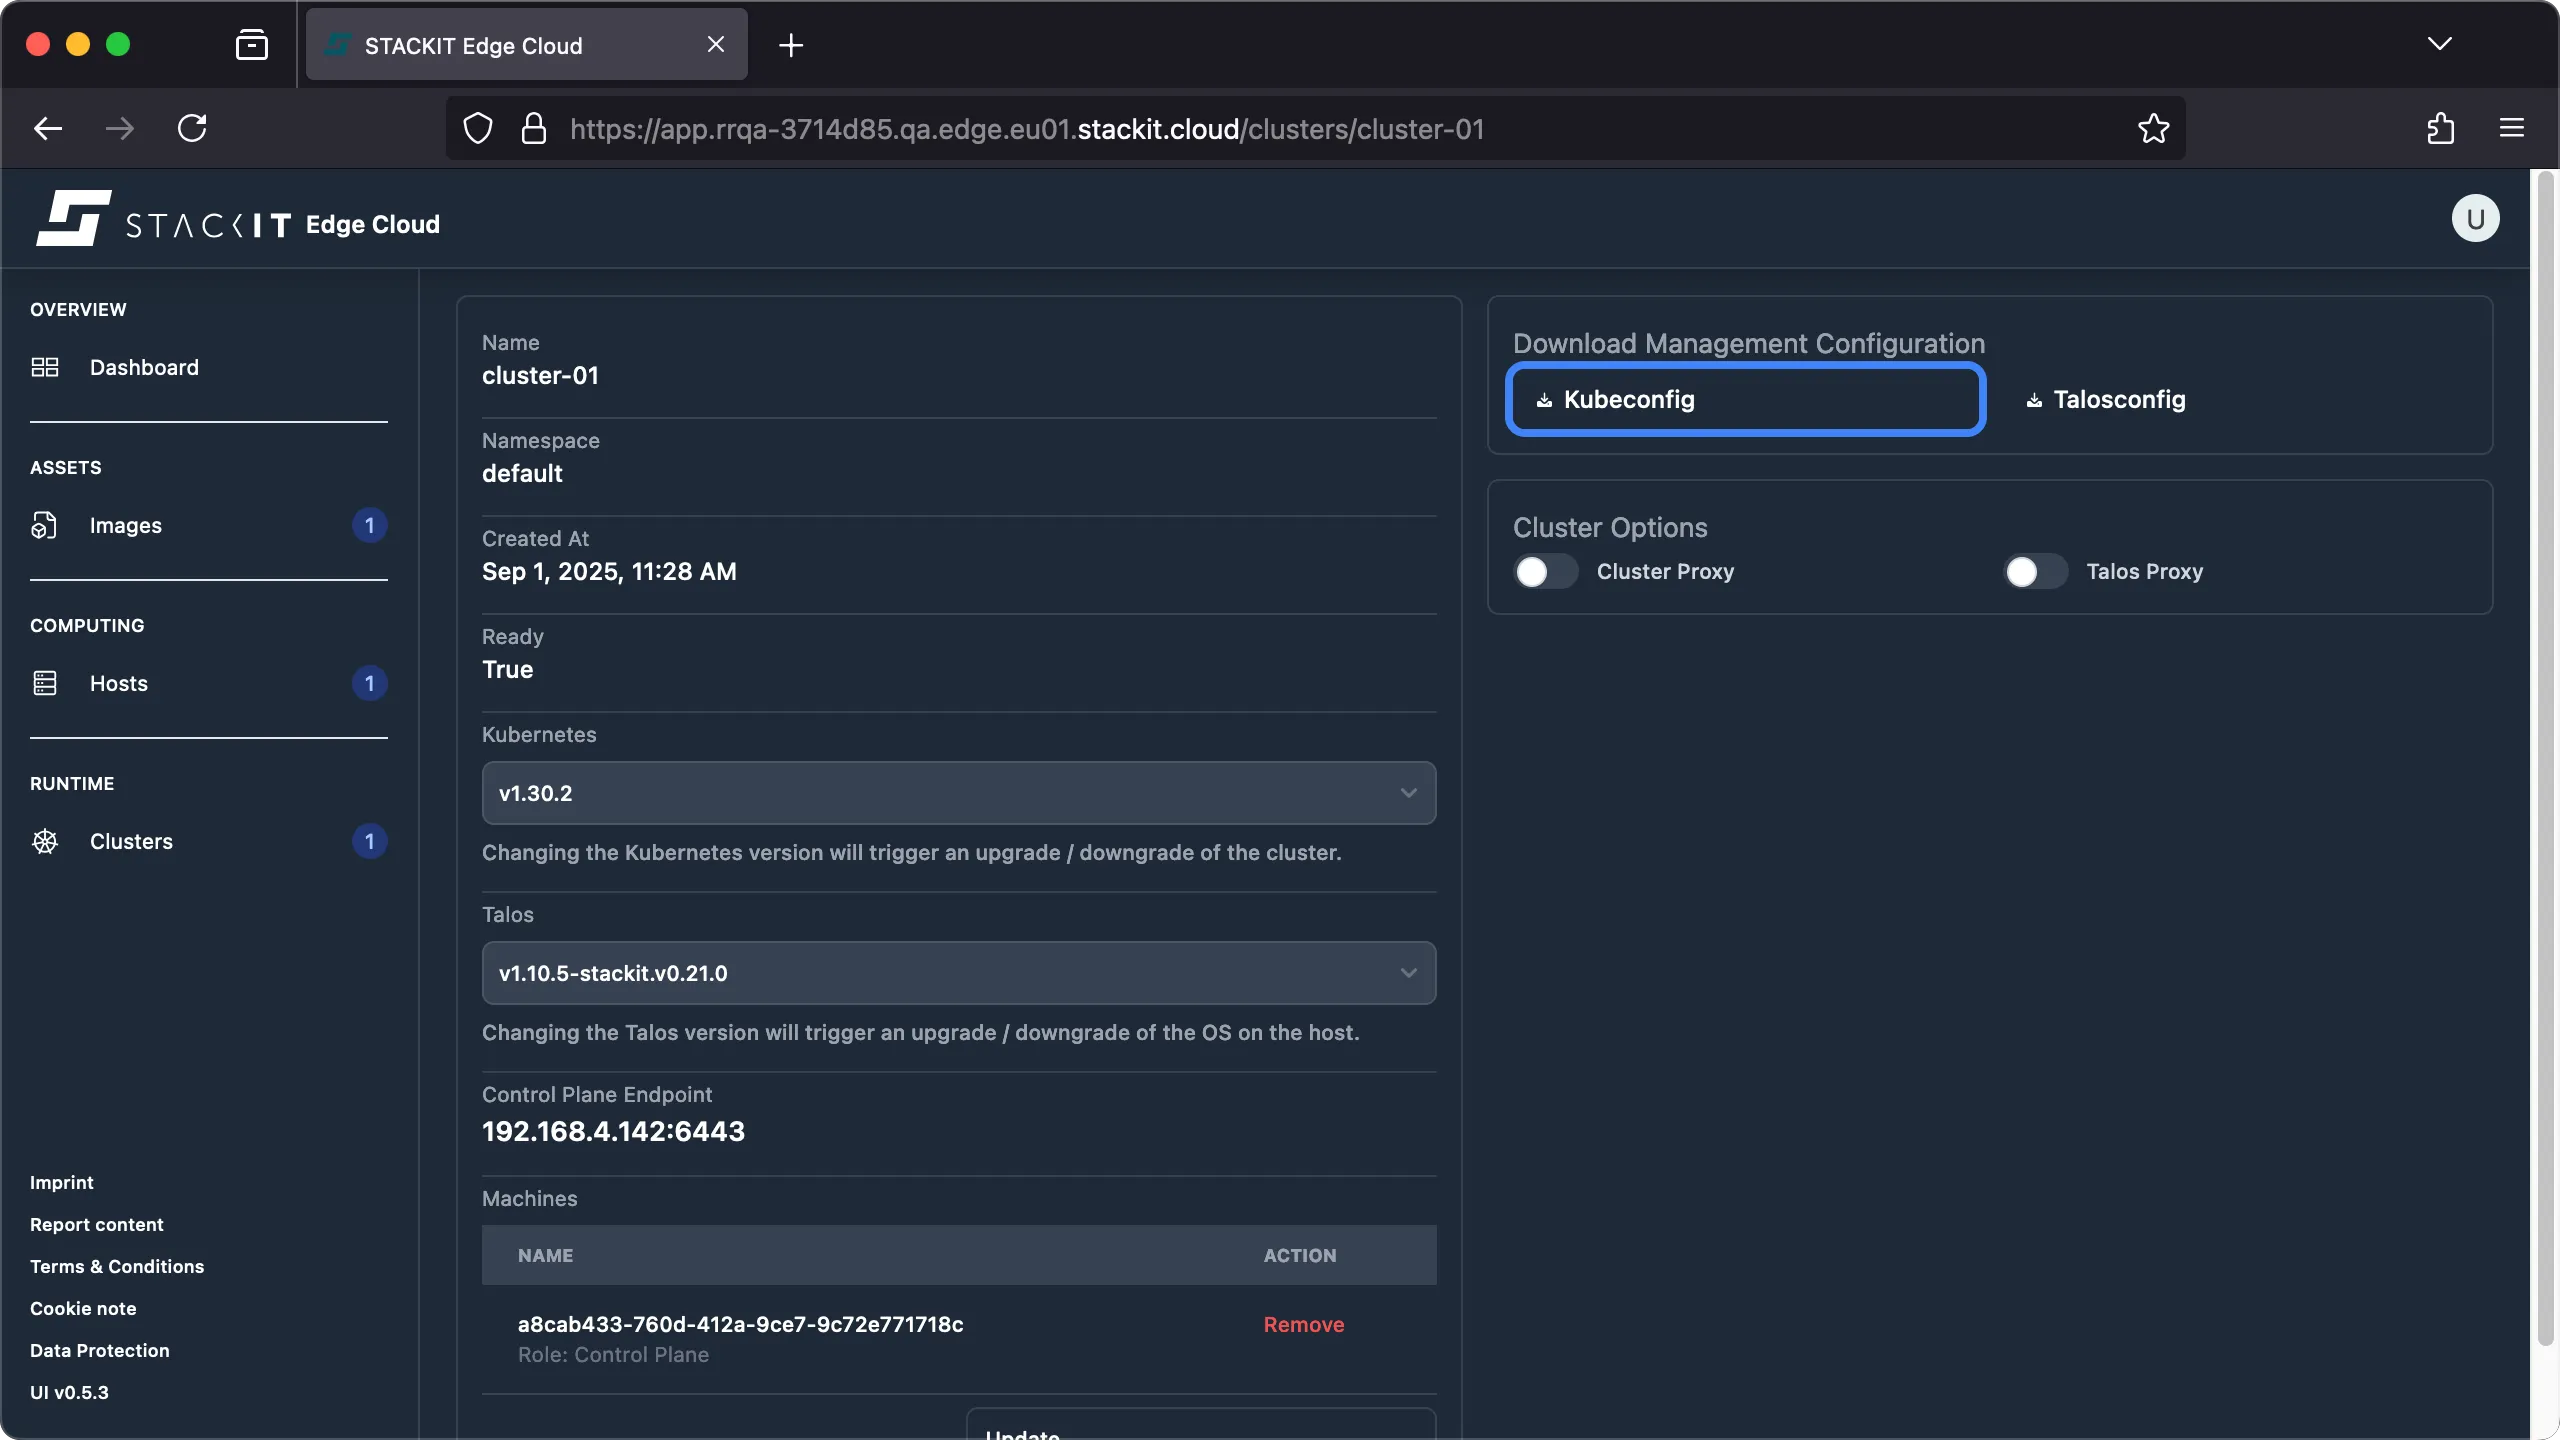
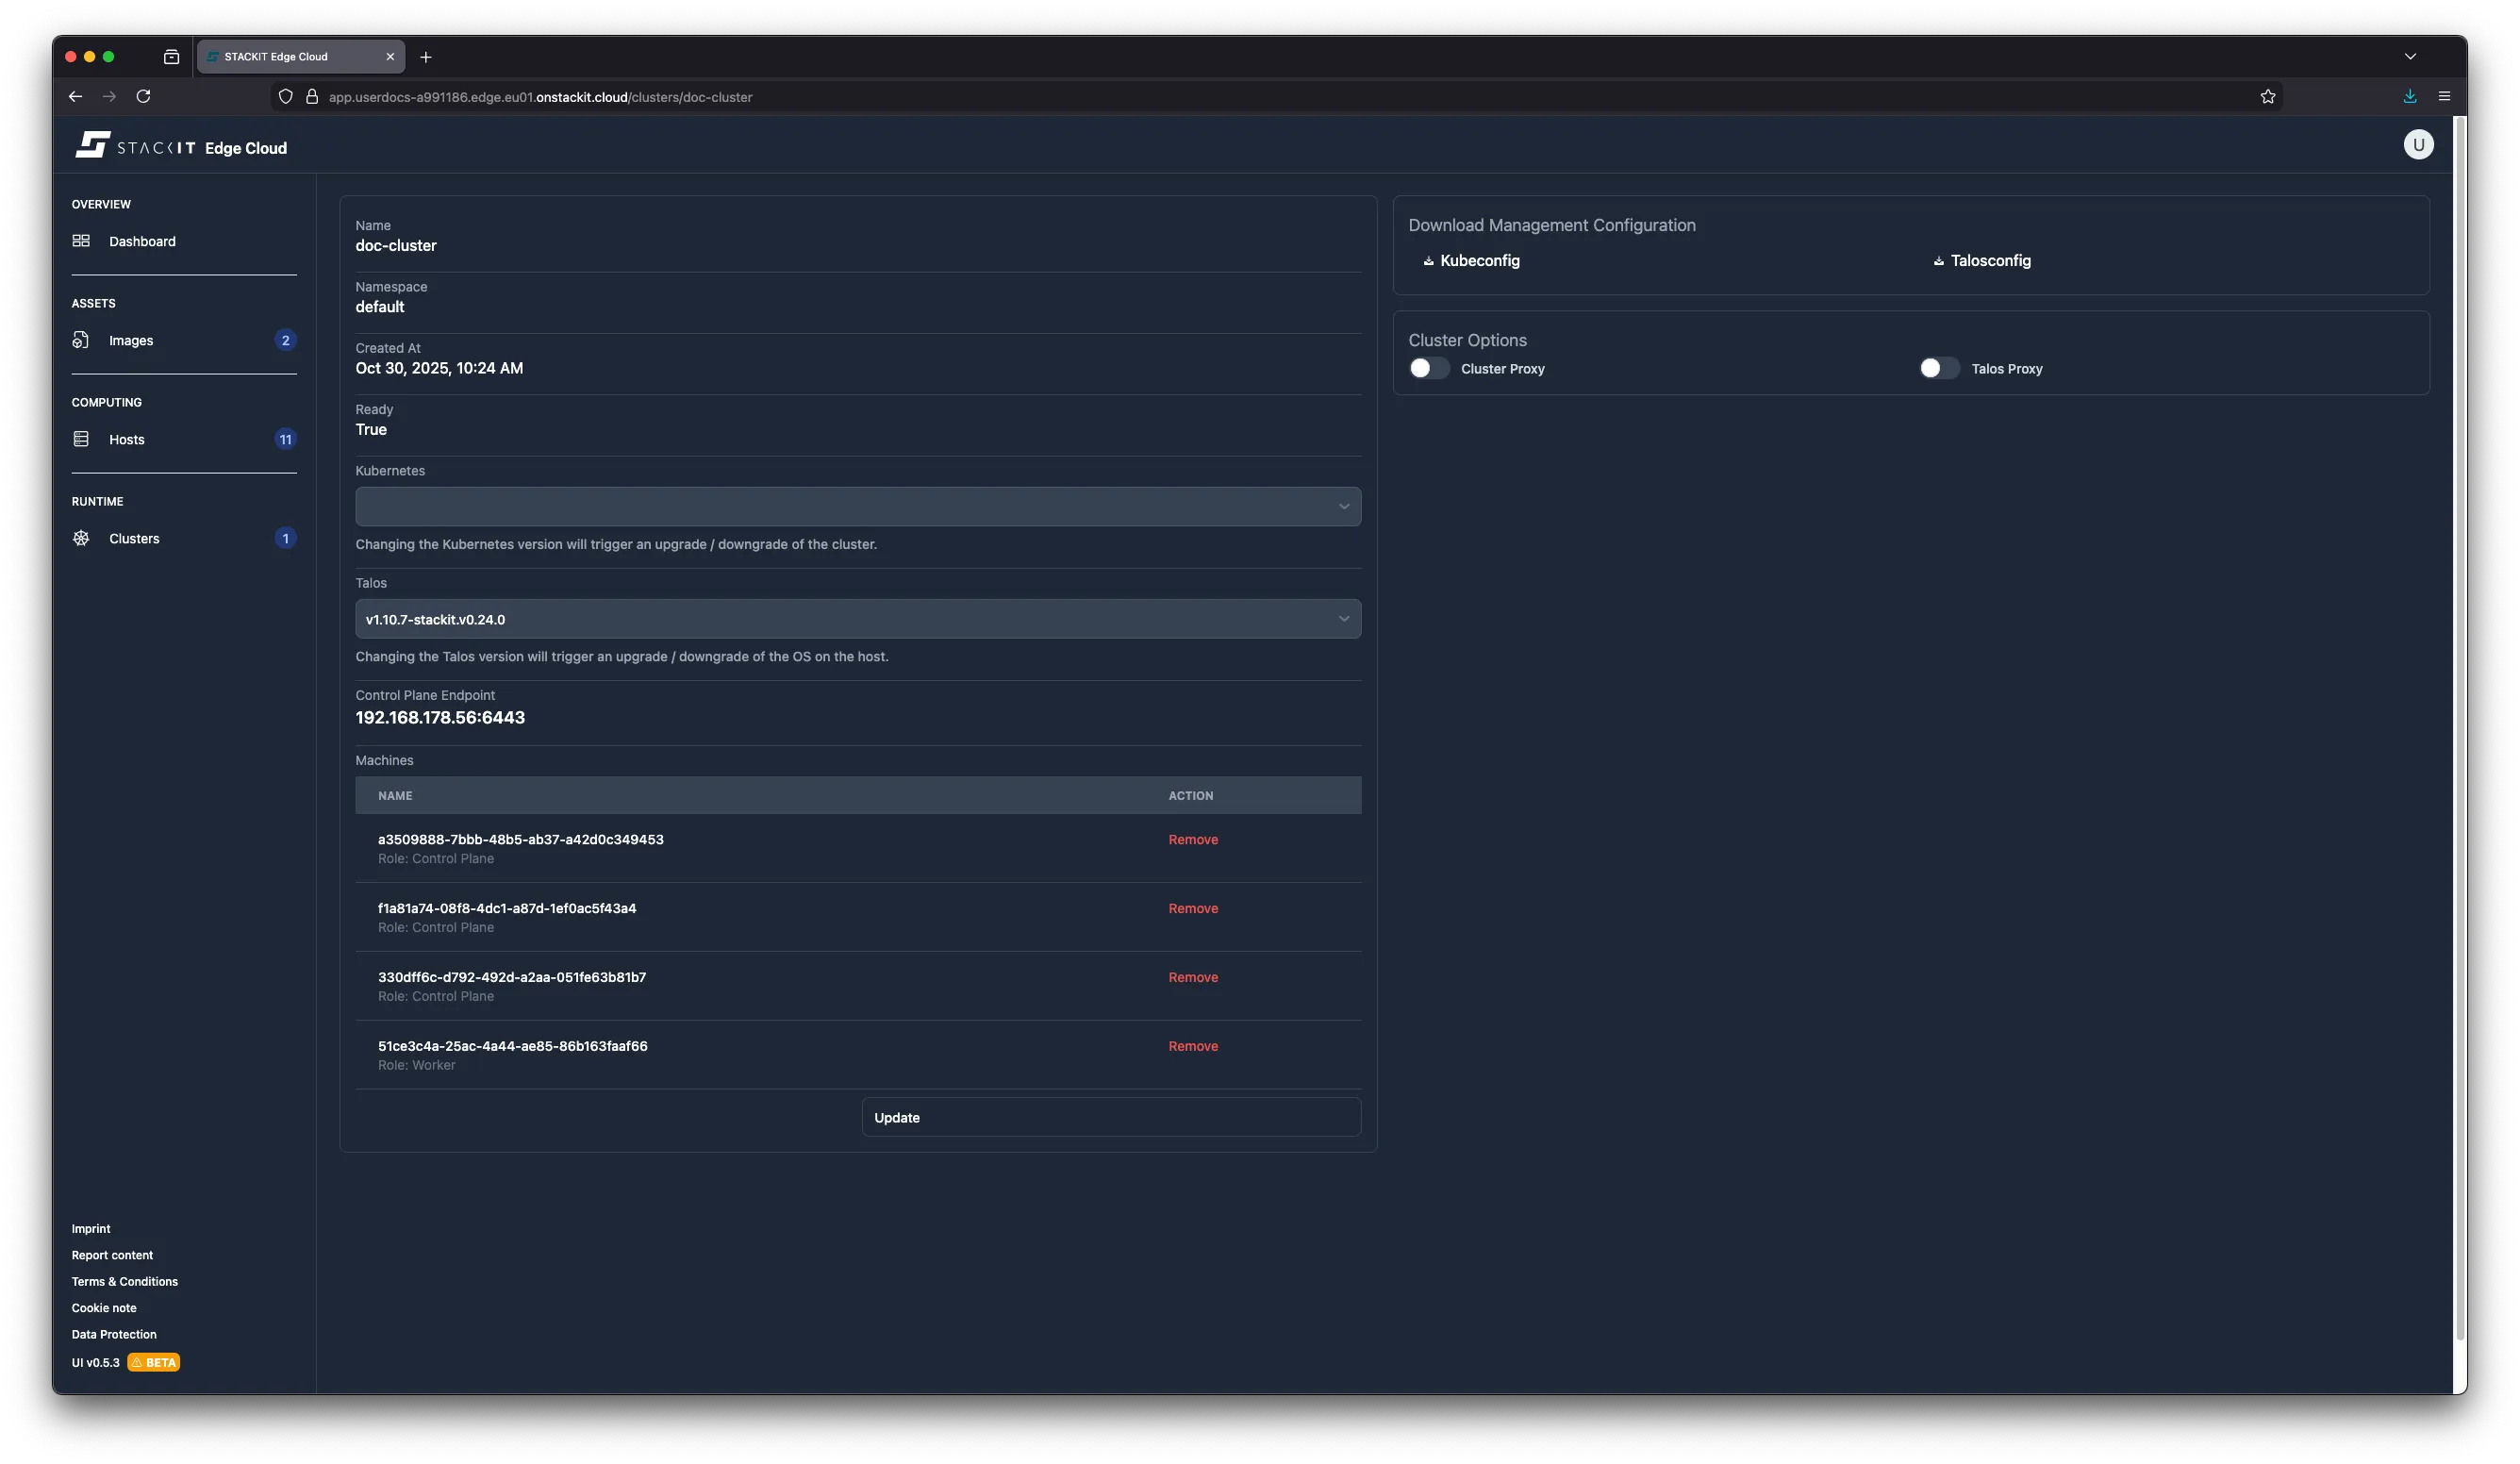
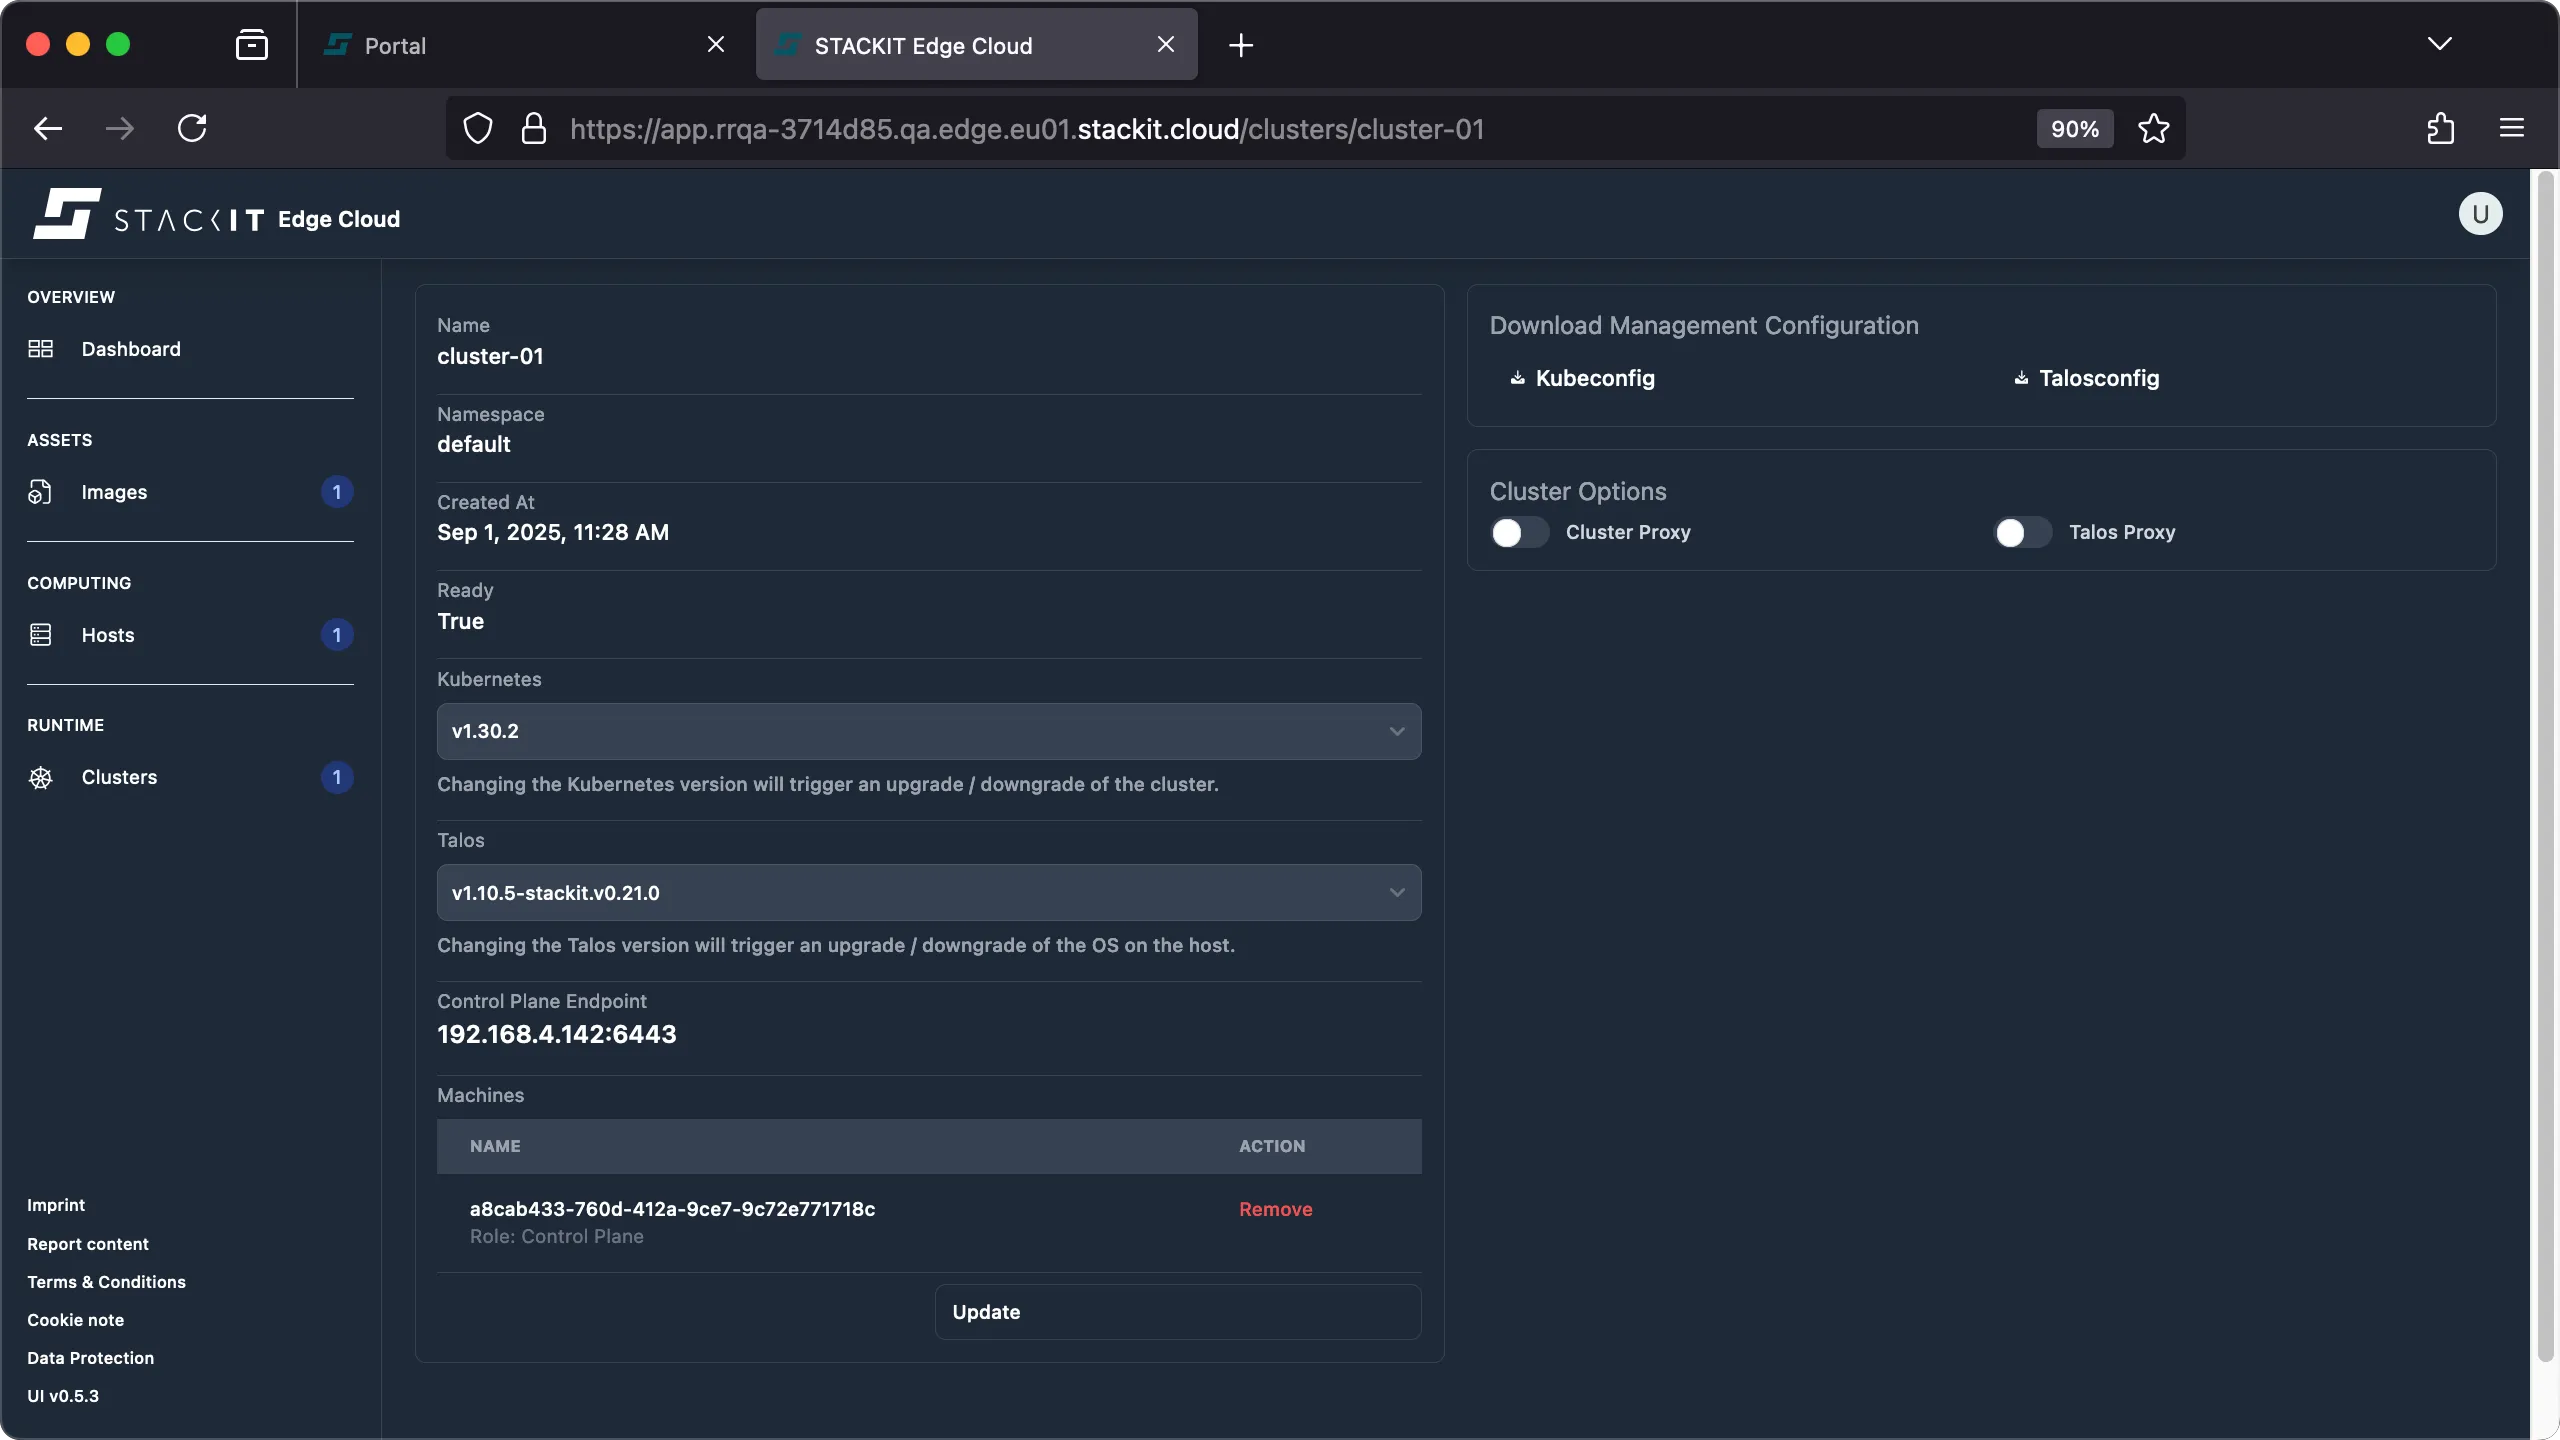
Navigate to the Cluster section. You’ll get to the Clusters overview. Click on the name of the cluster you want to get the Kubeconfig file for.
-
Click on the Kubeconfig button to start the download of a valid Kubeconfig file for the selected cluster.
Prerequisites:
- Successfully authenticated with a STEC instance.
- Tools: a generic Linux bash terminal,
kubectl,yq.
Steps:
-
The kubeconfig for every cluster lives in the STEC instance as a Kubernetes secret. You simply have to get the correct secret, decode and save it to a file.
Terminal window > export KUBECONFIG=~/.kubeconfig/your-stec.kubeconfig.yaml> CLUSTER_NAME="cluster-01"> kubectl get secrets/${CLUSTER_NAME}-kubeconfig --namespace default -o yaml | yq '.data.value' | base64 --decode > ${CLUSTER_NAME}.kubeconfig.yaml
Using kubectl
Section titled “Using kubectl”You may use any Kubernetes API compatible client to interact with Kubernetes. For this example we’ll
use kubectl.
Make sure you use the latest version of kubectl that’s supported with the Kubernetes version of
the Kubernetes cluster you’re working with. In the examples below we’ve been using kubectl version
1.33.1.
Prerequisites:
- You acquired a valid kubeconfig for the STEC managed Edge Cluster.
- Tools: a generic Linux bash terminal,
kubectl.
Steps:
> export KUBECONFIG=your-edge-cluster.kubeconfig.yaml> kubectl get nodesNAME            STATUS   ROLES           AGE   VERSIONtalos-4ic-txr   Ready    control-plane   19m   v1.30.2
> kubectl get pods --all-namespacesNAMESPACE    NAME                                   READY  STATUS   RESTARTS     AGEkube-system  coredns-8477467d67-vb27c               1/1    Running  0            19mkube-system  coredns-8477467d67-vmmwk               1/1    Running  0            19mkube-system  kube-apiserver-talos-4ic-txr           1/1    Running  0            19mkube-system  kube-controller-manager-talos-4ic-txr  1/1    Running  2 (20m ago)  18mkube-system  kube-flannel-6rzll                     1/1    Running  0            19mkube-system  kube-proxy-7hf7w                       1/1    Running  0            19mkube-system  kube-scheduler-talos-4ic-txr           1/1    Running  2 (20m ago)  18m
Getting your talosconfig
Section titled “Getting your talosconfig”You authenticate with Talos using a talosconfig file. Follow the next steps to get the file.
Prerequisites:
- Successfully authenticated in the UI of a STEC instance.
Steps:
-
Navigate to the Cluster section. You’ll get to the Clusters overview. Click on the name of the cluster you want to get the talosconfig file for.
-
Click on the talosconfig button to start the download of a valid talosconfig file for the selected cluster.

Prerequisites:
- Successfully authenticated with a STEC instance.
- Tools: a generic Linux bash terminal,
kubectl,yq.
Steps:
-
The talosconfig for every cluster lives in the STEC instance as a Kubernetes secret. You simply have to get the correct secret, decode and save it to a file.
Terminal window > export KUBECONFIG=~/.kubeconfig/your-stec.kubeconfig.yaml> CLUSTER_NAME="cluster-01"> kubectl get secrets/${CLUSTER_NAME}-talosconfig --namespace default -o yaml | yq '.data.talosconfig' | base64 --decode > ${CLUSTER_NAME}.talosconfig.yaml
Using talosctl
Section titled “Using talosctl”You may use any gRPC compatible client to interact with Talos. For this example we’ll use talosctl.
Every Talos Linux node does expose an endpoint for the Talos gRPC API. When you use talosctl it
will try to connect to the gRPC endpoint specified in the talosconfig. This may fail if the endpoint
is not reachable. In that case you can specify a different node from the cluster you want to
interact with using the --endpoints CLI parameter of talosctl, providing a IP / DNS record of that
endpoint, to connect to a different endpoint.
The --nodes parameter of talosctl however always has to be specified and specifies the nodes
that should be targeted by the talosctl command. If the --endpoints used are different from the
--nodes used the chosen endpoint will proxy the command to all the specified nodes. A network
connection from the talosctl CLI is only created to the --endpoints.
Check the talosctl documentation to learn
more about how to use talosctl.
Make sure you use the latest version of talosctl that’s supported with the Talos version of the
Talos node you’re working with. In the examples below we’ve been using talosctl version 1.10.5.
Prerequisites:
- You acquired a valid talosconfig for the STEC managed Edge Cluster.
- Tools: a generic Linux bash terminal,
talosctl,
yq.
Steps:
> export TALOSCONFIG=your-edge-cluster.talosconfig.yaml
> TALOS_IP=$(yq '.contexts.[ keys |.[0]].endpoints[0] | split(":") |.[0]'./my-edge-cluster.talosconfig)
> talosctl --nodes $TALOS_IP get membersNODE NAMESPACE TYPE ID VERSION HOSTNAME MACHINE TYPE OS ADDRESSES192.168.4.142 cluster Member talos-4ic-txr 1 talos-4ic-txr controlplane Talos (v1.10.5) ["192.168.4.142"]
> talosctl --nodes $TALOS_IP get svcNODE NAMESPACE TYPE ID VERSION RUNNING HEALTHY HEALTH UNKNOWN192.168.4.142 runtime Service apid 2 true true false192.168.4.142 runtime Service auditd 2 true true false192.168.4.142 runtime Service containerd 2 true true false192.168.4.142 runtime Service cri 2 true true false192.168.4.142 runtime Service dashboard 1 true false true192.168.4.142 runtime Service etcd 2 true true false192.168.4.142 runtime Service ext-edgehostlet 1 true false true192.168.4.142 runtime Service kubelet 2 true true false192.168.4.142 runtime Service machined 2 true true false192.168.4.142 runtime Service syslogd 2 true true false192.168.4.142 runtime Service trustd 2 true true false192.168.4.142 runtime Service udevd 2 true true false
Using the cloud proxy
Section titled “Using the cloud proxy”The cloud proxy is a feature that, when enabled, allows you to connect to your STEC edge cluster from anywhere in the world using nothing but an internet connection. If your cluster is behind a restricted network or you are otherwise not able to directly connect to it you may enable the STEC cloud proxy for that cluster.
How the cloud proxy works.
The cloud proxy is a optional feature that, when enabled, will create a HTTPS tunnel between the STEC control plane running on STACKIT cloud and a STEC edge cluster. The Kubernetes and/or Talos Linux API endpoints are than exposed to the internet and reachable to anyone. The connection is initialized from the STEC edge cluster, which means that the only requirement for the STEC cloud proxy to function is a outgoing connection from the edge cluster to the STACKIT cloud on TCP port 443 (HTTPS). There is no need to open inbound port to use the cloud proxy feature. When enabled the STEC control plane will send a command over it’s management interface forcing the edge cluster to initialize the tunnel connection. This process may take a few minutes since new services need to be started and DNS records have to be created before the proxy can be used.

Once the tunnel is established you can use the Talos gRPC and/or Kubernetes REST APIs using the provided API proxy endpoints on the STACKIT cloud. There is no need for your clients, e.g. kubectl or talosctl, to be able to reach the edge cluster directly.

Prerequisites:
- Successfully authenticated in the UI of a STEC instance
Steps:
-
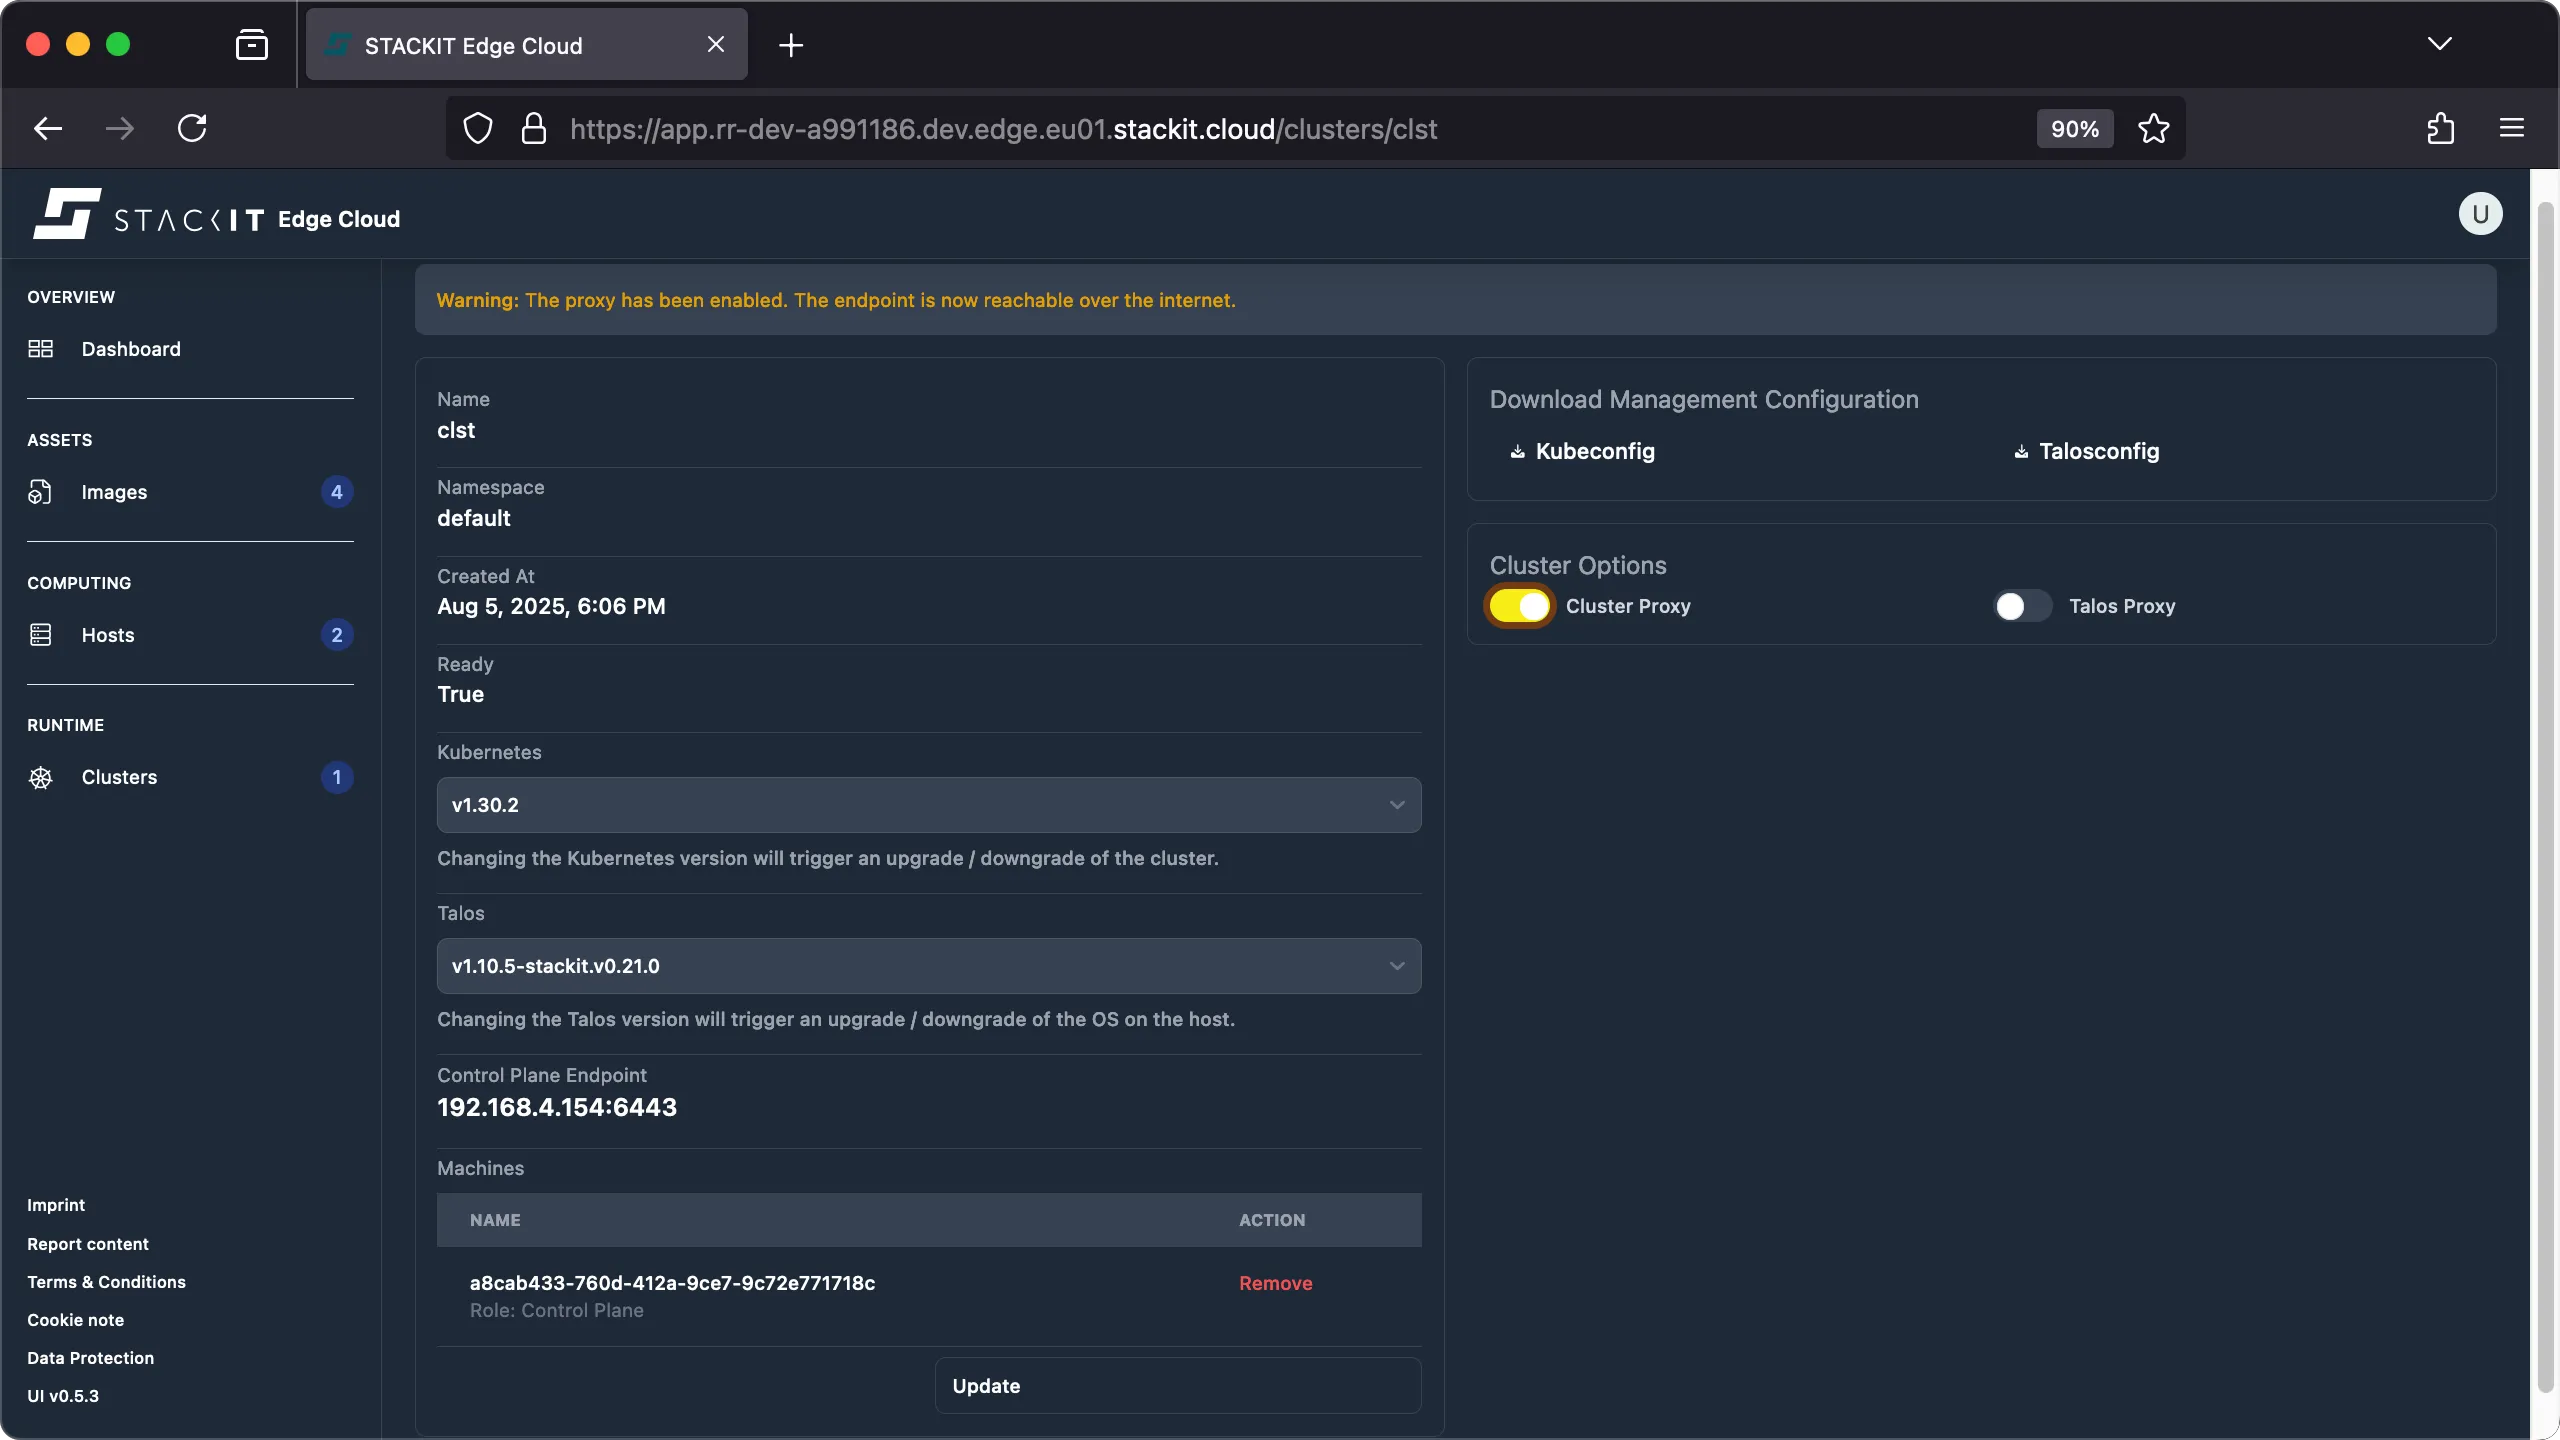
Navigate to the Cluster section. You’ll get to the Clusters overview. Click on the name of the cluster you want to enable the cloud proxy feature for.
-
If you want to enable the proxy for the Kubernetes API enable the “Cluster Proxy” slider. If you want to enable the proxy for the Talos Linux API enable the “Talos Proxy” slider. You can enable / disable the proxy for each of the services independent from each other.
-
Wait a few minutes for the proxy configuration to finish before you try to use the proxy. Note that in order to use the proxy you’ll have to change the endpoint in the Kubeconfig and/or talosconfig as explained in the following tipp box.
Prerequisites:
- Successfully authenticated with a STEC instance.
- Kubeconfig for the STEC instance is exported in your terminal session.
- Tools: a generic Linux bash terminal,
kubectl,yq.
Steps:
-
Patch the EdgeCluster resource to enable the
spec.proxyas neededTerminal window > export KUBECONFIG=~/.kubeconfig/your-stec.kubeconfig.yaml> CLUSTER_NAME="cluster-01"> kubectl patch edgeclusters.edge.stackit.cloud/$CLUSTER_NAME --type=merge -p '{"spec": {"proxy": {"kubernetes": true, "talos": true}}}'> kubectl get edgeclusters.edge.stackit.cloud/$CLUSTER_NAME -o yaml | yq '.spec.proxy'kubernetes: truetalos: true -
Wait a few minutes for the proxy configuration to finish before you try to use the proxy. Note that in order to use the proxy you’ll have to change the endpoint in the kubeconfig and/or talosconfig as explained in the following tipp box.
When you enable the Kubernetes cloud proxy or the Talos cloud proxy you’ll have to redownload or reconfigure your kubeconfig and talosconfig respectively to actually make use of the cloud proxy feature. This is because the kubeconfig and/or talosconfig have to use a different endpoint when using the cloud proxy. Please find a example diff of the configuration when using and when not using the cloud proxy feature.
kubeconfig
Section titled “kubeconfig”apiVersion: v1kind: Configclusters: - cluster: certificate-authority-data: xxx server: https://192.168.4.142:6443 name: <cluster>users: - name: <cluster>-admin user: client-certificate-data: xxx client-key-data: xxxcontexts: - context: cluster: <cluster> user: <cluster>-admin name: <cluster>-admin@<cluster>current-context: <cluster>-admin@<cluster>apiVersion: v1kind: Configclusters: - cluster: certificate-authority-data: xxx server: https://<cluster>.k8s.<instance>.edge.<region>.stackit.cloud:443 name: <cluster>users: - name: <cluster>-admin user: client-certificate-data: xxx client-key-data: xxxcontexts: - context: cluster: <cluster> user: <cluster>-admin name: <cluster>-admin@<cluster>current-context: <cluster>-admin@<cluster>talosconfig
Section titled “talosconfig”context: <cluster>contexts: <cluster>: endpoints: - 192.168.4.142:50000 ca: xxx crt: xxx key: xxxcontext: <cluster>contexts: <cluster>: endpoints: - 192.168.4.142:443 - <cluster>.talos.<instance>.edge.<region>.stackit.cloud:443 ca: xxx crt: xxx key: xxxDeploying workload
Section titled “Deploying workload”A STEC edge cluster is a vanilla Kubernetes cluster. This means workload management can be done with
any Kubernetes API compatible tool. For the purpose of this example kubectl will be used. Other
popular options are k9s or
freelens.
When managing large fleets of Kubernetes clusters you should consider using a tool designed for this task such as Argo CD, Flux CD or similar.
Prerequisites:
- Successfully authenticated with a STEC instance.
- Kubeconfig for the edge cluster is exported in your terminal session.
- Tools: a generic Linux bash terminal,
kubectl,yq.
Steps:
-
Deploy your workload with kubectl.
Terminal window > export KUBECONFIG=my-edge-cluster.kubeconfig.yaml> kubectl create deployment hello-stec --image=docker.io/nginxdemos/nginx-hello:plain-text --dry-run=client -o yaml | yq '.spec.replicas=0' | kubectl apply -f -### perform your changes as needed, e.g. add imagePullSecrets. Than scale the deployment to 1.> kubectl scale deployment hello-stec --replicas=1### forward the port of the deployment to your localhost> kubectl port-forward deployment/hello-stec 8080:8080> curl localhost:8080Server address: 127.0.0.1:8080Server name: hello-stec-6b97f4567f-qmzwbDate: 01/Sep/2025:17:25:19 +0000URI: /Request ID: 4530af346a3857f129fb76131fab6d97### cleanup after testing> kubectl delete deployment hello-stec
Upgrading Clusters
Section titled “Upgrading Clusters”You can update the used Talos and Kubernetes version of your edge cluster, but only one of them at a
time. This is done by changing the version via UI, or by editing the versions in the edgecluster
resource in your Edge Cloud instance. You can check out the progress of the update by looking at the
status of the edgecluster resource in your Edge Cloud instance.
During an update the version parts of the spec will be locked, you have to wait for the update to finish before you can start further updates. Do not add or remove any nodes from the cluster during an update, this might brick your cluster.
Upgrading Kubernetes
Section titled “Upgrading Kubernetes”You can upgrade the Kubernetes version independent from the Talos Linux operating system as long as the chosen combination is supported according to the Talos Linux release notes.
We currently supporting the following updates:
kubernetes-upgrade-from-1-30-to-1-30-14kubernetes-upgrade-from-1-30-14-to-1-31-0kubernetes-upgrade-from-1-31-to-1-31-13kubernetes-upgrade-from-1-31-13-to-1-32-0kubernetes-upgrade-from-1-32-to-1-32-9kubernetes-upgrade-from-1-32-9-to-1-33-0kubernetes-upgrade-from-1-33-to-1-33-5kubernetes-upgrade-from-1-33-5-to-1-34-0kubernetes-upgrade-from-1-34-to-1-34-1
The upgrade process will start immediately.
Prerequisites:
- Successfully authenticated in the UI of a STEC instance.
Steps:
-
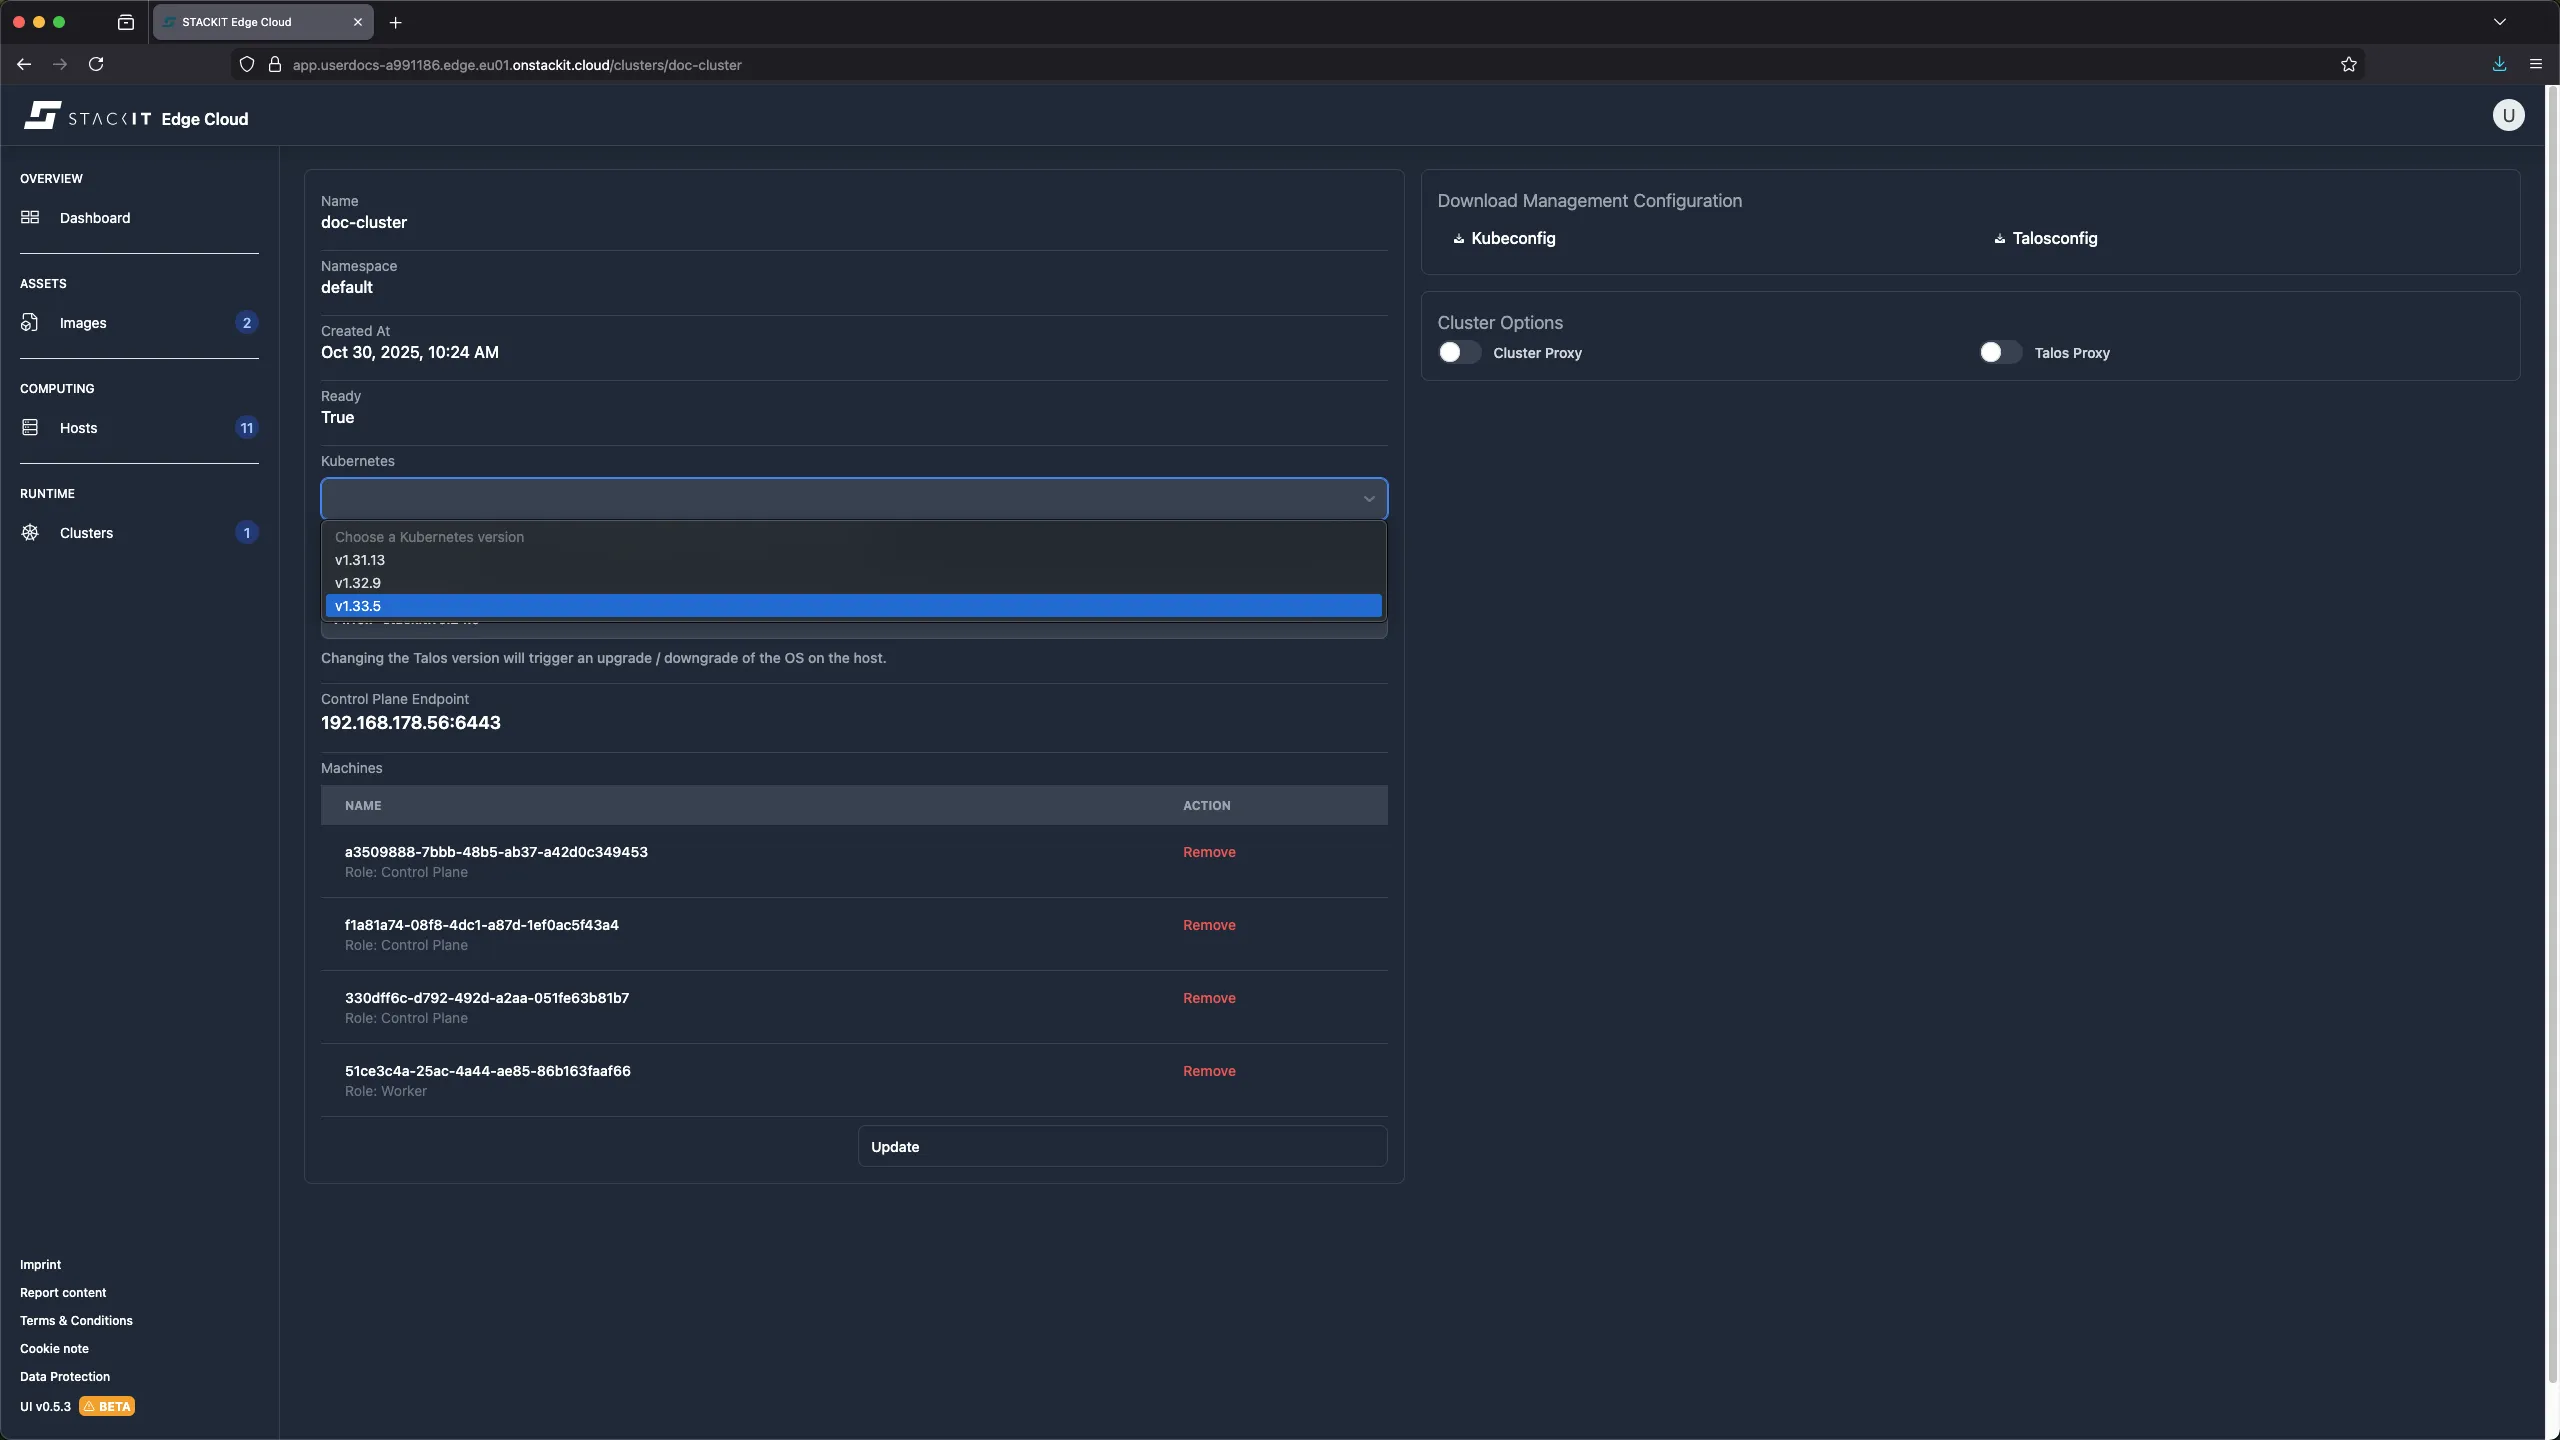
Navigate to Clusters in the UI.
-
Click on the Cluster you want to update.
-
Select a new valid version from the Kubernetes dropdown.
-
Click on the update bottom at the bottom of the page.
Prerequisites:
- Successfully authenticated with a STEC instance.
- Kubeconfig for the STEC instance is exported in your terminal session.
- Tools: a generic Linux bash terminal,
kubectl,yq.
Steps:
-
Start by editing the Kubernetes version in the
edgeclusterobject:Terminal window > export KUBECONFIG=~/.kubeconfig/your-stec.kubeconfig.yaml> CLUSTER_NAME="cluster-01"> kubectl edit edgeclusters.edge.stackit.cloud/$CLUSTER_NAME -
Change the value in
spec.talos.kubernetes.versionto the new supported valueapiVersion: edge.stackit.cloud/v1alpha1kind: EdgeClustermetadata:# [...]spec:nodes:# [...]proxy:kubernetes: falsetalos: falsetalos:clusterConfigPatches: []kubernetes:version: v1.32.9 # Edit this value and saveversion: v1.10.6-stackit.v0.23.2 -
If there is a valid upgrade path for the new value according to the list above you will get a confirmation that the resource was saved. If there is no valid upgrade plan for this version change or your current Talos version does not support the new Kubernetes version the admission webhook will reject the change
-
Your nodes will be upgraded to the new Kubernetes version
Upgrading Talos
Section titled “Upgrading Talos”You can upgrade the Talos Linux operating system independent from the Kubernetes version as long as the chose combination is supported according to the Talos Linux release notes. See “get available images” section in the Creating Images page for a list of possible values.
These are the generally allowed upgrade Paths for Talos:
-
talos-upgrade-stec-1-9-to-1-10 -
talos-upgrade-stec-1-10-to-1-10 -
talos-upgrade-stec-1-10-to-1-11 -
talos-upgrade-stec-1-11-to-1-11 -
The upgrade process will start immediately. A staged Talos upgrade is enforced which means that the node will reboot before applying the upgrade.
-
Make sure to check the Talos changelog before upgrading the Talos version. STEC currently does not do anything special to workaround possible issues when changing the Talos version.
Prerequisites:
- Successfully authenticated in the UI of a STEC instance.
Steps:
-
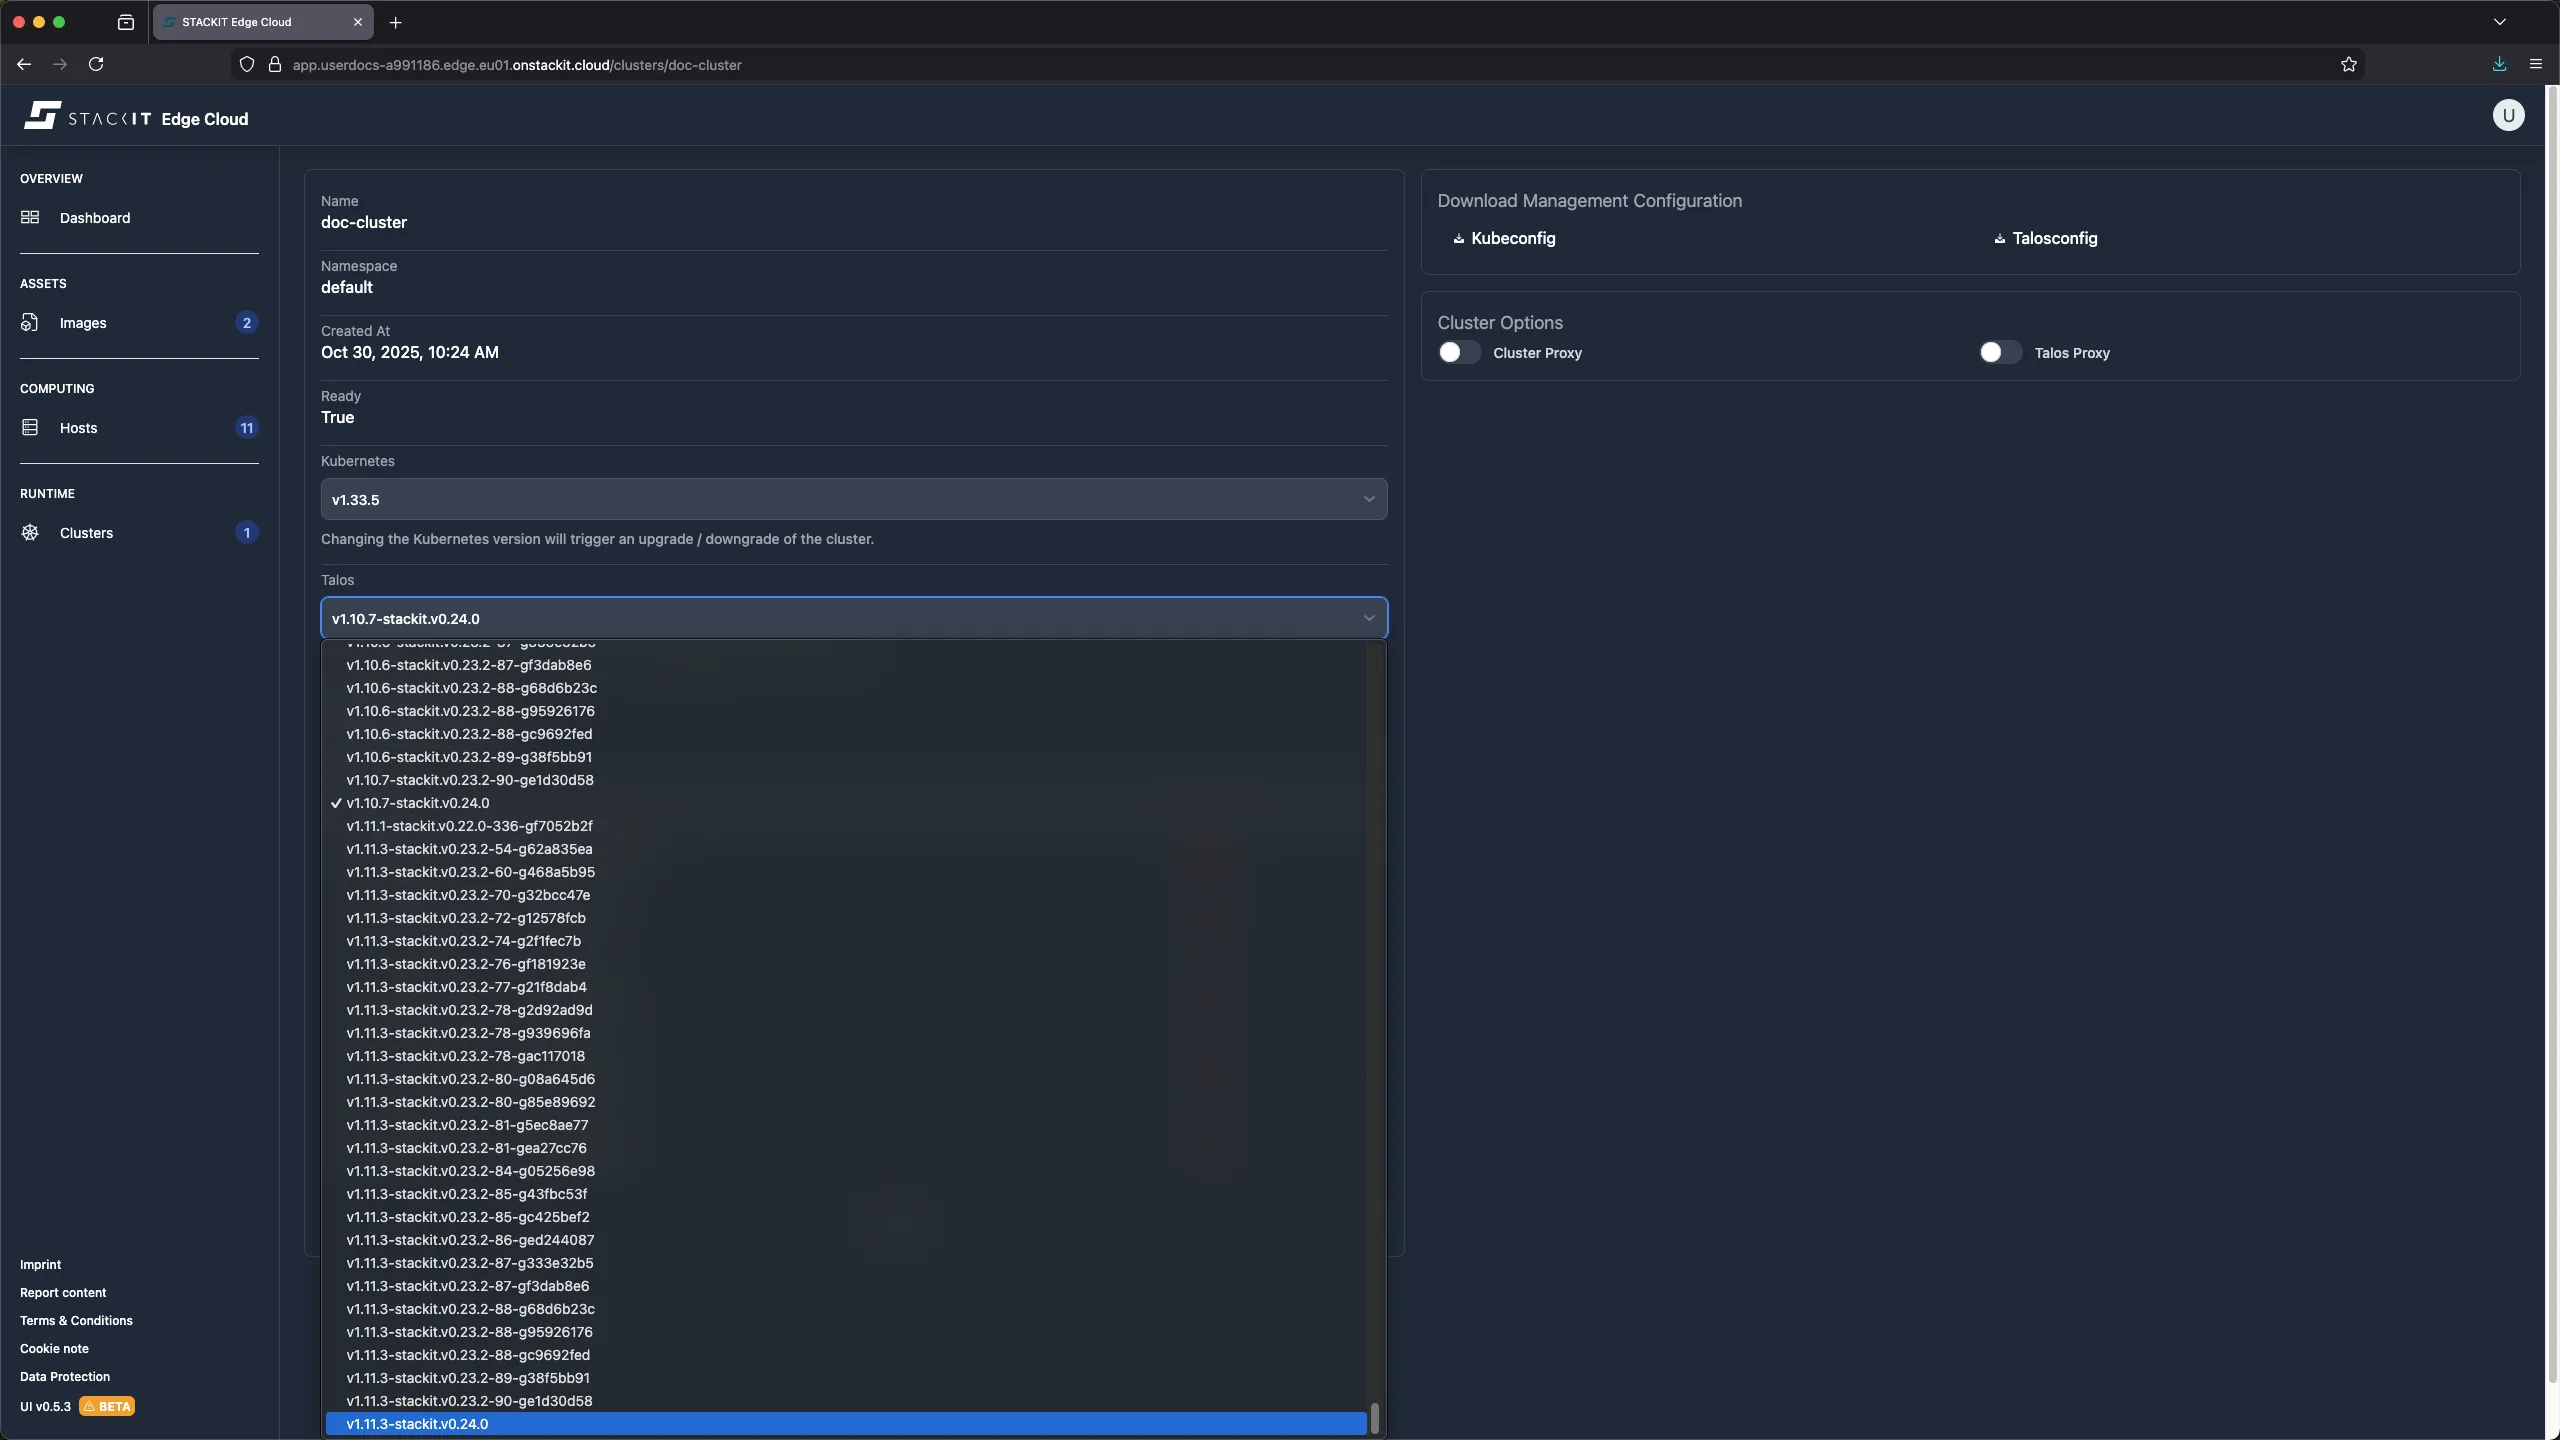
Navigate to Clusters in the UI.
-
Click on the Cluster you want to update.
-
Select a new valid version from the Talos dropdown.
-
Click on the update bottom at the bottom of the page.
Prerequisites:
- Successfully authenticated with a STEC instance.
- Kubeconfig for the STEC instance is exported in your terminal session.
- Tools: a generic Linux bash terminal,
kubectl,yq.
Steps:
-
Start by editing the Talos Version in the
edgeclusterobject:Terminal window > export KUBECONFIG=~/.kubeconfig/your-stec.kubeconfig.yaml> CLUSTER_NAME="cluster-01"> kubectl edit edgeclusters.edge.stackit.cloud/$CLUSTER_NAME -
Change the value in
spec.talos.versionto the new supported value:apiVersion: edge.stackit.cloud/v1alpha1kind: EdgeClustermetadata:# [...]spec:nodes:# [...]proxy:kubernetes: falsetalos: falsetalos:clusterConfigPatches: []kubernetes:version: v1.32.9version: v1.10.6-stackit.v0.23.2 # Edit this value to an existing newer version and save -
If there is a valid upgrade path for the new value according to the list above you will get a confirmation that the resource was saved. If there is no valid upgrade plan for this version change the admission webhook will reject the change.
-
Your nodes will be upgraded to the new Talos version.
Removing a host from a cluster
Section titled “Removing a host from a cluster”You can remove a host from a cluster to decommission or reuse it elsewhere.
When you remove the last host from a cluster this will result in the cluster being deleted.
When you remove a host from a cluster its machine configuration is removed and the host is reset. This means it will be rebooted with the initial kernel parameters it’s image had when it was created. If that’s not what you want you’ll have to edit the machine configuration of a host to overwrite the kernel parameters using the machine.install.extraKernelArgs. The changes made there will persist even when resetting a machine. In addition any Kubernetes workload running on the host will be stopped since it’s no longer part of a Kubernetes cluster. Depending on your cluster and workload configuration the stopped workload might be restarted on one of the remaining hosts of the cluster.
When a host is reset the data saved on it might still be accessible. It is your responsibility to delete remaining data as needed.
Prerequisites:
- Successfully authenticated in the UI of a STEC instance.
Steps:
-
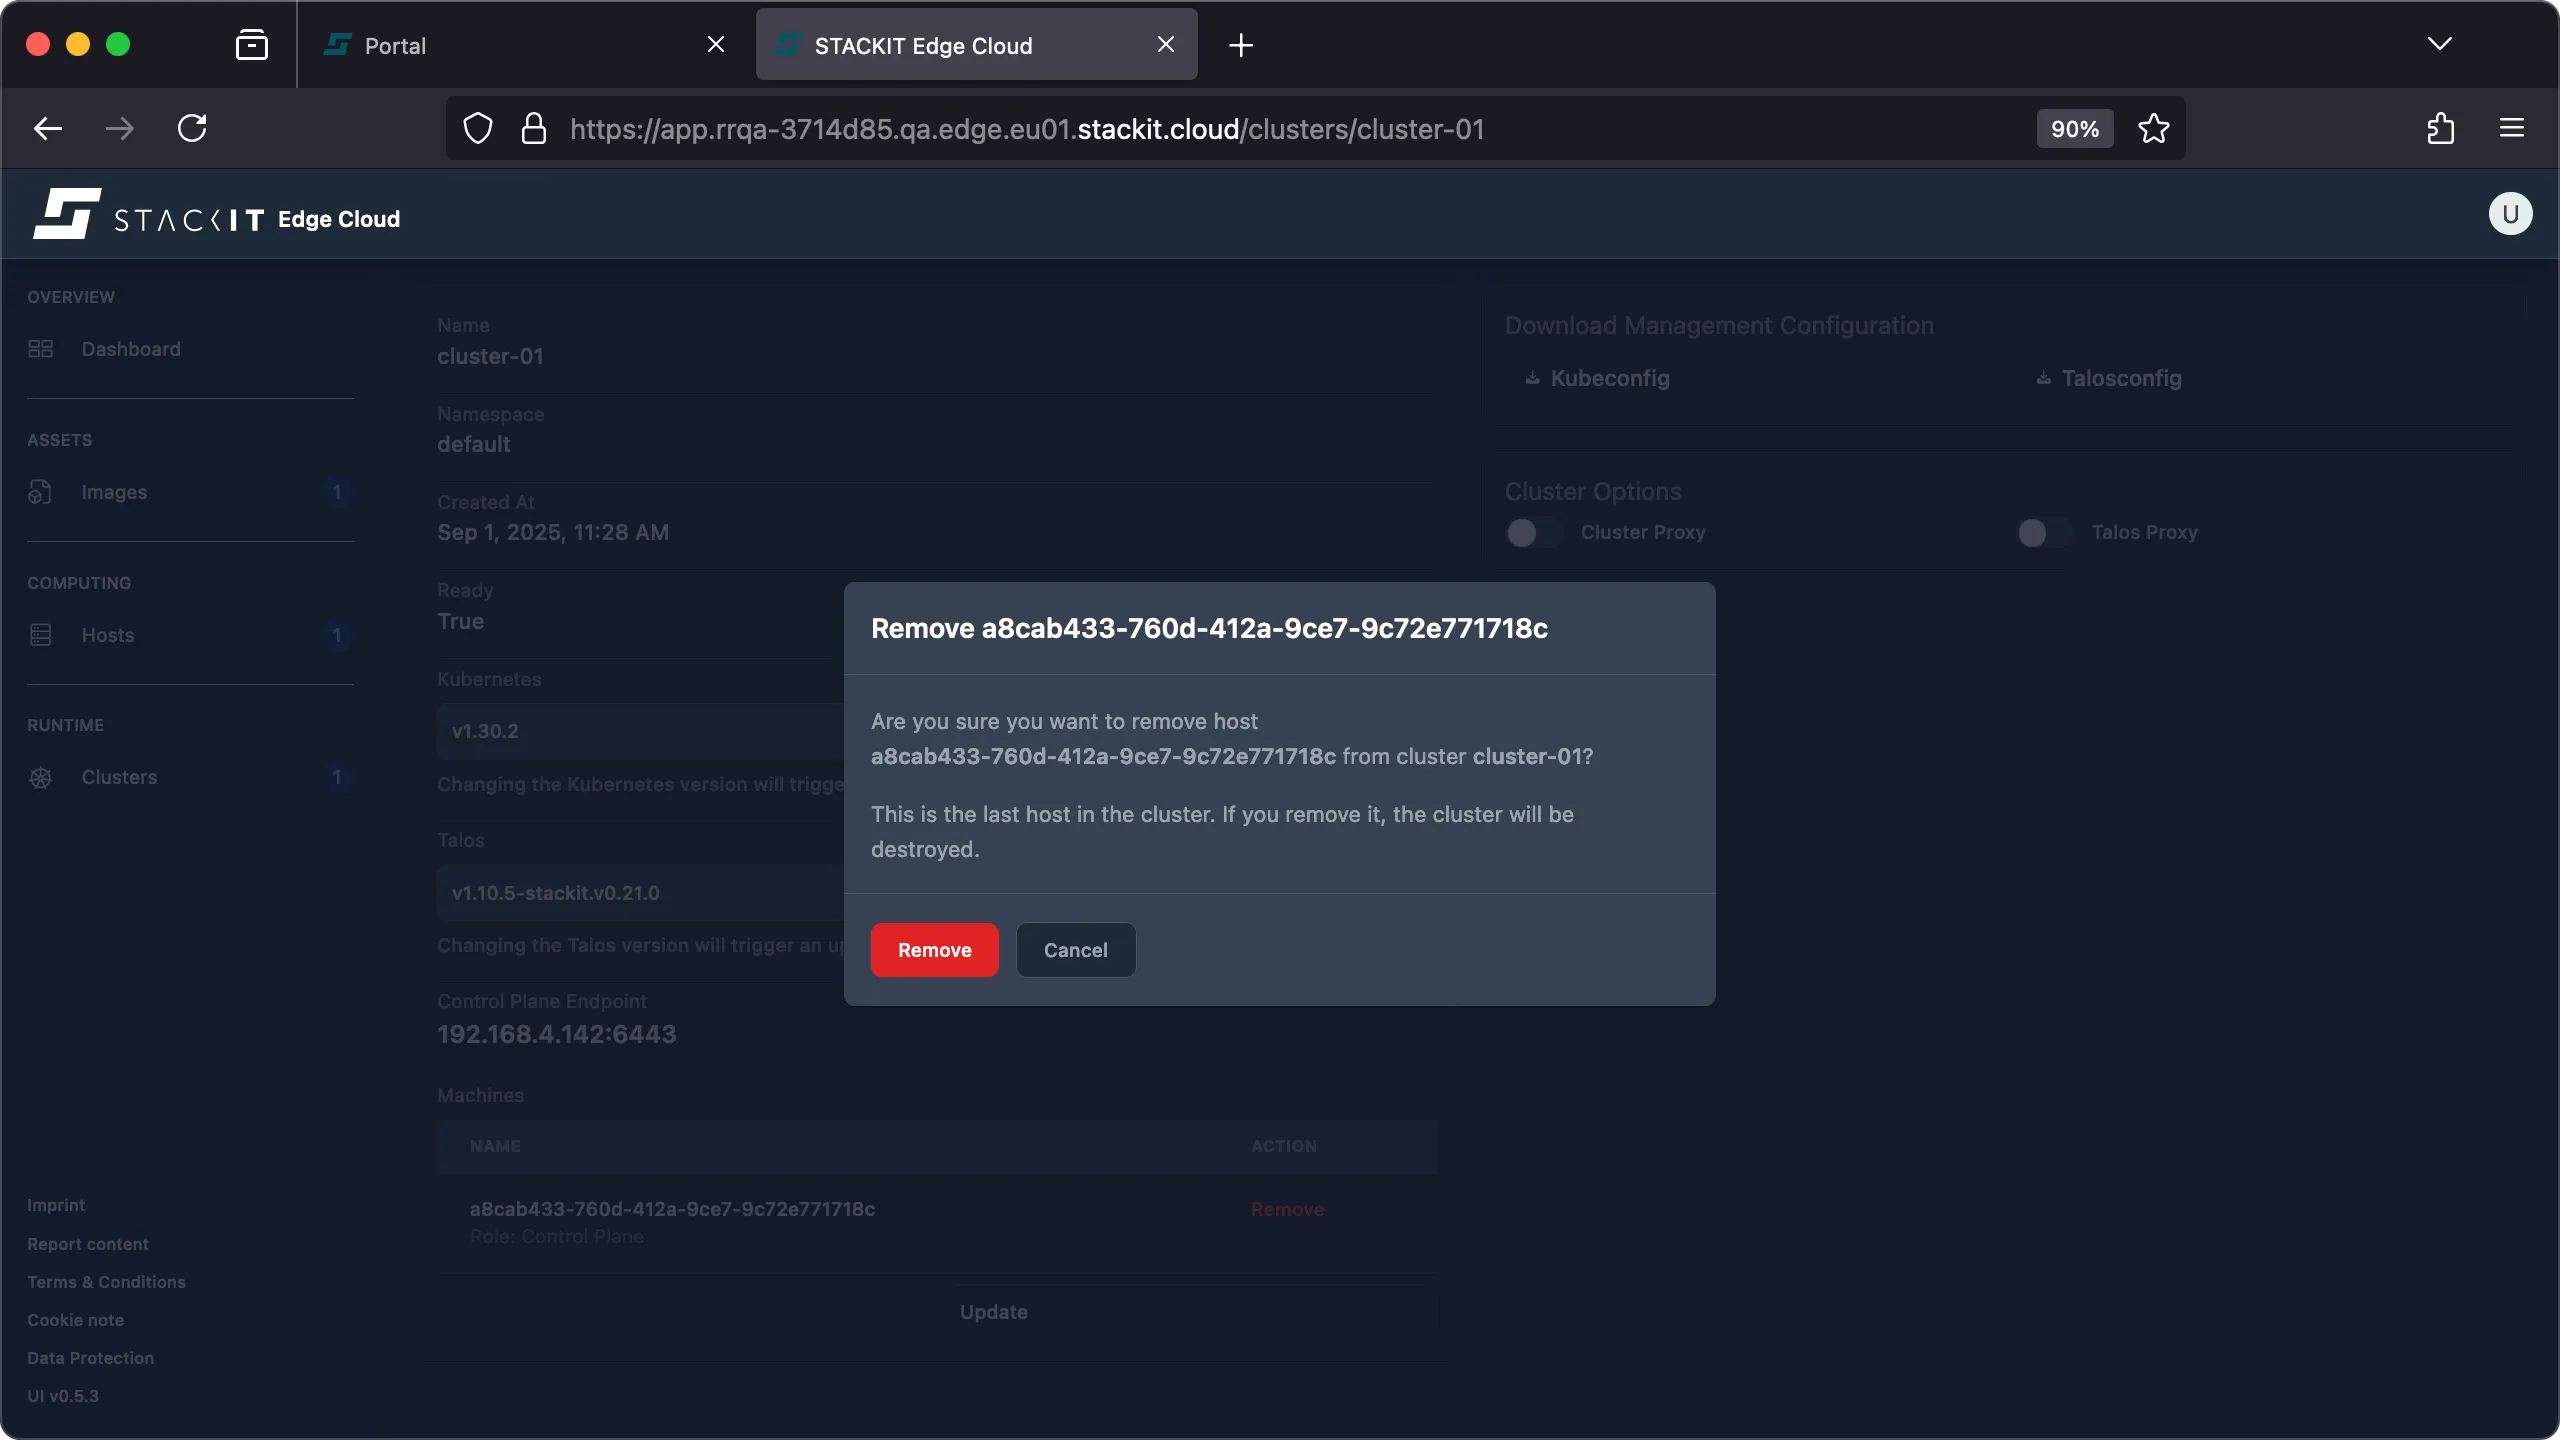
Navigate to the clusters view in the UI.

-
Click the cluster name of the cluster you want to remove a host from.
-
Scroll down to the list of machines that are part of this cluster. Identify the host that you want to remove from the cluster and click ‘remove’. When you remove a host from a cluster its machine configuration is removed and the host is reset.
-
If you remove the last host from a cluster this will result in the cluster being deleted.
Prerequisites:
- Successfully authenticated with a STEC instance.
- Kubeconfig for the STEC instance is exported in your terminal session
- Tools: a generic Linux bash terminal,
kubectl,yq.
Steps:
-
In this example we’ll be using SSA to remove a host from a cluster. Please review the remarks on the different patch methods available in the advanced topics for config patches.
-
Using SSA involves a 3-step get-edit-apply workflow: get the resource you want to edit, remove metadata such as the status field and perform your changes to your resource, apply the desired state.
Terminal window > CLUSTERNAME="YOUR-EDGECLUSTER-NAME"> EDGEHOST_TO_DELETE="123456789012-abcd-abcd-abcd-123456789012"### Get the cluster resource> kubectl get edgecluster ${CLUSTER_NAME} --namespace ${NAMESPACE} -o yaml > current-cluster.yaml### Remove the status, relevant metadata and the host> yq 'del(.status,.metadata.resourceVersion,.metadata.uid,.metadata.creationTimestamp,.metadata.generation,.metadata.finalizers)' current-cluster.yaml | yq '(.spec.nodes) |= map(select(.edgeHost!= "'$EDGEHOST_TO_DELETE'"))' > desired-cluster.yaml### Perform a server-side apply> kubectl apply -f desired-cluster.yaml --server-side --force-conflictsedgecluster.edge.stackit.cloud/xxx serverside-applied -
You can now verify the host is gone from the cluster.
Terminal window > kubectl get edgecluster/${CLUSTER_NAME} -o yaml | yq '.spec.nodes' -- configPatches:- ""edgeHost: 098765432109-abcd-abcd-abcd-098765432109installDisk: /dev/vdamachineConfigRef: ""role: controlplanetalos: {} -
If you remove the last host from a cluster this will result in the cluster being deleted.
Deleting a cluster
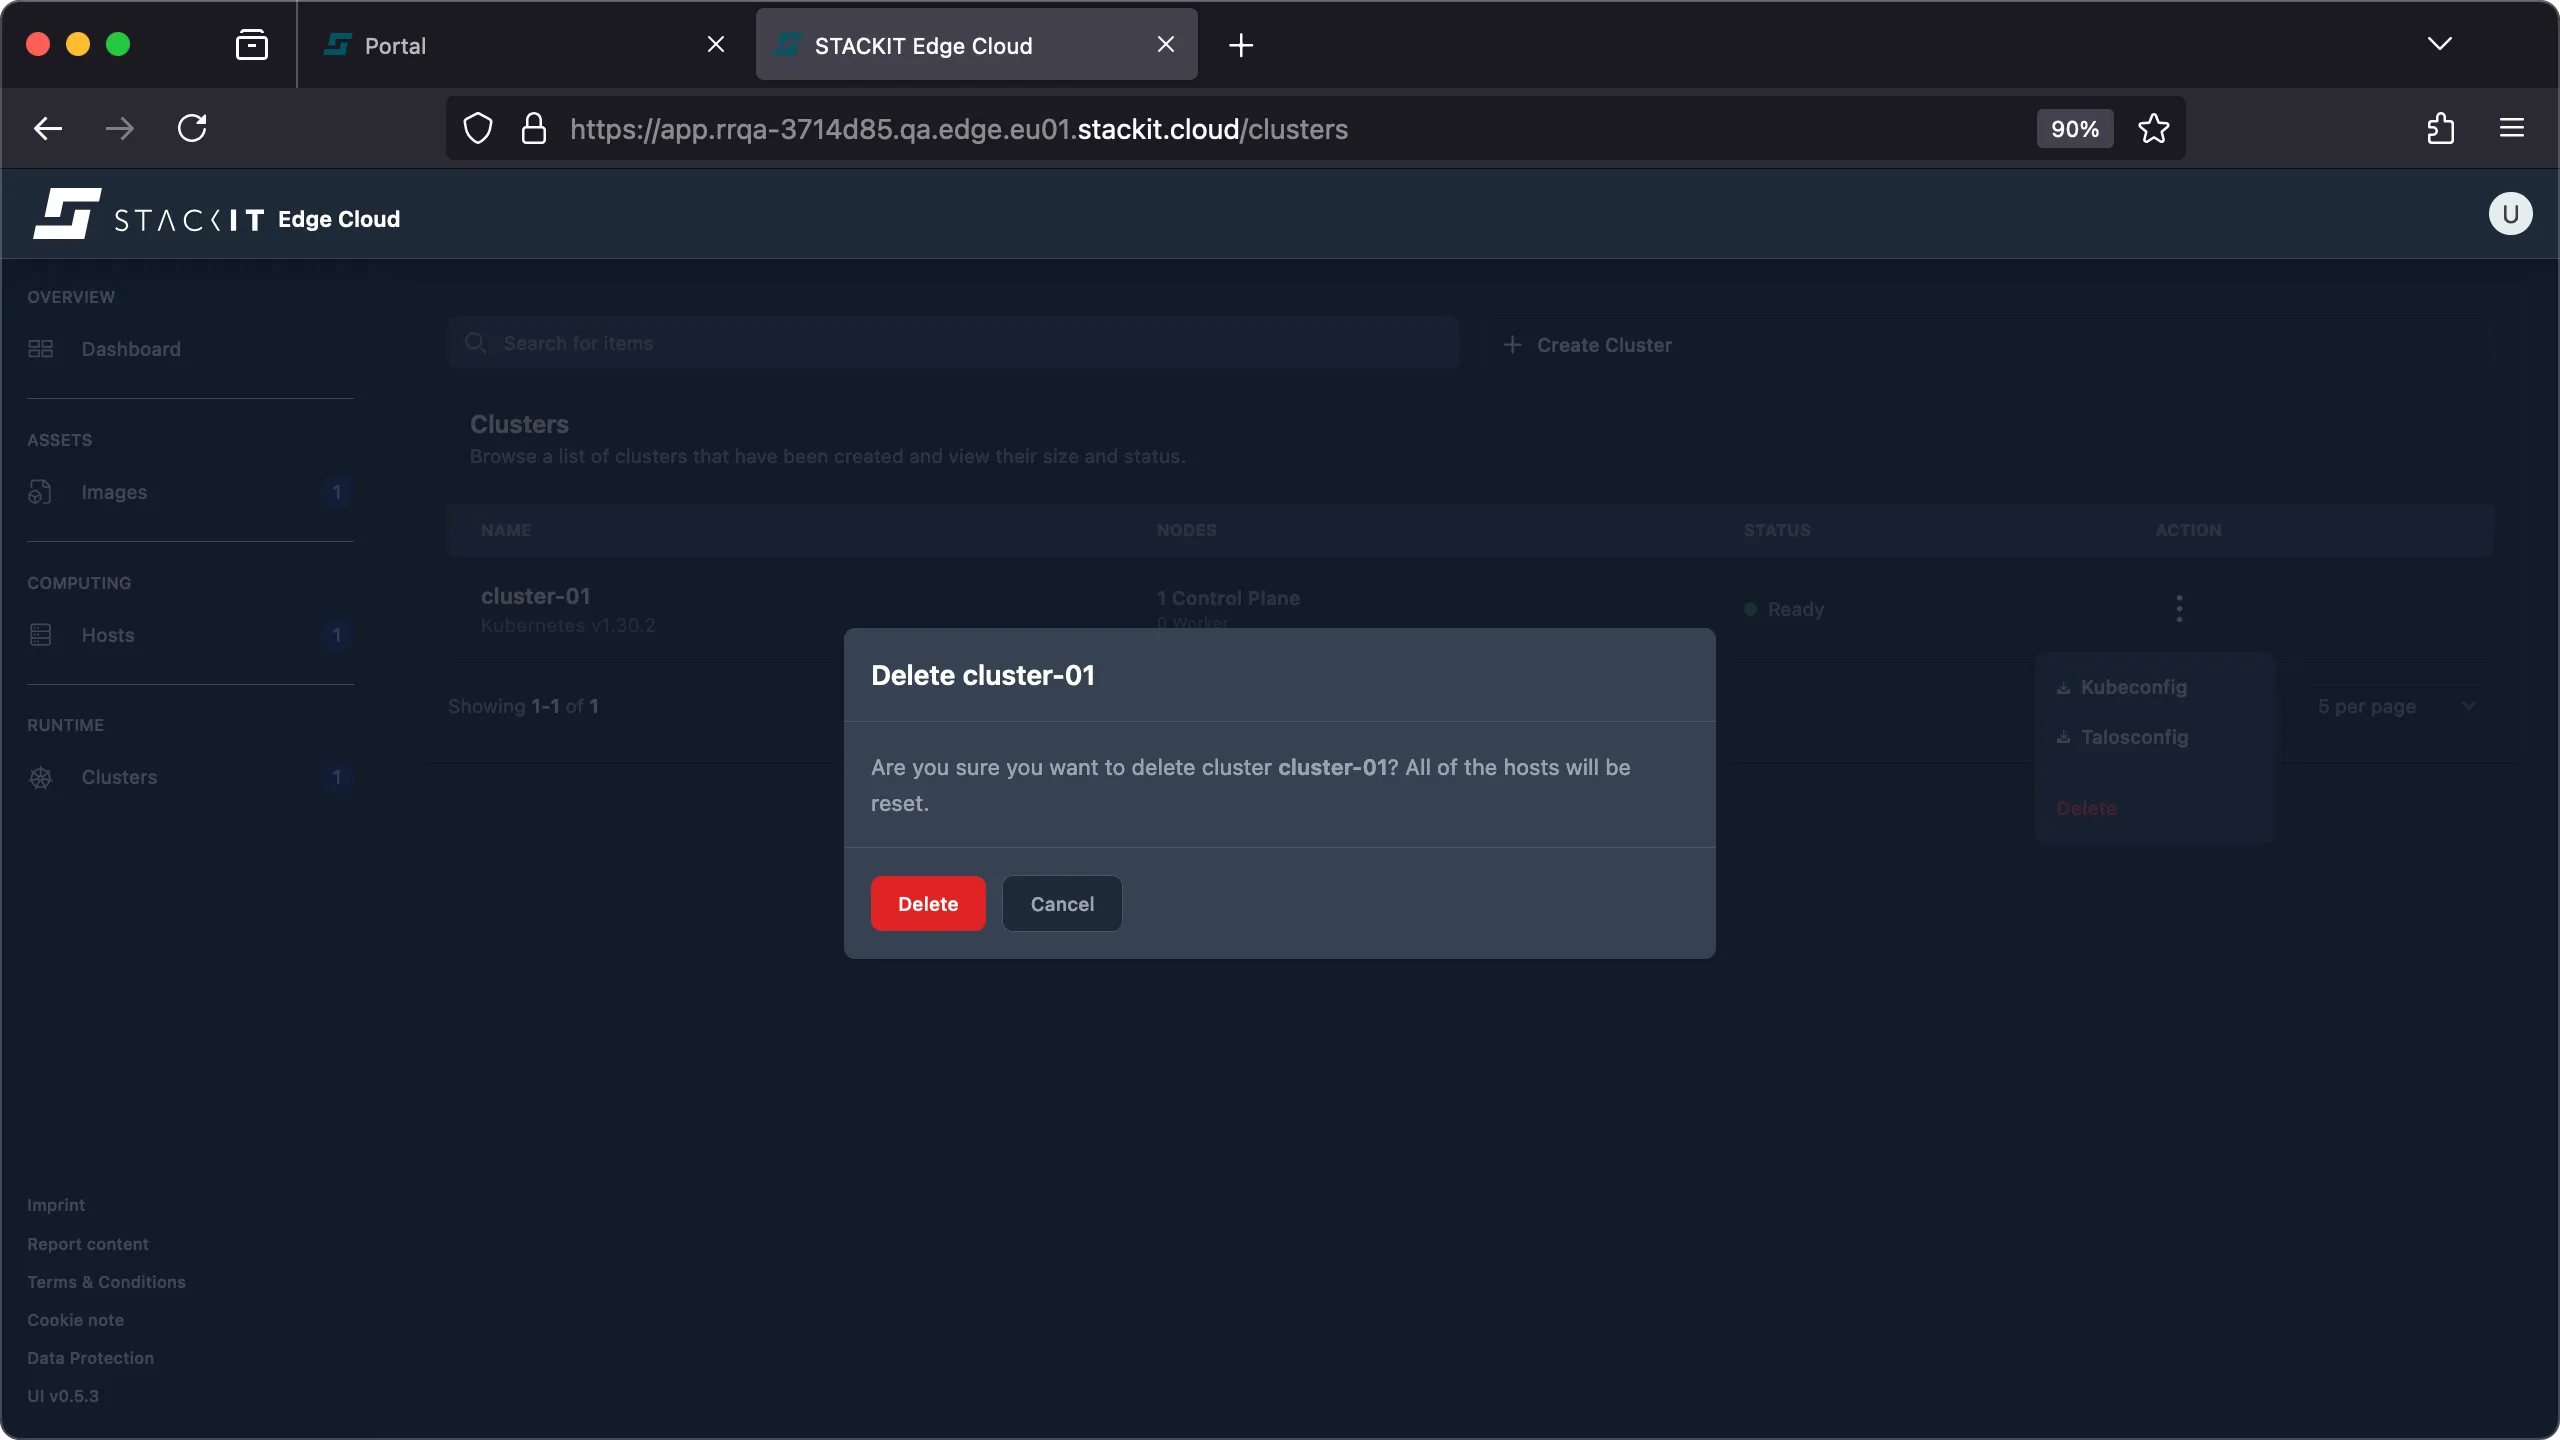
Section titled “Deleting a cluster”When a edge cluster is no longer needed you can delete it to free up resources.
When you delete a cluster the machine configuration of all hosts that are part of this cluster is removed and the hosts are reset. This means those hosts will be rebooted with the initial kernel parameters it’s image had when it was created. Any Kubernetes workload running on those hosts will be stopped and deleted.
When a host is reset the data saved on it might still be accessible. It is your responsibility to delete remaining data as needed.
Prerequisites:
- Successfully authenticated in the UI of a STEC instance.
Steps:
-
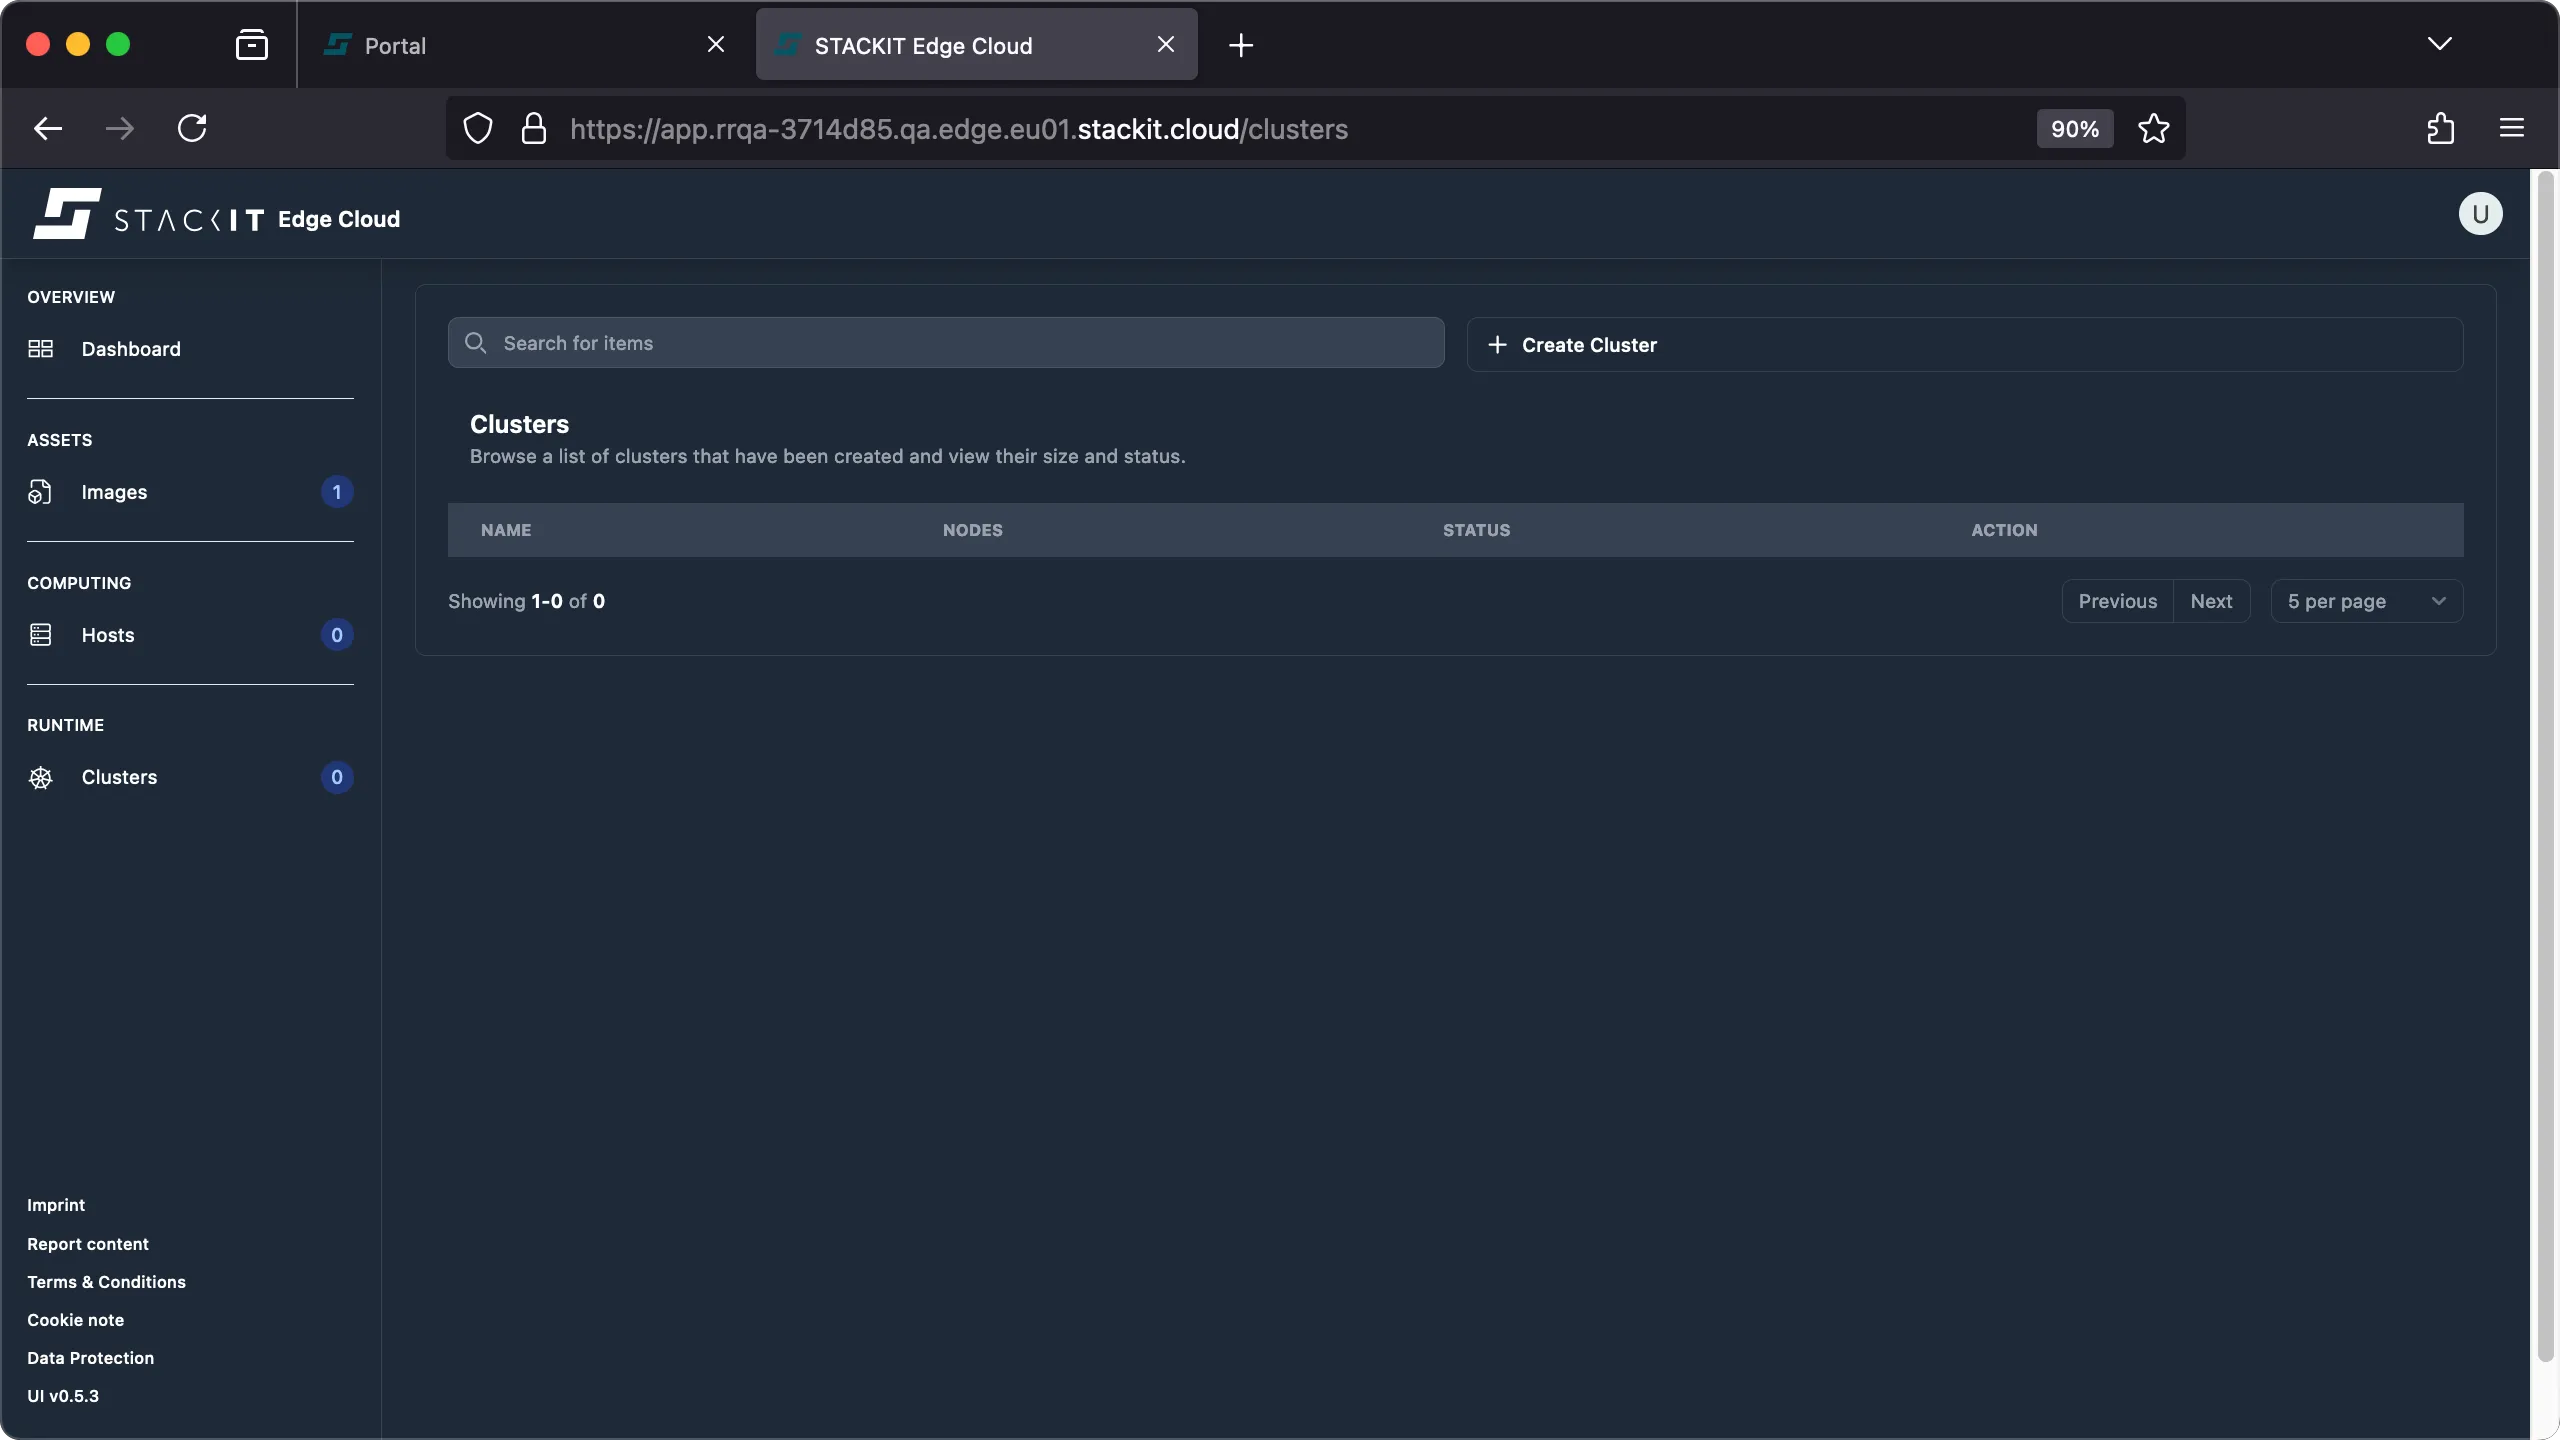
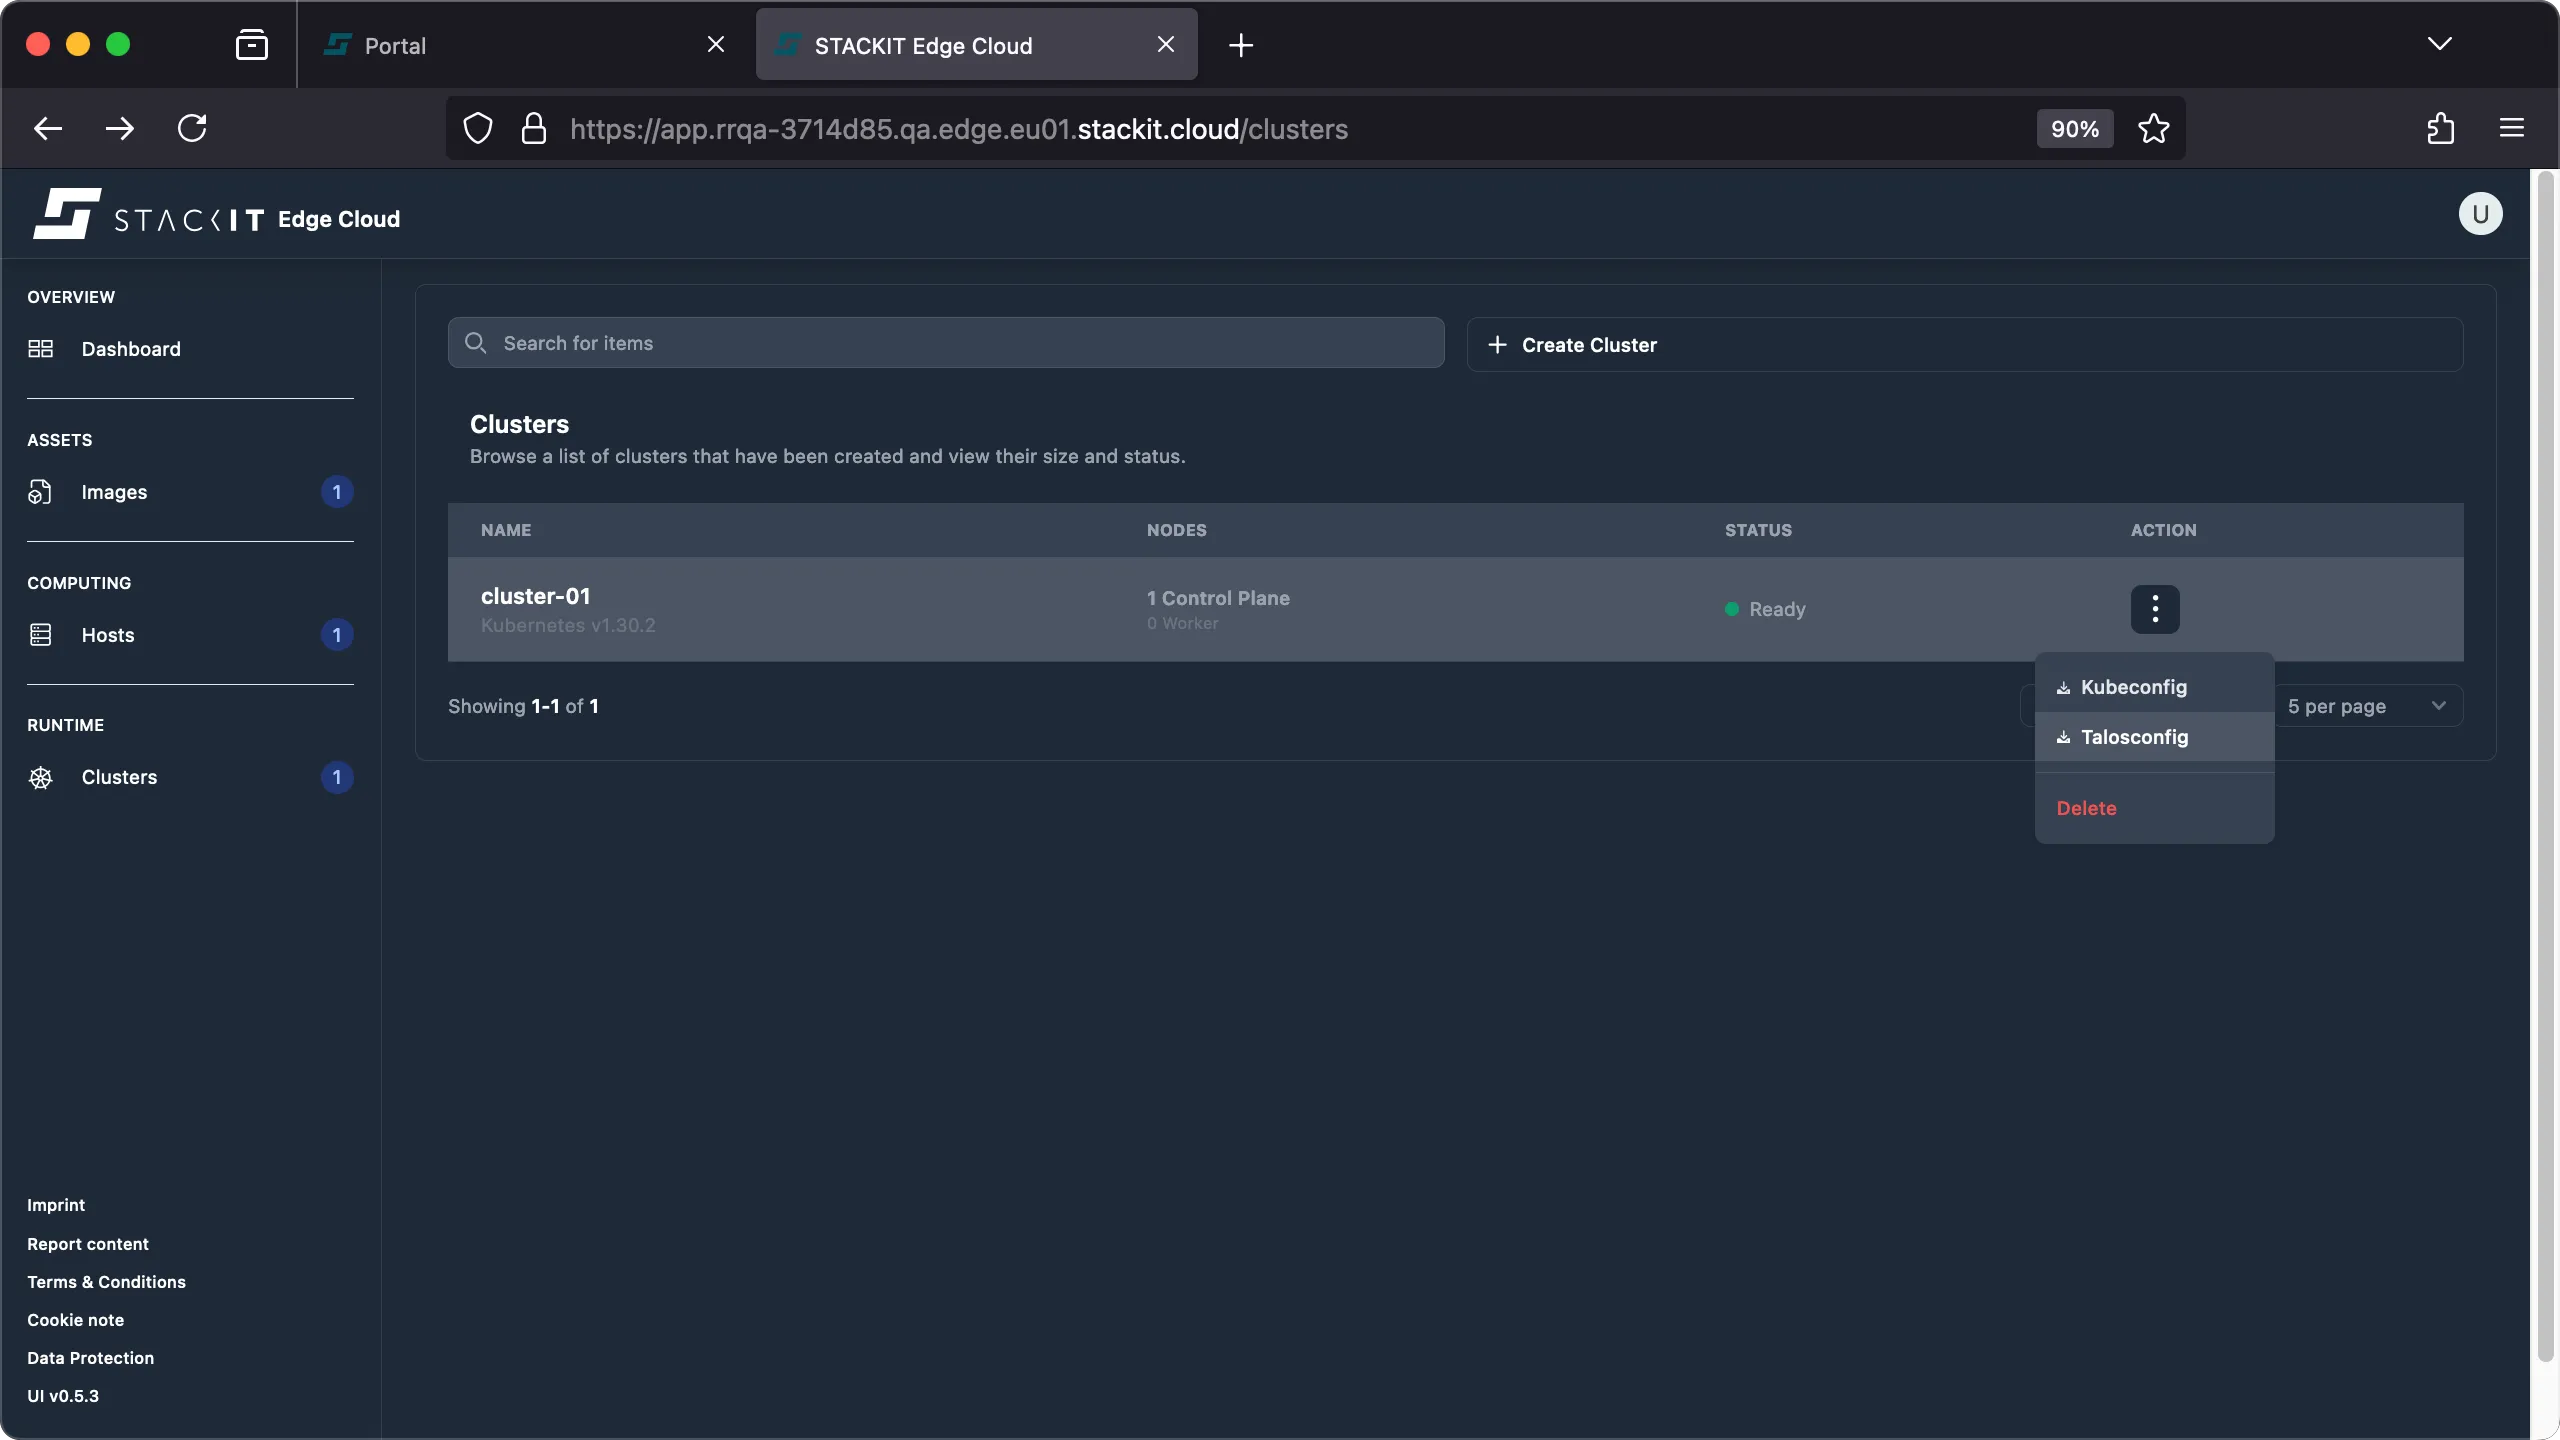
Navigate to the Clusters view in the UI.
-
Click the Action button of the cluster you want to delete and click on the ‘delete’ action.
-
The cluster is deleted. All hosts that are part of it will be reset.
Prerequisites:
- Successfully authenticated with a STEC instance.
- Kubeconfig for the STEC instance is exported in your terminal session.
- Tools: a generic Linux bash terminal,
kubectl,yq.
Steps:
-
Delete the EdgeCluster resource.
Terminal window > export KUBECONFIG=~/.kubeconfig/your-stec.kubeconfig.yaml> CLUSTER_NAME="cluster-01"> kubectl delete edgeclusters.edge.stackit.cloud/$CLUSTER_NAMEedgecluster.edge.stackit.cloud "cluster-01" deleted -
The cluster is deleted. All hosts that are part of it will be reset.