Deploy WordPress
Zuletzt aktualisiert am
This tutorial will show you how to deploy a WordPress site on your Kubernetes cluster and connect it with a managed STACKIT MariaDB database service.
Prerequisites
Section titled “Prerequisites”- Access to a running Kubernetes Cluster
- STACKIT Cloud Portal project
Deploy WordPress
Section titled “Deploy WordPress”Create a STACKIT MariaDB Database
Section titled “Create a STACKIT MariaDB Database”For the purpose of this guide we will use the STACKIT MariaDB Database offering. Please refer to the STACKIT MariaDB Documentation to find out how to create a new instance.
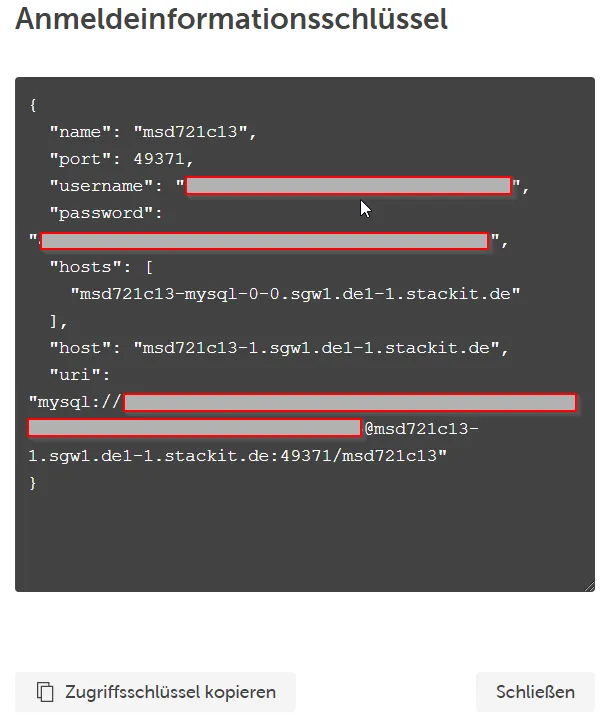
After you have a running MariaDB instance, you need to save the database details (name, port, username, password, host port) for the next step:
Now it’s time to switch over to your shell, configured to use your Kubernetes cluster (Accessing an SKE Cluster).
Create the cluster configuration
Section titled “Create the cluster configuration”Define a Kubernetes manifest named wordpress-deployment.yaml with the following content and replace the values in the stringData section with your MariaDB credentials. Check Docker Hub for newer image versions and replace the image tag.
wordpress-deployment.yaml:
apiVersion: v1kind: Secretmetadata:  name: mariadb  labels:    app: wordpressstringData:  db_host: "<HOST>:<PORT>"  db_name: "<NAME>"  db_user: "<USER>"  db_password: "<PASSWORD>"
---
apiVersion: v1kind: Servicemetadata:  name: wordpress  labels:    app: wordpressspec:  type: LoadBalancer  ports:  - name: wordpress    port: 80  selector:    app: wordpress
---
apiVersion: v1kind: PersistentVolumeClaimmetadata:  name: wordpress  labels:    app: wordpressspec:  accessModes:  - ReadWriteOnce  resources:    requests:      storage: 20Gi
---
apiVersion: apps/v1kind: Deploymentmetadata:  name: wordpress  labels:    app: wordpressspec:  selector:    matchLabels:      app: wordpress  template:    metadata:      labels:        app: wordpress    spec:      containers:      - name: wordpress        image: wordpress:5.8        env:        - name: WORDPRESS_DB_HOST          valueFrom:            secretKeyRef:              name: mariadb              key: db_host        - name: WORDPRESS_DB_NAME          valueFrom:            secretKeyRef:              name: mariadb              key: db_name        - name: WORDPRESS_DB_USER          valueFrom:            secretKeyRef:              name: mariadb              key: db_user        - name: WORDPRESS_DB_PASSWORD          valueFrom:            secretKeyRef:              name: mariadb              key: db_password        ports:          - containerPort: 80            name: wordpress        volumeMounts:          - name: wordpress-vol            mountPath: /var/www/html      volumes:      - name: wordpress-vol        persistentVolumeClaim:          claimName: wordpress
Now you are ready to trigger the actual deployment of WordPress. The manifest you’ve created above will create a secret with the database credentials, a service of type LoadBalancer for external access to WordPress, a persistent volume claim for storage and finally the WordPress deployment itself.
To apply the manifest to your cluster run:
kubectl apply -f wordpress-deployment.yamlTo view the status of your deployment run:
kubectl get deployment wordpressAs soon as all pods are ready you can connect to the WordPress deployment using the external IP of the service.
To get the external IP run:
kubectl get service wordpressIf the external IP is in status <pending> wait and recheck.
Now you can start with the configuration of your WordPress installation.
For that, access the WordPress installation in a browser by using the URL: http://<externalIP>.
That’s it! You’ve deployed WordPress on your Kubernetes cluster!