Create your first Workflows instance and run tasks on it
Last updated on
Prerequisites
Section titled “Prerequisites”- You have a STACKIT customer account: Create a customer Account
- You have a STACKIT user account: Create a user account
- You have a STACKIT project: Create a project
In this guide you create a Workflows instance, write your first DAG and trigger it.
Creating a Workflows instance
Section titled “Creating a Workflows instance”To order a Workflows instance, navigate to the product in STACKIT Portal and click on Create Workflows.
You must first enter some general information about the instance. Instance Name must not be longer than 25 characters and must be DNS-compliant (lowercase letters, numbers, hyphen). The chosen instance name will become part of the instance’s URL. Description is an optional field with a maximum of 255 characters.
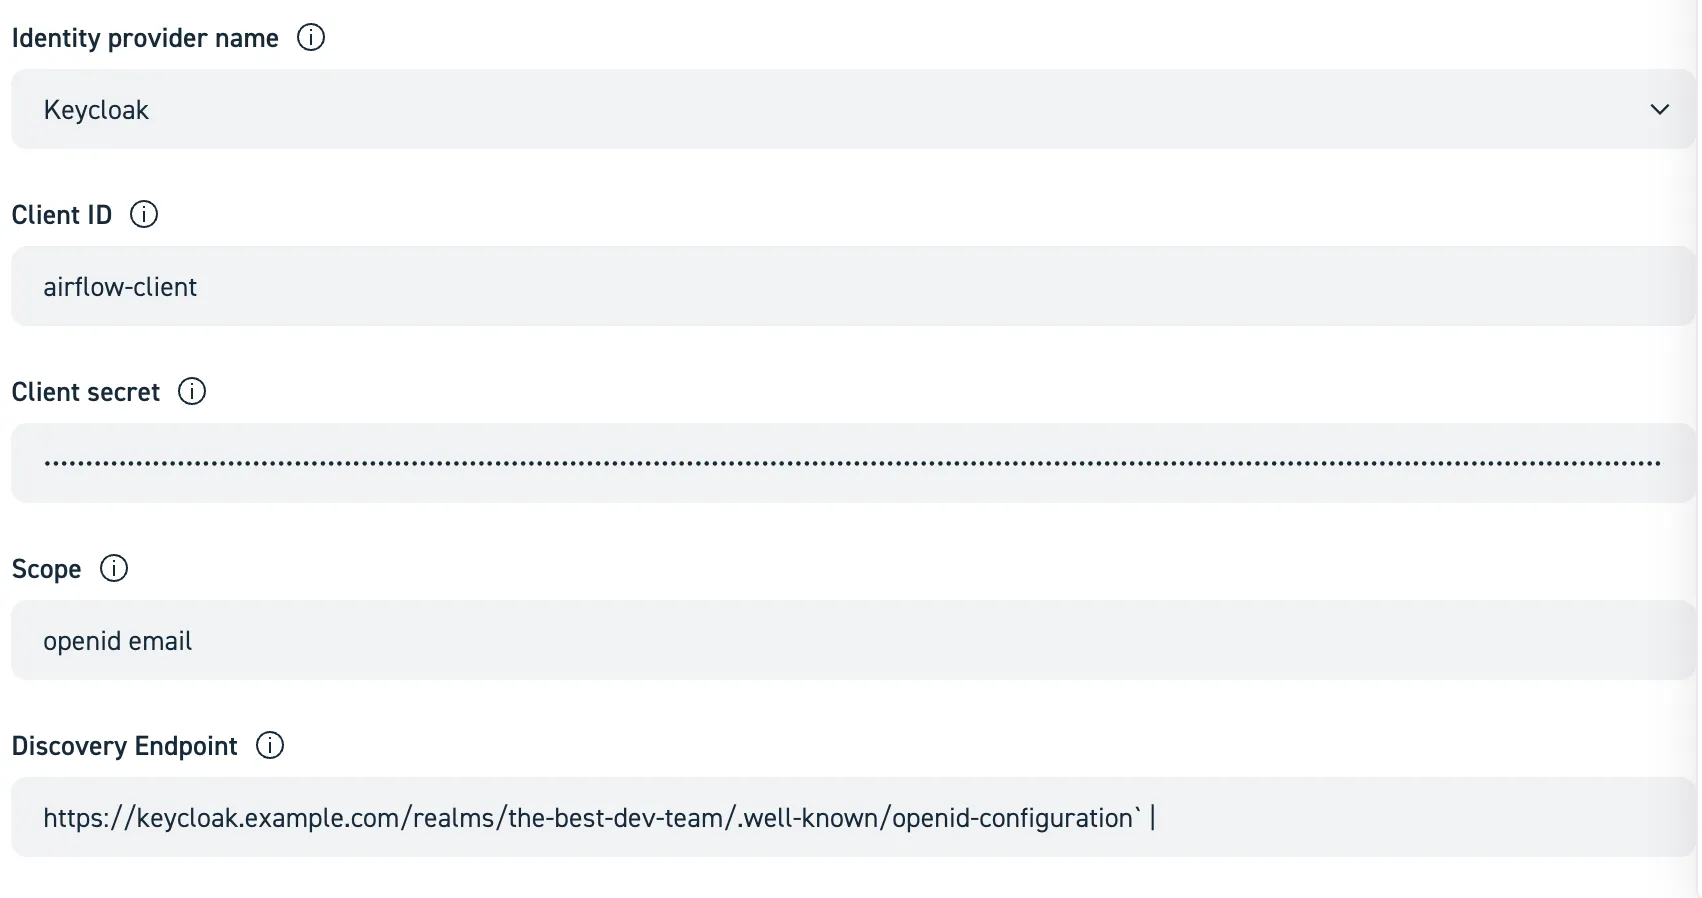
In this tutorial we show an implementation with Keycloak. Use our Create and manage instances for Workflow guide to gather more information on how to configure your IdP.
Let’s assume, that you’ve gotten the following credentials from your Keycloak administrator:
clientId | clientSecret | scope | discoveryEndpoint |
|---|---|---|---|
airflow-client | YDaXT@s&%7UikF7@q_NLFBVdfUHjX^ | openid email | https://keycloak.example.com/realms/the-best-dev-team/.well-known/openid-configuration |
Then simply enter them in the appropriate fields:
As mentioned above, Airflow DAGs are written as Python code. The code must be stored in a Git repository and STACKIT Workflows needs read access to the repository. At startup of the server, it clones the repository and then periodically syncs changes into Workflows. You must provide:
- DAG Repository URL (e.g.,
https://github.com/acme/myrepo.git) - Branch name (e.g., “main”)
- Username + Password or PAT (Personal Access Token)
- Monitoring To gain insights about the resource consumption, runtime, etc. of your DAGs, you can opt-in to export metrics to an already existing STACKIT Observability instance. Hint: an Observability instance with the plan “Observability-Monitoring-Basic-EU01” or higher is recommended. If you do plan to not also use it for log aggregation, use the “Monitoring-only” variant.
Running your first Python task
Section titled “Running your first Python task”This guide will walk you through the entire process of creating a simple workflow, adding it to your Git repository, and seeing it run in STACKIT Workflows.
-
Write your first DAG
A DAG (Directed Acyclic Graph, see also Apache Airflow 2.10 documentation is a Python file that defines your workflow’s tasks and their dependencies.
Create a new file on your local machine named
hello_world_dag.pyand paste the following code into it. This simple DAG has two tasks: one that returns “Hello” and another that prints the output from the first task and adds “World” plus some other message.from __future__ import annotationsimport pendulumfrom airflow.decorators import dag, task# 1. The @dag decorator defines the DAG@dag(dag_id="hello_world_taskflow",start_date=pendulum.datetime(2025, 1, 1, tz="Europe/Berlin"),schedule=None,catchup=False,tags=["example", "taskflow"],)def hello_world_dag():# 2. The @task decorator turns a function into a task@taskdef say_hello():print("Hello from a TaskFlow task!")return "Hello World"@taskdef say_world(message: str):print(f"The first task says: {message}")print("Workflows make orchestration easy!")# 3. Dependencies are inferred from function callsmessage_from_hello = say_hello()say_world(message_from_hello)# This line is needed to make the DAG visible to Airflowhello_world_dag() -
Add the DAG file to a DAGs folder
In the root of the Git repository you entered as DAGs Repository in the Portal-based setup, create a folder named
dags. Workflows automatically scans this folder for new workflow files.It is not required to name the folder
dags, but it’s considered as best practice, see also DAGs Repository in the Concepts section.Place your
hello_world_dag.pyfile inside thisdagsfolder. Your repository structure should look like this:your-dags-repo/└── dags/└── hello_world_dag.py -
Commit and push your changes
Save your changes to your Git repository using the following commands in your terminal:
Terminal window # Add the new DAG file to be tracked by Gitgit add dags/hello_world_dag.py# Save the changes with a descriptive messagegit commit -m "Add my first hello world DAG"# Push the changes to your remote repositorygit push -
See Your DAG in the Airflow UI
Since your repository is connected to the Workflows service, the system will automatically sync your changes. After at most a minute, your new DAG will appear in the Airflow UI.
Navigate to the Airflow UI for your Workflows instance.
Find hello_world_dag in the list of DAGs (you can also filter for the tag
exampleortaskflowbecause we tagged the DAG like that).Important: By default, new DAGs are paused. Click the toggle switch on the left to unpause it and make it active.
-
Trigger and monitor your DAG
To run your workflow immediately, click the “Play” (▶️) button on the right-hand side.
Click on the DAG name (hello_world_dag) to go to the Grid View. You will see the DAG Run appear. Click on
Graphto see the execution graph of the DAG. The squares will turn green as each task successfully completes.You can click on any green square and then on the “Logs” tab to see the output from your tasks, like “Hello from your first Airflow task!”.
Congratulations! You have successfully authored and ran your first workflow.
Running your first Spark task
Section titled “Running your first Spark task”In this section, we demonstrate how you can run Spark Tasks on an existing Spark cluster from within STACKIT Workflows. The next section shows a more convenient version using STACKIT Spark Operator which does not require an existing Spark cluster.
Your First Spark DAG: A Step-by-Step Guide This guide will show you how to submit a simple PySpark script as a workflow using Airflow. We’ll create a Spark script, define an Airflow DAG to run it, and monitor the job in the Airflow UI. See also Apache Spark Operators.
Prerequisites:
A configured Spark environment that your Workflows service can submit jobs to. The environment must be configured in
Airflow as a Spark connection named spark_default.
-
Write Your PySpark script
First, create a simple Spark script. This example script creates a small DataFrame, shows its content, and finishes.
Create a new file named
hello_spark.pyon your local machine and paste the following code into it:hello_spark.py from pyspark.sql import SparkSessionif __name__ == "__main__":# 1. Create a SparkSessionspark = SparkSession.builder.appName("HelloWorldSpark").getOrCreate()print("SparkSession created successfully!")# 2. Create a sample DataFramedata = [("Alice", 1), ("Bob", 2)]columns = ["name", "id"]df = spark.createDataFrame(data, columns)# 3. Show the DataFrame contentprint("Sample DataFrame:")df.show()# 4. Stop the SparkSessionspark.stop()print("Spark job finished successfully!") -
Write the Airflow DAG to submit the script
Next, create the Airflow DAG that will submit this script to your Spark cluster. This DAG uses the SparkSubmitOperator.
Create a new file named
spark_submit_dag.pyand paste the following code into it:spark_submit_dag.py from __future__ import annotationsimport pendulumfrom airflow.decorators import dagfrom airflow.providers.apache.spark.operators.spark_submit import SparkSubmitOperator@dag(dag_id="spark_submit_hello_world_taskflow",start_date=pendulum.datetime(2025, 1, 1, tz="Europe/Berlin"),schedule=None,catchup=False,tags=["example", "spark", "taskflow"],)def spark_submit_dag():"""This DAG submits a simple Spark script using the TaskFlow API."""submit_spark_job = SparkSubmitOperator(task_id="submit_hello_spark_job",application="/dags/tasks/hello_spark.py",conn_id="spark_default",verbose=True,)# 3. Call the function at the end of the file to create the DAG object.spark_submit_dag() -
Structure and push your code Create a scripts folder for your PySpark file and a dags folder for your DAG file. This keeps your project organized.
Your repository structure should look like this:
your-dags-repo/├── dags/│ └── spark_submit_dag.py└── dags/tasks/└── hello_spark.pyNow, commit and push these new files to your Git repository.
-
Trigger and monitor in Airflow
As before, after your Git repository is synced with the Workflows service, find the spark_submit_hello_world DAG in the Airflow UI.
- Unpause the DAG using the toggle switch on the left.
- Trigger the DAG by clicking the “Play” (▶️) button.
- Click on the DAG run to monitor its progress. When the task turns green, click on it and view the Logs. You will see the output from the spark-submit command and the print statements from your script, including the DataFrame table.
Using the STACKIT Spark Operator
Section titled “Using the STACKIT Spark Operator”When using the STACKIT Spark operator, no pre-existing Spark cluster is required. Instead, you can define the required Spark resources via decorator parameters and the Spark environment is then created on-fly-in in a Kubernetes cluster.
-
Write your DAG
Create a new file named
stackit_spark.pyon your local machine and paste the code below into it. The code contains different examples how to use STACKIT’s Spark operator. Please read the code and especially the comments carefully.import pendulumfrom airflow.decorators import dag, taskfrom stackit_airflow.airflow_plugin.decorators import stackitfrom stackit_airflow.airflow_plugin.operators import StackITSparkOperator# It is good practice but not required to specify the image to use.default_kwargs = {"image": "schwarzit-xx-sit-dp-customer-artifactory-docker-local.jfrog.io/stackit-spark:spark3.5.3-0.1.2"}@dag(schedule=None,start_date=pendulum.datetime(2021, 1, 1, tz="UTC"),catchup=False,tags=["demo"],dag_id="04_simple_spark",)def simple_spark():# This is a regular task using the airflow taskflow API@task()def generate_number():import randomreturn random.randint(1, 100)# This is the STACKIT Workflows Spark Kubernetes provider which makes it easy to run spark jobs from Workflows.# By default, this launches a single node spark with 1 CPU and 6 GB RAM.@stackit.spark_kubernetes(**default_kwargs)def spark_single_node(random_number: int):import stackit_sparkimport pandas as pdspark = stackit_spark.get_spark()df = spark.createDataFrame(pd.DataFrame({"random_number": [random_number]}))df.show()# If we need more resources, we can specify them with the `cpu` and `memory_gb` parameters.# By default, memory is calculated as: Memory in GB = 6 * CPU.# Memory can also be specified explicitly.@stackit.spark_kubernetes(cpu=8, memory_gb=50)def spark_single_node_large(random_number: int):import stackit_sparkimport pandas as pdimport timespark = stackit_spark.get_spark()data = pd.DataFrame({"random_number": [random_number]})df = spark.createDataFrame(data)df.show()time.sleep(60)# You can optionally specify the resources and also the number of executors.# `cpu` and `memory_gb` set resources for the driver, `executor_cpu` and `executor_memory_gb`# set resources for the executors.# If memory is not specified, it is calculated based on the specified CPUs. (1 CPU = 6 GB RAM)# `executors` sets the number of executors.# This uses by default a stackit provided spark image. It can be overridden.# For many tasks one spark node is enough.# However, for very large transformations, we might need to spin up a cluster.## Take this step only if you need more than ~16 CPUs and 128 GB RAM.# Running Spark in cluster mode can sometimes even hurt performance as# data needs to be shuffled between nodes - and Network I/O is often the bottleneck.## `cpu` and `memory_gb` can still be used to configure the driver.# Executors are configured with `executor_cpu` and `executor_memory_gb`.# The number of executors can be set with `executors`. Each executor# gets the resources specified in `executor_cpu` and `executor_memory_gb`.@stackit.spark_kubernetes(cpu=2, executors=3, executor_cpu=2, **default_kwargs)def spark_cluster(random_number: int):import stackit_sparkimport pandas as pdimport time# You can customize spark here:spark = stackit_spark.get_spark(additional_config={"spark.sql.shuffle.partitions": 200,"spark.executor.memoryOverhead": "1g",# We add additional jars from maven"spark.jars.packages": "org.apache.hadoop:hadoop-azure-datalake:3.3.4,org.apache.hadoop:hadoop-azure:3.3.4,",})data = pd.DataFrame({"random_number": [random_number]})df = spark.createDataFrame(data)df.show()sc = spark._jsc.sc()executors = [executor.host() for executor in sc.statusTracker().getExecutorInfos()]print(f"Executors: {executors}")time.sleep(60)# Instead of using the taskflow API, you can also use an operator and specify a script to# be executed.t1 = StackITSparkOperator(task_id="spark_operator",# You can use here all parameters that you already learned about above.cpu=2,# Specify a relative path here from the root of the DAGs Repositoryscript="/dags/tasks/hello_spark.py", #From the previous example**default_kwargs,)# When using the StackITSparkOperator, the script is run in the context of# the git repository it is contained in. This means you can use imports inside# of scripts!# Per default, the script is expected to be in the same repository as this DAG.# If it is in another repository, you can specify the git_* arguments of the# operator. Check the `spark-full-configuration.py` example below.t1 = StackITSparkOperator(task_id="spark_operator_with_imports",# You can use here all parameters that you already learned about above.cpu=2,# Specify a relative path here from the root of the DAGs Repositoryscript="/dags/tasks/my_spark_job_with_imports.py",**default_kwargs,)# Even when using your own image, you can still use this operator to execute# a python script in any git repository in the context of your image. You# won't be able to use the `stackit_spark` module in this case.# `python` needs to be installed in the image.t1 = StackITSparkOperator(task_id="run_script_in_custom_image",# You can use here all parameters that you already learned about above.# This will still set the resource requests of your pod!cpu=2,# Specify a relative path here from the root of the DAGs Repositoryscript="/dags/tasks/basic_python_script.py",image="python:3.12-slim-bullseye",# All pods must run as non-root users. We recommend to use images# that already run as non-root users.security_context={"runAsUser": 1000},)random_number = generate_number()spark_single_node(random_number)spark_single_node_large(random_number)spark_cluster(random_number)random_number >> t1simple_spark()Copy & paste the following snippets to your
dags/tasks/folder. The filename is always given in the first line a comment.dags/tasks/my_spark_job.py import stackit_sparkimport timeimport pandas as pdspark = stackit_spark.get_spark()data = pd.DataFrame({"number": [10]})df = spark.createDataFrame(data)time.sleep(30)df.show()dags/tasks/my_tools/say_hello.py def say_hello():print("Hello from say_hello()")dags/tasks/my_spark_job_with_imports.py import stackit_sparkimport pandas as pdfrom my_tools.say_hello import say_hellosay_hello()spark = stackit_spark.get_spark()data = pd.DataFrame({"number": [10]})df = spark.createDataFrame(data)df.show()dags/tasks/basic_python_script.py # Print current dateimport datetime# You can use libraries baked into your own container image here# import awesome_libprint("Hello from basic_python_script.py")print(f"The current date is {datetime.datetime.now()}") -
Structure and push your code
As before, create a scripts folder for your PySpark and plain Python files and a dags folder for your DAG file.
Your repository structure should look like this:
your-dags-repo/└─ dags/├── stackit_spark.py└── tasks/├── my_spark_job.py├── my_spark_job_with_imports.py├── basic_python_script.py└── say_hello.pyNow, commit and push these new files to your Git repository.
-
Trigger and monitor in Airflow
As before, after your Git repository is synced with the Workflows service, find the spark_submit_hello_world DAG in the Airflow UI.
- Unpause the DAG using the toggle switch on the left.
- Trigger the DAG by clicking the “Play” (▶️) button.
- Click on the DAG run to monitor its progress. When the task turns green, click on it and view the Logs. You will see the output from the spark-submit command and the print statements from your script, including the DataFrame table.
Additional insights with STACKIT Observability
Section titled “Additional insights with STACKIT Observability”If you have opted-in for monitoring during STACKIT Workflows setup, detailed metrics about the health and workload of
your Workflows instance will be pushed to your STACKIT Observability instance.
The instance contains a dashboard named STACKIT Workflows that contains charts showing the status of the cluster itself
and detailed metrics about workflow running, e.g., CPU and memory consumption.