Create your first instance of SQLServer Flex and connect to it
Last updated on
Prerequisites
Section titled “Prerequisites”- You have a STACKIT customer account: Create a customer Account
- You have a STACKIT user account: Create a user account
- You have a STACKIT project: Create a project
Prepare, order and create an instance
Section titled “Prepare, order and create an instance”In this Getting started guide you will create an instance and configure it. This guide shows the most common settings for a small developer environment. When following this guide, you will work with the STACKIT Portal.
- Visit the STACKIT Portal
- On the sidebar click on SQLServer Flex. 3. On the bar on the top click on Create SQLServer Flex.
After completing the steps, you see an overlay with three sections (General information, Plans and Setup).
General information
Section titled “General information”- Either leave the name for the instance as it is or insert a custom one.
- Select General purpose (Single) as instance type.
- Leave the plan settings as they are (4 CPUs and 16 GB RAM) unless you know in advance how much resources you’ll need. You can change the plan anytime by selecting Plans in the sidebar.
- Select premium-perf6-stackit as Performance class.
-
Adjust the Disk size according to you needs. It is safe to start with 5 GB. You can enlarge it anytime.
-
Select the SQLServer Flex version you want to use. For new projects we recommend to use the newest available version.
-
Select the schedule for daily backups.
-
Add your clients IPv4 address to the list of ACLs.
If you want to connect with the computer, with which you are browsing these docs, use Cloudflare’s IP trace tool to determine your IPv4 address. Open your browser of choice and visit the Cloudflare Trace Tool. Copy the value behind
ip. It should look likexxx.xxx.xxx.xxx. Now append/32to it and add it as ACL entry. To do so, click on Add IP Range and paste it in the field.
After reviewing every setting, click on Order fee-based to create your new instance. Then you will see a confirmation that your instance is created. Your new instance will be added to the list of instances. After a few minutes it will switch from Creating to Active.
Configure your instance
Section titled “Configure your instance”To make any changes to your instance, you need to select it. Please click on the sidebar on SQLServer Flex and then on your newly created instance. Then the overview page of you instance will be displayed.
Create a user and copy the credentials
Section titled “Create a user and copy the credentials”-
Navigate to SQLServer Flex and select the database server where you want to create a database.
-
Select Users in the menu.
-
Click on Create user.
-
Enter the username and select the roles for this user.
The first user must be assigned to the roles ##STACKIT_LoginManager## (for creating additional logins) and ##STACKIT_DatabaseManager## (for creating databases).
-
Select the default database for this user.
If you do not select a database or if none is available for selection, tempdb is assigned to the user as the default database.
-
Click on Create.
-
Copy the created credentials and save them in a secure location.
These login details cannot be retrieved later.
-
Click on Done.
Connect to your new instance
Section titled “Connect to your new instance”You can connect to SQLServer Flex instances using any client tool that supports SQL Server as a source connection. Below are examples of connecting using SQL Server Management Studio and Azure Data Studio as client tools.
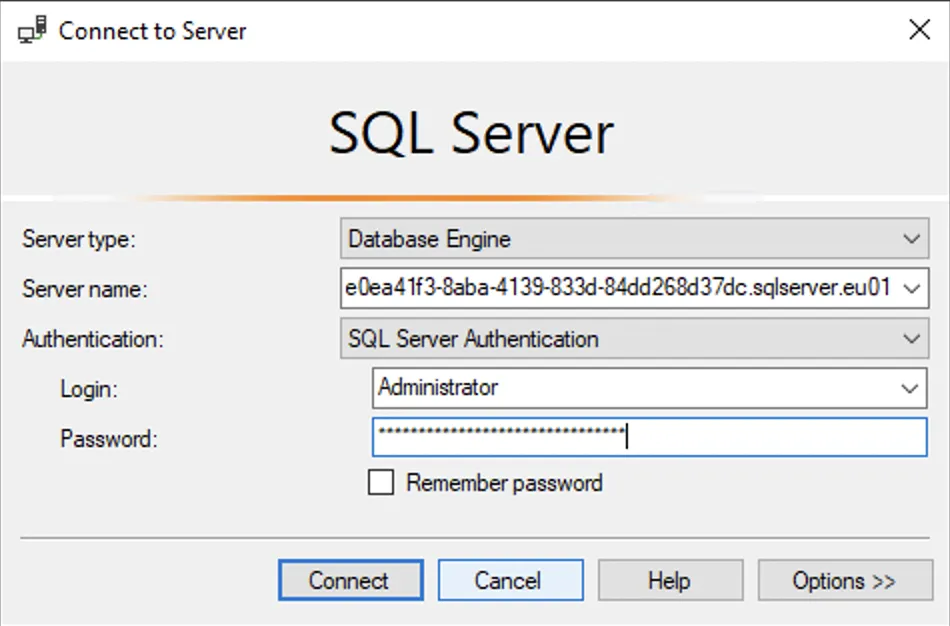
To connect to the SQLServer Flex instance via SQL Server Management Studio (SSMS), the following parameters must be defined:
| Parameter | Suggested values |
|---|---|
| Server type | Database Engine |
| Server name | The fully qualified server name (<instance ID>.sqlserver.eu01.onstackit.cloud)On the overview page of your created SQLServer Flex Instance you find the Instance ID |
| Authentication | SQL Server Authentication |
| User name | SQL Server login name Use the user name you just create in step Create a user and copy the credentials |
| Password | SQL Server login password Use the password you just create in step Create a user and copy the credentials |
See the screenshot below for an example of the parameters.
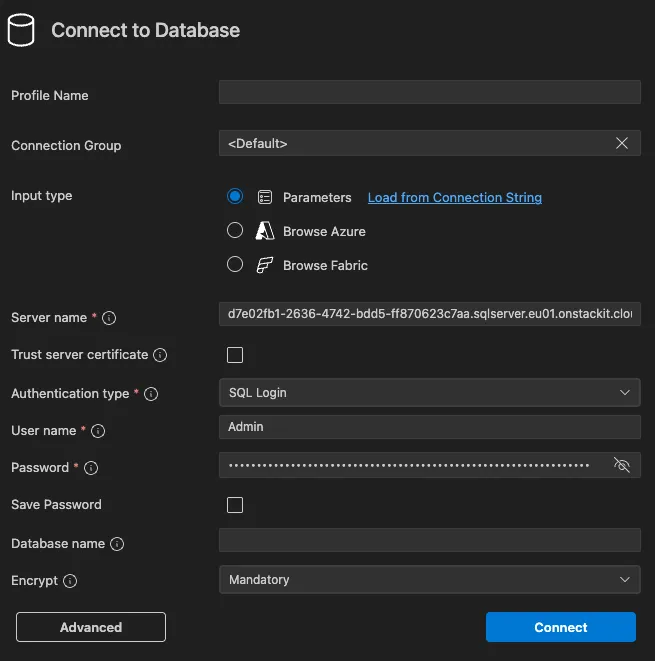
To connect to the SQLServer Flex instance via Visual Studio Code, the following parameters must be defined in the MSSQL Server Extension:
| Parameter | Suggested values |
|---|---|
| Input type (checkbox) | Parameters |
| Server | The fully qualified server name (<instance ID>.sqlserver.eu01.onstackit.cloud) |
| Authentication Type | SQL Login |
| User name | SQL Server login name |
| Password | SQL Server login password |
Use the user name an password you just create in step Create a user and copy the credentials
See the screenshot below for an example of the parameters.
Once your client has established a connection, you can start working in your SQLServer Flex instance. You can now create databases, create tables, query data, and connect your applications to the instance. For more information on specific features and best practices, see the following chapters in this documentation.
Insert and query data
Section titled “Insert and query data”To get familiar with SQLServer Flex you can insert and query some sample data.
At first create a table and insert a small dataset:
CREATE DATABASE book_db;
CREATE TABLE book_db.dbo.Books(  BookId     INT IDENTITY(1,1) PRIMARY KEY,  Title      NVARCHAR(200) NOT NULL,  Genre      NVARCHAR(100) NULL,  [Year]     INT NULL,  Author     NVARCHAR(100) NULL,  [Type]     NVARCHAR(50) NULL,  CreatedAt  DATETIME2(0) NOT NULL CONSTRAINT DF_Books_CreatedAt DEFAULT SYSUTCDATETIME());
INSERT INTO book_db.dbo.Books (Title, Genre, [Year], Author, [Type])VALUES  (N'The White Lioness', N'Thriller', 1993, N'Henning Mankell', N'novel'),  (N'1984', N'Dystopian Fiction', 1949, N'George Orwell', N'novel'),  (N'The Hobbit', N'Fantasy', 1937, N'John Tolkien', N'novel');
The database should answer with a reply which is similar to:
Started executing query at Line 1(3 rows affected)Total run time: 00:00:00.058Now you can search for one entry in the dataset. This corresponds with a use case where a user searches in the frontend for a specific book:
SELECT * FROM book_db.dbo.Books WHERE Title LIKE N'%Hobbit%';You get the following output:
| BookId | Title | Genre | Year | Author | Type | CreatedAt |
|---|---|---|---|---|---|---|
| 3 | The Hobbit | Fantasy | 1937 | John Tolkien | novel | 2025-10-08 05:37:42 |
Now you ran some basic commands with the database. From here on you can dig deeper with the How-tos.