Erste Key Value Store-Instanz erstellen und verbinden
Zuletzt aktualisiert am
Voraussetzungen
Abschnitt betitelt „Voraussetzungen“- Sie besitzen ein STACKIT-Kundenkonto: Kundenkonto erstellen
- Sie besitzen ein STACKIT-Benutzerkonto: Benutzerkonto erstellen
- Sie besitzen ein STACKIT-Projekt: Projekt erstellen
Instanz vorbereiten, bestellen und erstellen
Abschnitt betitelt „Instanz vorbereiten, bestellen und erstellen“Anhand dieser Anleitung erstellen und konfigurieren Sie Ihre erste Instanz. Sie zeigt die gängigen Einstellungen für eine kleine Entwicklerumgebung. Dabei nutzen Sie das STACKIT Portal. Zur Verwaltung von Instanzen stehen auch alternative Werkzeuge zur Verfügung. Für ein tieferes Verständnis lesen Sie Instanzen für Key Value Store erstellen und verwalten.
- Navigieren Sie im STACKIT Portal zu Key Value Store
- Wählen Sie in der oberen Leiste Key Value Store erstellen.
Anschließend sehen Sie ein Overlay mit drei Abschnitten (Allgemeine Informationen, Pläne und Benutzerdefinierte Parameter).
Allgemeine Informationen
Abschnitt betitelt „Allgemeine Informationen“- Belassen Sie den Instanznamen für die Instanz entweder wie er ist oder geben Sie einen benutzerdefinierten Namen ein.
- Wählen Sie unter Instanz-Version die Key Value Store-Version aus, die Sie verwenden möchten. Wir empfehlen die Nutzung der neuesten verfügbaren Version.
- Belassen Sie die Einstellung für den Plan wie sie ist (1 Node, 1 vCPU, 4 GB RAM und 10 GB Festplatte), außer Sie kennen im Voraus die genau benötigten Ressourcen. Sie können den Plan später nur innerhalb bestimmter Grenzen ändern.
Benutzerdefinierte Parameter
Abschnitt betitelt „Benutzerdefinierte Parameter“- Belassen Sie die Einstellungen für den Disk Threshold wie sie sind (80%).
- Fügen Sie die IPv4-Adresse Ihres Clients zur Liste der ACL IP Range hinzu.
IPv4-Adresse zur Liste hinzufügen: Wenn Sie sich von dem Computer aus verbinden möchten, mit dem Sie diese Dokumentation lesen, verwenden Sie das IP-Trace-Tool von Cloudflare, um Ihre IPv4-Adresse zu ermitteln. Öffnen Sie das IP-Trace-Tool im Browser und kopieren Sie den Wert hinter ip. Er sollte so aussehen: xxx.xxx.xxx.xxx. Hängen Sie nun /32 an diesen Wert an und fügen Sie ihn als ACL-Eintrag hinzu. Trennen Sie diesen dazu mit einem vorangestellten Komma von den bestehenden Einträgen.
Für ein tieferes Verständnis von ACL-Einträgen besuchen Sie Instanzen für Key Value Store erstellen und verwalten.
Prüfen und Bestellen: Nachdem Sie alle Einstellungen überprüft haben, wählen Sie Kostenpflichtig bestellen. Anschließend erscheint eine Bestätigung, dass die Instanz erstellt wird. Die Instanz wird zur Liste der Instanzen hinzugefügt. Innerhalb weniger Minuten wechselt ihr Status von In Bearbeitung zu Aktiv.
Ihre Instanz konfigurieren
Abschnitt betitelt „Ihre Instanz konfigurieren“Navigieren Sie im STACKIT Portal zu Key Value Store und wählen Sie die erstellte Instanz. Die Übersichtsseite Ihrer Instanz erscheint.
Zugangsdaten erstellen
Abschnitt betitelt „Zugangsdaten erstellen“- Wählen Sie in der Seitenleiste Zugangsdaten.
- Wählen Sie Zugangsdaten erstellen.
- Kopieren Sie die Informationen aus dem Popup an einen sicheren Ort.
- Wählen Sie Schließen.
Mit der Instanz verbinden
Abschnitt betitelt „Mit der Instanz verbinden“Um eine Verbindung zur Instanz herzustellen, benötigen Sie eine Client-Software. In dieser Anleitung verwenden wir Redis Insight. Dies können Sie auf der Redis Insight Download-Seite herunterladen. Eine Alternative ist der Befehl valkey-cli. Für weitere Informationen besuchen Sie die Valkey CLI-Dokumentation.
Folgen Sie den Anweisungen Ihres Betriebssystems, um das heruntergeladene Redis Insight-Installationspaket zu installieren. Öffnen Sie nach erfolgreicher Installation Redis Insight und fügen Sie Ihre Verbindung hinzu:
- Öffnen Sie Redis Insight und wählen Sie Add Redis database.
- Fügen Sie die Verbindungs-URI/URL, die Sie im Abschnitt Zugangsdaten erstellen erhalten haben, in das Feld Connection URL ein.
- Wählen Sie dann Connection Settings und wechseln Sie zum Reiter Security.
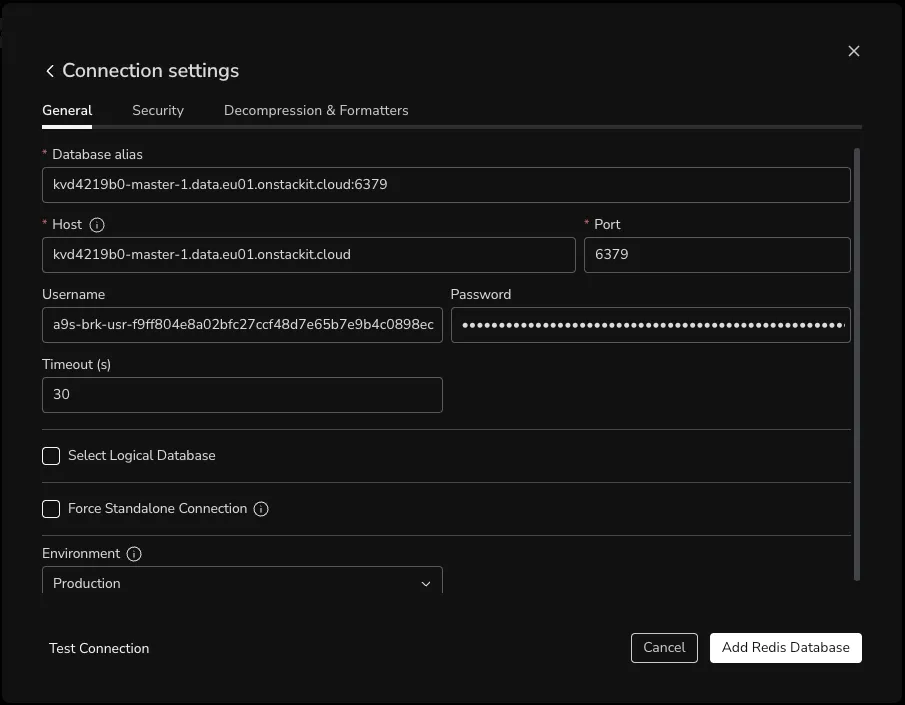
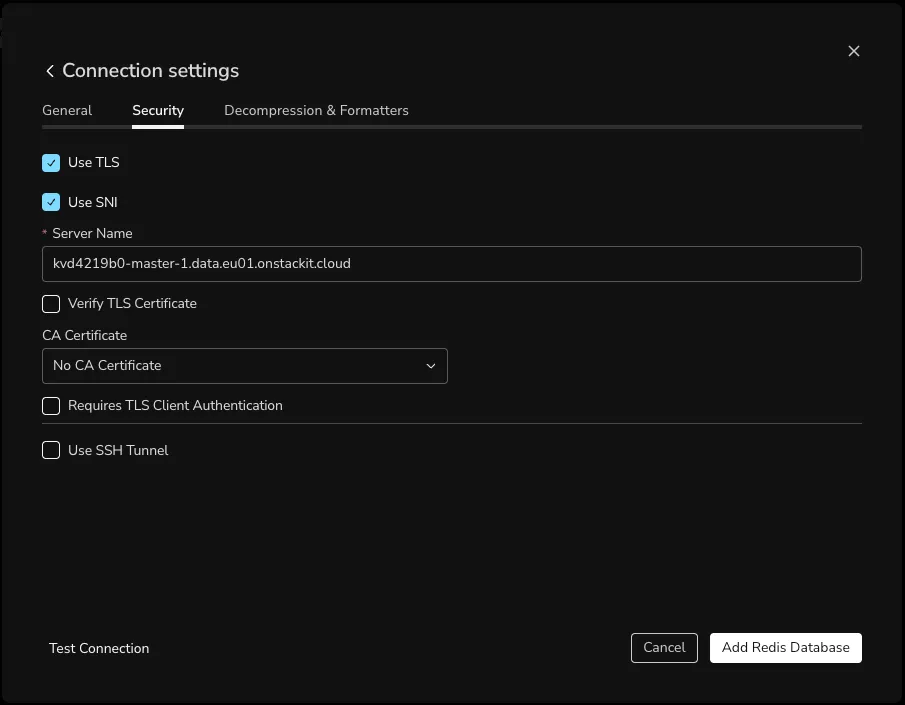
- Wählen Sie Use SNI und belassen Sie das vorausgefüllte Feld wie es ist.
- Stellen Sie sicher, dass Use TLS aktiviert ist.
- Wählen Sie Add Redis Database, um die Verbindung herzustellen.
Nachdem Ihr Client eine Verbindung hergestellt hat, können Sie als praxisnahes Anwendungsbeispiel Musterdaten für eine Bestenliste (Leaderboard) einfügen.
Wählen Sie unten links >_ CLI und fügen Sie eine Gruppe von vier Spielern und deren Punktestand ein, die eine Bestenliste darstellen:
ZADD leaderboard 1200 "alice" 950 "bob" 1430 "carol" 500 "dave"Die Datenbank gibt zurück:
(integer) 4Lassen Sie sich nun von der Datenbank die drei besten Spieler zurückgeben:
ZREVRANGE leaderboard 0 2 WITHSCORESDie Datenbank gibt zurück:
1) "carol"2) "1430"3) "alice"4) "1200"5) "bob"6) "950"Nun gewinnt ein Spieler und 575 Punkte werden seinem Konto gutgeschrieben:
ZINCRBY leaderboard 575 "dave"Die Datenbank gibt den aktualisierten Punktestand von Dave zurück:
"1075"Lassen Sie sich nun erneut die drei besten Spieler von der Datenbank zurückgeben:
ZREVRANGE leaderboard 0 2 WITHSCORESDie Ausgabe lautet:
1) "carol"2) "1430"3) "alice"4) "1200"5) "dave"6) "1075"Dave ist nun unter den ersten drei.
In diesem Beispiel haben Sie grundlegende Befehle mit dem Key Value Store ausgeführt. Fahren Sie von hier aus mit den How-Tos fort.