Verbindung zu Ihrer Key Value Store-Instanz herstellen
Zuletzt aktualisiert am
Voraussetzungen
Abschnitt betitelt „Voraussetzungen“- Sie haben eine Key Value Store-Instanz erstellt. Siehe Instanzen für Key Value Store erstellen und verwalten
- Sie haben einen Benutzer mit den passenden Berechtigungen für die Datenbank in Ihrer Instanz. Falls nicht, können Sie einen über Anmeldedaten für Key Value Store erstellen und verwalten anlegen.
Verbindung zur Key Value Store-Instanz herstellen
Abschnitt betitelt „Verbindung zur Key Value Store-Instanz herstellen“Öffnen Sie nach der Installation eine Shell Ihrer Wahl und verbinden Sie sich mit Ihrer Datenbank. Der Befehl valkey-cli unterstützt das Format der Verbindungszeichenfolge (Connection String). Sie benötigen die Verbindungszeichenfolge und den Endpunkt Ihrer Instanz, um die erforderlichen Flags anzugeben. Sie können alle diese Parameter im Reiter Anmeldedaten Ihrer Instanz einsehen. Den Endpunkt müssen Sie aus der Verbindungszeichenfolge extrahieren.
Befehl:
valkey-cli -u <Verbindungszeichenfolge> --tls --sni <Endpunkt> --cacert /pfad/zu/ca.pemWenn Sie das Passwort nicht direkt in der Befehlszeilen-Historie offenlegen möchten, sollten Sie stattdessen dieses Verbindungsformat verwenden:
valkey-cli -h <Endpunkt> -p <Port> --user <Benutzername> --sni <Endpunkt> --askpass --tls --cacert /pfad/zu/ca.pemDie Konsole zeigt eine Ausgabe ähnlich dieser:
kvd4219b0-master-1.data.eu01.onstackit.cloud:53137>Geben Sie nun ping ein, um zu prüfen, ob die Verbindung erfolgreich hergestellt wurde:
kvd4219b0-master-1.data.eu01.onstackit.cloud:53137> pingBei erfolgreicher Verbindung antwortet die Datenbank mit:
PONGJetzt können Sie mit der Nutzung der Datenbank beginnen.
Drücken Sie STRG + D, um die Verbindung zu trennen und zu Ihrer Eingabeaufforderung zurückzukehren.
Redis Insight ist ein grafisches Werkzeug (GUI) zum Zugreifen und Verwalten der Datenbank. Folgen Sie den Anweisungen auf der Redis Insight Installationsseite oder installieren Sie es über den Paketmanager Ihres Betriebssystems, falls verfügbar.
Öffnen Sie Redis Insight nach der Installation. Kopieren Sie die Verbindungszeichenfolge, die Sie beim Erstellen des Benutzers gespeichert haben.
- Wählen Sie nach dem Öffnen von Redis Insight Add Redis database.
- Fügen Sie die Verbindungs-URI/URL, die Sie im Abschnitt Anmeldeinformationen erstellen erhalten haben, in das Feld Connection URL ein.
- Wählen Sie dann Connection Settings und wechseln Sie zum Reiter Security.
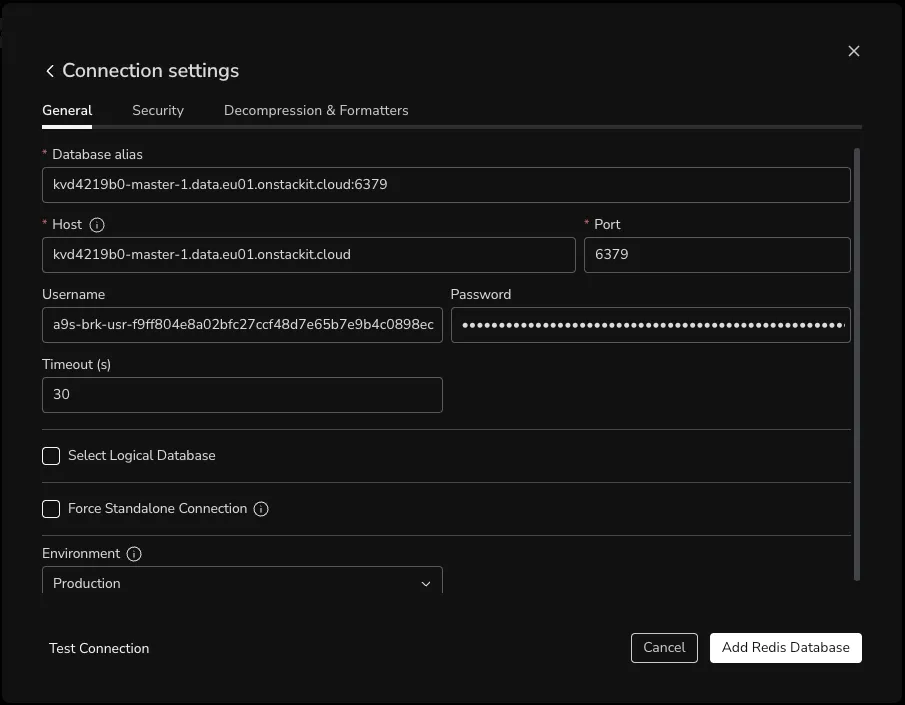
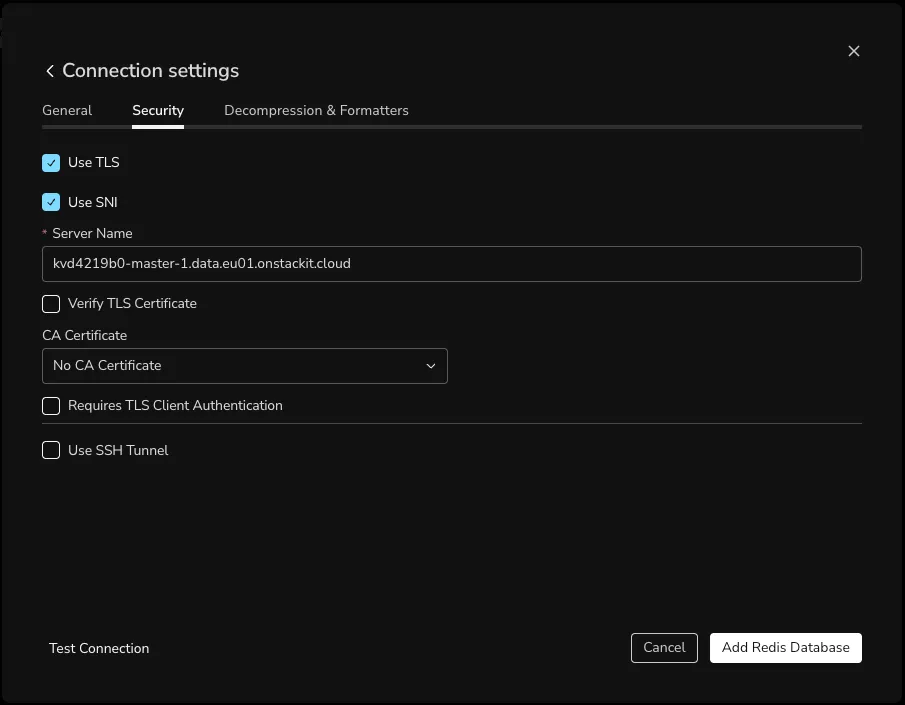
- Gehen Sie auf Use SNI und lassen Sie das vorausgefüllte Feld unverändert.
- Stellen Sie sicher, dass Use TLS aktiviert ist.
- Wählen Sie Add Redis Database, um die Verbindung herzustellen.
Umgang mit TLS-Zertifikaten
Abschnitt betitelt „Umgang mit TLS-Zertifikaten“Je nachdem, wo Ihre Key Value Store-Instanz gehostet wird, benötigen Sie ein spezifisches CA-Zertifikat (Certificate Authority), um Ihre sichere TLS-Verbindung aufzubauen.
Öffentlich erreichbare Dienste (STACKIT Portal)
Abschnitt betitelt „Öffentlich erreichbare Dienste (STACKIT Portal)“Wenn Sie Ihre Instanz über das STACKIT Portal erstellt haben, nutzt der Dienst öffentliche Zertifikate, die von SwissSign ausgestellt wurden.
- Öffentliche Projekte: Moderne Betriebssysteme vertrauen SwissSign von Haus aus. In der Regel können Sie sich verbinden, indem Sie das Flag
--tlsverwenden, ohne ein Zertifikat anzugeben. Wenn Ihr System diesem nicht vertraut (beispielsweise bei minimalen Docker-Containern), müssen Sie die SwissSign Root- und Intermediate-CAs aus dem SwissSign-Repository herunterladen und über das Flag--cacertübergeben. - Interne Projekte (Schwarz): Unternehmensgeräte vertrauen den internen Netzwerkzertifikaten standardmäßig. Es ist keine manuelle Konfiguration des Zertifikats erforderlich.
Cloud Foundry-Laufzeitumgebung
Abschnitt betitelt „Cloud Foundry-Laufzeitumgebung“Wenn Ihre Datenbank innerhalb der Cloud Foundry-Laufzeitumgebung läuft, verwendet sie eine private Zertifikatsstelle (Private CA). Sie müssen dieses Zertifikat aus Ihrem Dienstschlüssel extrahieren, um eine Verbindung herzustellen.
-
Erstellen Sie Ihren Cloud Foundry Dienstschlüssel oder rufen Sie ihn auf.
-
Suchen Sie das Feld
cacrtin der JSON-Ausgabe. -
Kopieren Sie die gesamte Zertifikatszeichenfolge (einschließlich
-----BEGIN CERTIFICATE-----und-----END CERTIFICATE-----). -
Ersetzen Sie die
\n-Zeichen durch tatsächliche Zeilenumbrüche und speichern Sie die Ausgabe in einer Datei namenscf_ca.pem. -
Fügen Sie das Zertifikat beim Verbindungsaufbau über die CLI an Ihren Befehl an:
Terminal-Fenster valkey-cli -h <Endpunkt> -p <Port> --user <Benutzername> --askpass --tls --cacert /pfad/zu/cf_ca.pem