Use STACKIT DNS for DNS01 to act as a DNS01 ACME Issuer with Cert-Manager
Last updated on
This guide delineates the integration of STACKIT DNS with Cert Manager to facilitate the utilization of DNS-01 ACME issuers. Among the capabilities enabled by this setup is the provisioning of wildcard SSL certificates for a specific DNS zone.
Prerequisites
Section titled “Prerequisites”- Cluster type: SKE: This guide provides specific instructions for Deploying on an SKE cluster. Alternative cluster configurations may necessitate varying implementation steps.
- Required Credentials: A dedicated service account and corresponding authentication service account key are necessary for the deployment process. Cert Manager will programmatically create and delete a temporary TXT-record in the DNS zone, requiring the service account to have DNS Admin.
- Application exposure mechanism: This documentation presupposes the use of an SKE cluster. Consequently, the methods for exposing applications via LoadBalancer or NodePort services may vary based on your cluster configuration.
- Component installation via Helm: For streamlined component deployment, this guide employs Helm as the package manager. Helm facilitates the installation of multiple dependent components.
By adhering to these prerequisites, you will be better prepared for the subsequent steps outlined in this tutorial.
Implementation
Section titled “Implementation”-
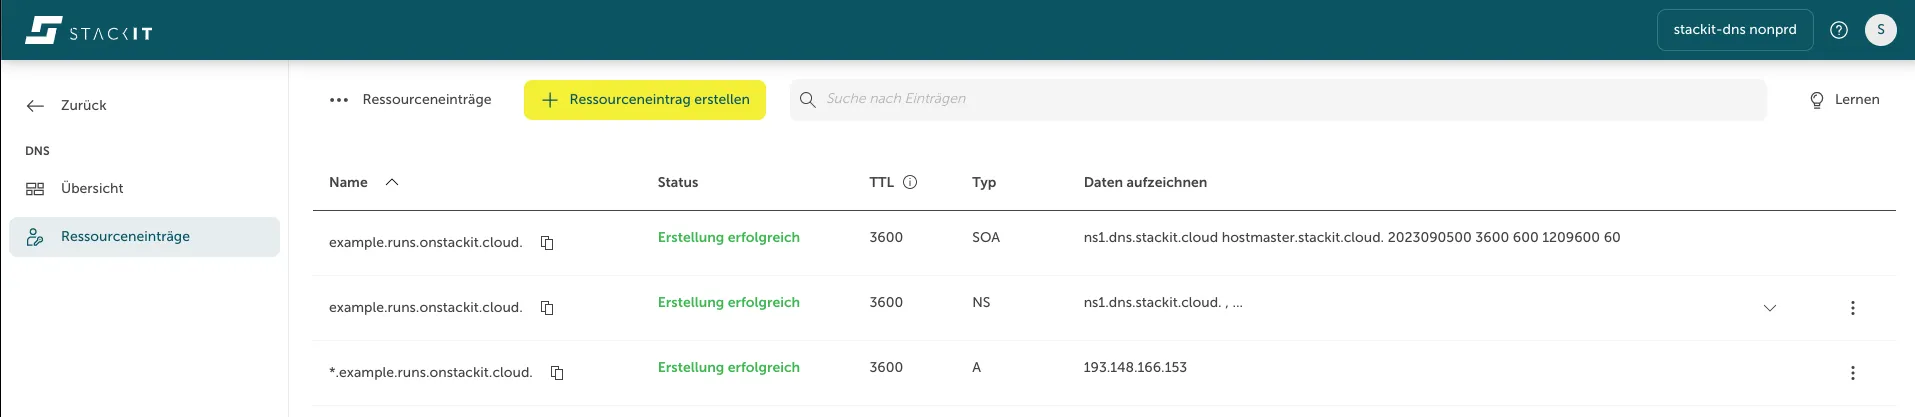
DNS Zone Configuration within STACKIT: Create a DNS zone as delineated. For illustration, a primary zone with our subdomain feature—example.runs.onstackit.cloud—has been created. Your choice of zone is flexible, but it must be delegated to STACKIT DNS. This ensures that Cert Manager can successfully resolve a record within the zone.
-
Cert Manager Deployment on Kubernetes Cluster: Proceed with the Cert Manager installation in your Kubernetes cluster following the installation guide on the Cert-Manager documentation:
Terminal window kubectl create ns cert-managerhelm repo add jetstack https://charts.jetstack.iohelm install cert-manager --namespace cert-manager jetstack/cert-manager --set webhook.timeoutSeconds=15 --set crds.enabledVerify the successful deployment by inspecting the pods within the cert-manager namespace:
Terminal window kubectl get pods -n cert-managerYou get an output like this:
NAME READY STATUS RESTARTS AGEcert-manager-776649d6c6-5s66l 1/1 Running 0 42scert-manager-cainjector-7bb8cb69c5-tvwxw 1/1 Running 0 42scert-manager-webhook-5c8bfb9bdf-2jrcg 1/1 Running 0 42s -
Reverse Proxy Installation: Nginx-Ingress-Controller: Deploy a reverse proxy, such as the Nginx Ingress Controller:
Terminal window helm repo add ingress-nginx https://kubernetes.github.io/ingress-nginxhelm repo updatekubectl create ns ingress-nginxhelm install ingress-nginx ingress-nginx/ingress-nginx --namespace ingress-nginxValidate its operational status by running:
Terminal window kubectl get pods -n ingress-nginxYou get an output like this:
NAME READY STATUS RESTARTS AGEingress-nginx-controller-7687f9d45-rvglp 1/1 Running 0 43sTerminal window kubectl get svc -n ingress-nginxYou get an output like this:
NAME TYPE CLUSTER-IP EXTERNAL-IP PORT(S) AGEingress-nginx-controller LoadBalancer 10.64.194.250 193.148.174.225 80:30055/TCP,443:31510/TCP 4m6singress-nginx-controller-admission ClusterIP 10.64.38.53 <none> 443/TCP 4m6sDocument the external IP address, as it will be required for subsequent A-record creation.
-
STACKIT Cert Manager Webhook Installation: Install the STACKIT Cert Manager Webhook.
Terminal window helm repo add stackit-cert-manager-webhook https://stackitcloud.github.io/stackit-cert-manager-webhookhelm install stackit-cert-manager-webhook --namespace cert-manager stackit-cert-manager-webhook/stackit-cert-manager-webhookConfirm the webhook is operational by checking its appearance in the pods list:
Terminal window kubectl get pods -n cert-managerYou get an output like this:
NAME READY STATUS RESTARTS AGEcert-manager-776649d6c6-5s66l 1/1 Running 0 24mcert-manager-cainjector-7bb8cb69c5-tvwxw 1/1 Running 0 24mcert-manager-webhook-5c8bfb9bdf-2jrcg 1/1 Running 0 24mstackit-cert-manager-webhook-78c855658f-wlzft 1/1 Running 0 15s -
Namespace Creation for Application Deployment: Generate a Kubernetes namespace where your application will reside:
Terminal window kubectl create ns example-app -
Service account key (sa.json) configuration: This guide assumes the utilization of a namespace-specific Cert Manager Issuer as opposed to a ClusterIssuer. Create a secret containing the STACKIT service account key (
sa.json). Create the secret in the same namespace as the Issuer (here:example-app):Terminal window kubectl create secret generic stackit-sa-authentication \-n example-app \--from-literal=sa.json='{"id": "4e1fe486-b463-4bcd-9210-288854268e34","publicKey": "-----BEGIN PUBLIC KEY-----\nPUBLIC_KEY\n-----END PUBLIC KEY-----","createdAt": "2024-04-02T13:12:17.678+00:00","validUntil": "2024-04-15T22:00:00.000+00:00","keyType": "USER_MANAGED","keyOrigin": "GENERATED","keyAlgorithm": "RSA_2048","active": true,"credentials": {"kid": "kid","iss": "iss","sub": "sub","aud": "aud","privateKey": "-----BEGIN PRIVATE KEY-----\nPRIVATE-KEY==\n-----END PRIVATE KEY-----"}}'Enable service-account authentication for the webhook deployment:
Terminal window helm upgrade stackit-cert-manager-webhook \--namespace cert-manager \stackit-cert-manager-webhook/stackit-cert-manager-webhook \--set stackitSaAuthentication.enabled=true -
Issuer Initialization: Take note that the email and the projectId parameters must be accurately configured; otherwise, Cert Manager will encounter errors during certificate provisioning. Let’s Encrypt will use your email address to contact you about expiring certificates, and issues related to your account. The STACKIT projectId should align with the zone created in step 1. You can copy it from the portals dashboard.
Terminal window kubectl apply -f - <<EOFapiVersion: cert-manager.io/v1kind: Issuermetadata:name: letsencrypt-prodnamespace: example-appspec:acme:server: https://acme-v02.api.letsencrypt.org/directoryemail: example@example.com # Replace this with your email addressprivateKeySecretRef:name: letsencrypt-prodsolvers:- dns01:webhook:solverName: stackitgroupName: acme.stackit.deconfig:projectId: <STACKIT PROJECT ID>EOF -
Wildcard Certificate Deployment: Create a wildcard SSL certificate for the DNS zone, rendering all subdomain records SSL-compliant.
Terminal window kubectl apply -f - <<EOFapiVersion: cert-manager.io/v1kind: Certificatemetadata:name: wildcard-examplenamespace: example-appspec:secretName: wildcard-example-tlsissuerRef:name: letsencrypt-prodkind: IssuercommonName: '*.example.runs.onstackit.cloud' # project must be the owner of this zoneduration: 8760h0m0sdnsNames:- example.runs.onstackit.cloud- '*.example.runs.onstackit.cloud'EOFMonitor for the appearance of a new TXT record, and once propagated, Cert Manager will automatically revoke this record and activate the certificate.

Terminal window kubectl get certs -n example-appYou get an output like this:
NAME READY SECRET AGEwildcard-example True wildcard-example-tls 11m -
Application Deployment: Deploy your application and validate its successful instantiation by observing a running pod within the Kubernetes dashboard.
Terminal window kubectl apply -f - <<EOFapiVersion: v1kind: ConfigMapmetadata:name: example-appnamespace: example-appdata:index.html: |<!DOCTYPE html><html><head><title>ExampleApp</title></head><body><header><h1 id="Hello World">Hello World</h1></header></body></html>---apiVersion: apps/v1kind: Deploymentmetadata:name: example-appnamespace: example-appspec:replicas: 1selector:matchLabels:app: example-apptemplate:metadata:labels:app: example-appspec:containers:- name: nginximage: nginxports:- containerPort: 80volumeMounts:- name: config-volumemountPath: /usr/share/nginx/htmlvolumes:- name: config-volumeconfigMap:name: example-app---apiVersion: v1kind: Servicemetadata:name: example-appnamespace: example-appspec:selector:app: example-appports:- protocol: TCPport: 80targetPort: 80EOFTerminal window kubectl get pods -n example-appYou get an output like this:
NAME READY STATUS RESTARTS AGEexample-app-588974765d-r6shs 1/1 Running 0 23s -
A-Record Creation: Generate an wildcard A-record within the DNS zone using the external IP address obtained in step 3. In our example it is: *.example.runs.onstackit.cloud:
-
Application Ingress Configuration: Establish an ingress rule for the application, ensuring that the wildcard certificate and ingress secret names align. The host should correspond to the A-record created in the preceding step.
Terminal window kubectl apply -f - <<EOFapiVersion: networking.k8s.io/v1kind: Ingressmetadata:name: app-ingressnamespace: example-appannotations:ingress.kubernetes.io/rewrite-target: /spec:ingressClassName: "nginx"rules:- host: "*.example.runs.onstackit.cloud"http:paths:- path: /pathType: Prefixbackend:service:name: example-appport:number: 80tls:- hosts:- "*.example.runs.onstackit.cloud"secretName: wildcard-example-tlsEOF -
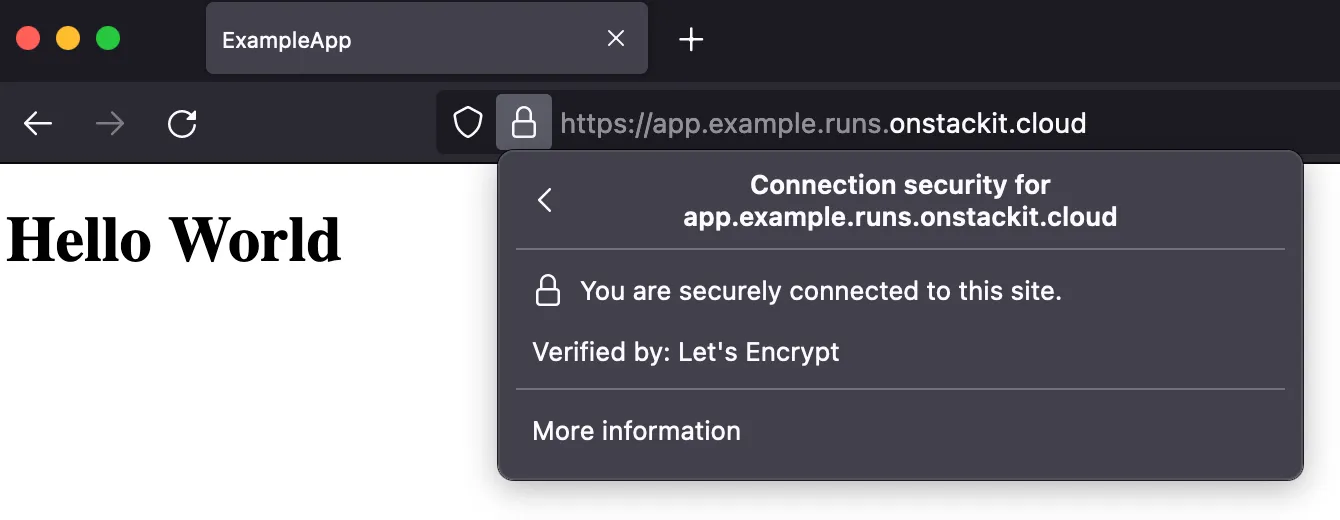
SSL Verification: Navigate to any subdomain matching the wilcard, e.g. app.example.runs.onstackit.cloud in a web browser. You should observe an active SSL certificate, corroborating the successful encryption setup.