Manage DNS zones
Last updated on
Prerequisites
Section titled “Prerequisites”- You have a STACKIT customer account: Create a customer Account
- You have a STACKIT user account: Create a user account
- You have a STACKIT project: Create a project
Create a DNS zone
Section titled “Create a DNS zone”Common Steps for Primary zones/Secondary zone/Zone delegations / Registrar setups
Section titled “Common Steps for Primary zones/Secondary zone/Zone delegations / Registrar setups”- Open your project in the STACKIT Portal
- Navigate to Networking > DNS
- Click Create DNS zone
Primary zone
Section titled “Primary zone”A primary DNS zone is the authoritative zone hosted on STACKIT. With this type of zone you can manage your records on STACKIT.
-
Enter a individual, descriptive Name for your zone.
-
Stay with the pre-selected type Primary.
-
Enter the fully qualified Domain name of the DNS zone. You can either use your custom domain part or use an existing STACKIT subdomain:
STACKIT DNS allows you to create a zone as DNS subdomain within one of five domains hosted by STACKIT. This feature allows you to utilize our DNS services without the need to delegate an existing or purchase a new domain. It makes it easy getting started with DNS and very cost-efficiency. By allowing you to harness our DNS services without buying a new domain, we provide you with a swift and economical solution to set up your DNS configurations.
The available STACKIT domains are:
runs.onstackit.cloudstackit.rocksstackit.ggstackit.zonestackit.run
Within these domains, you can set up a one-label subdomain, such as
Once your zone is in place, you can create a diverse array of Resource Record Sets (RRS) in it, including those with deeper subdomains. While a zone likeexample.run.onstackit.cloud. Activate the toggle Use free STACKIT subdomain and select a subdomain in the dropdown menu.sub.example.run.onstackit.cloudis not permissible, RRS of that nature certainly are. -
Add an optionally Description to your zone
-
Click Order-fee-based
Secondary zone
Section titled “Secondary zone”A secondary DNS zone is a read-only copy of a primary DNS zone that is pulled from primary name servers, which you have to specify. Additional configuration might be necessary on your primary name server to enable the zone transfer.
-
Enter a individual, descriptive Name for your zone.
-
Select type Secondary.
-
Enter the Primary name server IP addresses to transfer the DNS zone from. One IP address per line, IPv4 and IPv6 allowed. To enable the transfer, allow the following source IPs for AXFR zone transfer at your primary name server: IPv4:
83.136.34.51IPv6:2a02:850:8::51To enable notifications for the zone, add the following IPs as notified servers to your primary name server: IPv4:
83.136.34.51IPv6:2a02:850:8::51 -
Enter the primary Domain name of the DNS zone
-
Add an optionally description to your zone
-
Click Order-fee-based
Zone delegation / Registrar setup
Section titled “Zone delegation / Registrar setup”This zone cannot normally be used until you register the associated domain and configure the following entries with your registrar:
Cloud1
Section titled “Cloud1”NS: ns1.stackit.cloud
IPv4: 192.174.68.16
IPv6: 2001:67c:1bc::16
Cloud2
Section titled “Cloud2”NS: ns2.stackit.zone
IPv4: 176.97.158.16
IPv6: 2001:67c:10b8::16
List DNS zones
Section titled “List DNS zones”- Open your project in the STACKIT Portal
- Navigate to Networking > DNS
- You see a list of your DNS zones
Edit a DNS zone
Section titled “Edit a DNS zone”- Navigate to Networking > DNS
- Click at the DNS zone you want to edit
- Choose menu point Overview
- Click Edit
- Edit the zone
- Save the zone
Move a DNS zone
Section titled “Move a DNS zone”The move zone operation allows you to transfer a DNS zone from one project to another. This is useful for reorganizing project structures or for administrative purposes. The process involves requesting a move code in the old project and then using that code to complete the move in the new project.
First, request a move code from within the project you wish to move the zone from.
-
Ensure that you are in the project you wish to move the zone from.
-
Navigate to Networking > DNS.
-
Navigate to the zone entry, you want to move and open the three-dots-menu on the right.
-
Click on Create move code.
-
Copy domain name and move code from the pane to a safe location.
Secondly, receive the zone in the project you to move the zone to.
-
Ensure that you are in the project you wish to move the zone to.
-
Navigate to Networking > DNS.
-
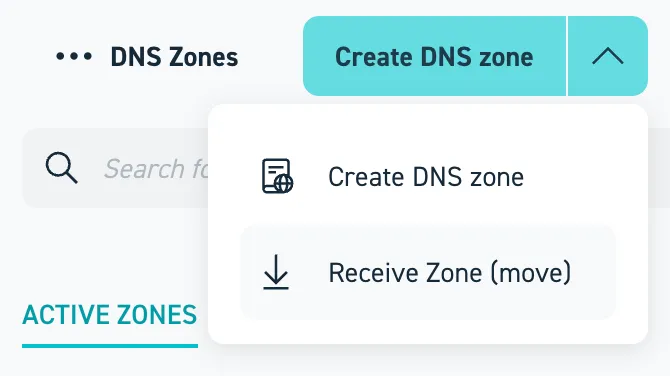
On the top menu click on the arrow next to Create DNS zone and select Receive zone (move).
-
On the new pane enter the Domain name and the Move code into the appropriate fields.
-
Read the pricing information and if you consent, click on Order fee-based.
-
Wait for the move to be completed.
- Request a move code
To request a move code, make a POST request to the move-code API endpoint with an access token with permissions for the current project. The move code is a temporary code that authorizes the zone move.
Terminal window curl --location --request POST "https://dns.api.stackit.cloud/v1/projects/$OLD_PROJECTID/zones/$ZONEID/move-code" \--header "Authorization: Bearer $AUTHENTICATION_TOKEN_OLD_PROJECT"{"message":"successfully created code to move zone","code":"xxxxxxxxxxxxx","expiresAt":"2024-07-13T13:15:40.113281394Z"} - Move the zone
Once you have securely transferred the move code to a member of the new project, this member can finalize with moving the zone to the new project by making a POST request to the move-zone API endpoint, using the move code obtained in the previous step.
Terminal window curl --location --request POST "https://dns.api.stackit.cloud/v1/projects/$NEW_PROJECTID/move-zone" \--header "Authorization: Bearer $AUTHENTICATION_TOKEN_NEW_PROJECT" \--data-raw '{"zoneDnsName": "$ZONENAME", "code": "$MOVECODE"}'{"message":"successfully moved zone"}
The billing for the DNS zone will stop for the old project and start for the new project once the move is completed. This ensures that costs are accurately attributed to the correct project based on where the DNS zone is actively managed.
This process transfers all associated DNS records to the new project without interruption of the DNS service, ensuring a seamless transition.
Delete a DNS zone
Section titled “Delete a DNS zone”Deleting an instance is irreversible. It includes deletion of all settings and configurations made for this instance, all data stored in the service (if any) and all corresponding backups in the STACKIT cloud.
- Select the project in which you want to delete an instance.
- Select the product from the main menu.
- In the list of your instances, navigate to the instance you want to delete.
- You can click the instance list entry to view details.
- In the context menu of the instance select Delete.
- In the popup dialogue, enter the name of the instance for confirmation. Your instance will be displayed for a few seconds with the status Deleting. After that, the instance will be deleted and no longer shown in the list.